DIY Spring Nails You’ll Love
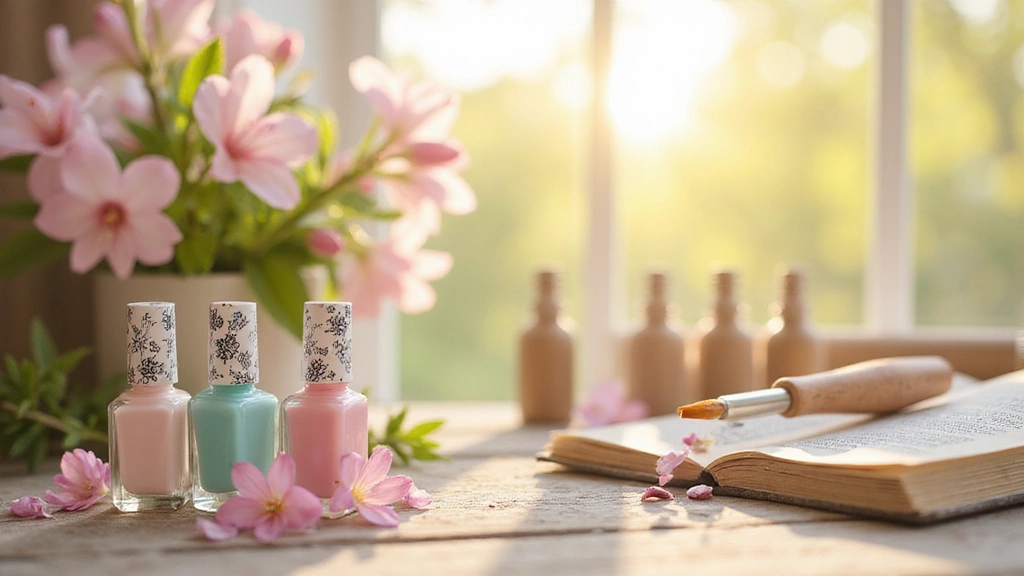
This guide features 16 eye-catching Spring nail tutorials that will spark your creativity and help you achieve the perfect spring nails right at home. From charming floral patterns to soft pastel shades, each tutorial is crafted to be both simple and stunning, making it easy for beginners to join in the fun.
So, gather your nail polish and tools, and get ready to unleash your inner nail artist with these DIY Spring Nails!
1. Floral Frenzy
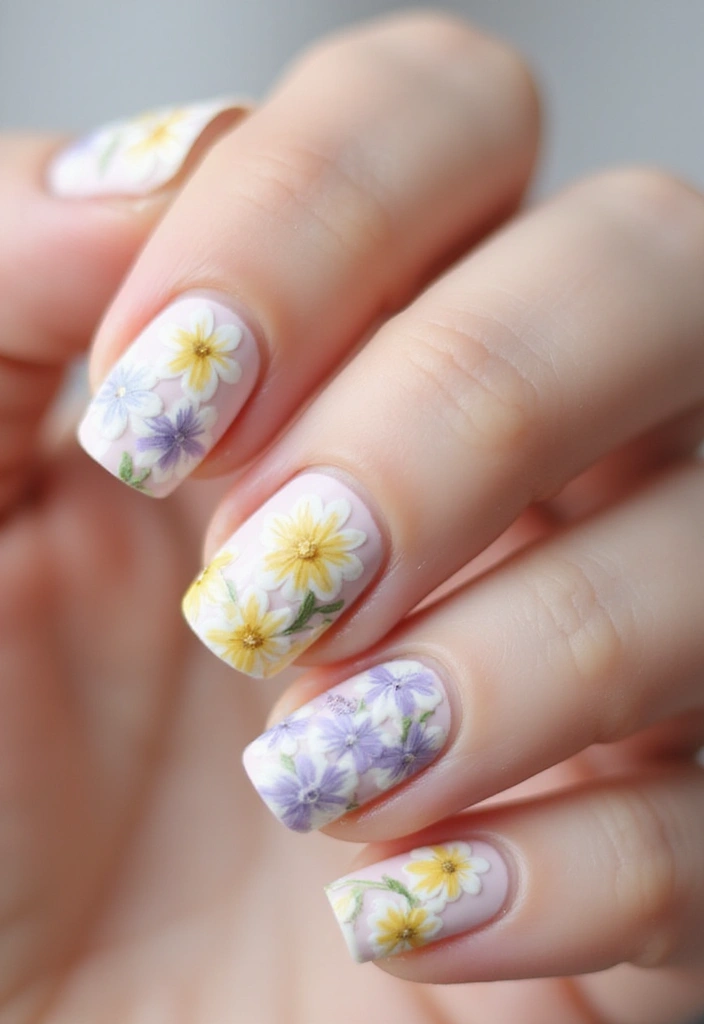
Nothing says spring quite like a burst of colorful flowers, and what better way to celebrate the season than by adorning your nails with a delightful floral design? This fresh Spring nail tutorial is designed to help you create stunning spring nails that will make you feel fresh and vibrant, channeling the spirit of blooming gardens.
Begin by applying a base coat of soft pink or mint green to your nails. These subtle shades serve as the perfect canvas for your floral masterpiece, reflecting the gentle colors of spring. Allow your base coat to dry completely to ensure a smooth application for your designs.
Next, grab a fine nail art brush, which will be your best friend throughout this process. Using white, yellow, and lavender polish, start painting tiny blossoms on your nails. Don’t worry about making them perfect; the charm of this design lies in its delicacy and whimsy. Each flower can be different in size and shape, so feel free to let your creativity flow.
Once you’ve created your blossoms, it’s time to add some greenery. Using a contrasting shade of green, paint delicate leaves around the flowers. This touch not only enhances the overall look but also creates a beautiful balance between the flowers and the background.
As you step back to admire your work, you’ll notice how each tiny brush stroke embodies the freshness of spring. The intricate details of your floral designs will evoke a sense of joy and warmth, capturing the essence of the season right at your fingertips.
For a finishing touch, apply a top coat to seal your artwork and give your nails a glossy, professional look. This step is essential not only for longevity but also for adding that extra shine that will make your spring nails truly stand out.
Imagine a close-up of your beautifully manicured nails, showcasing the lovely pastel backgrounds adorned with your tiny, intricate floral designs. The flowers appear delicate and fresh, resembling a miniature painting. Set against a soft, neutral backdrop, this visual will surely evoke feelings of warmth and the joy of springtime.
If you’re eager to get started on your floral nail art journey, here are some product recommendations to help you achieve the best results:
• Nail art brush set
• Pastel nail polish collection
• Top coat for nail art
With a little patience and creativity, you can transform your nails into a canvas of spring beauty, making this floral frenzy a perfect addition to your seasonal beauty routine. Enjoy the process, and don’t forget to show off your stunning nails!
2. Ombre Delight
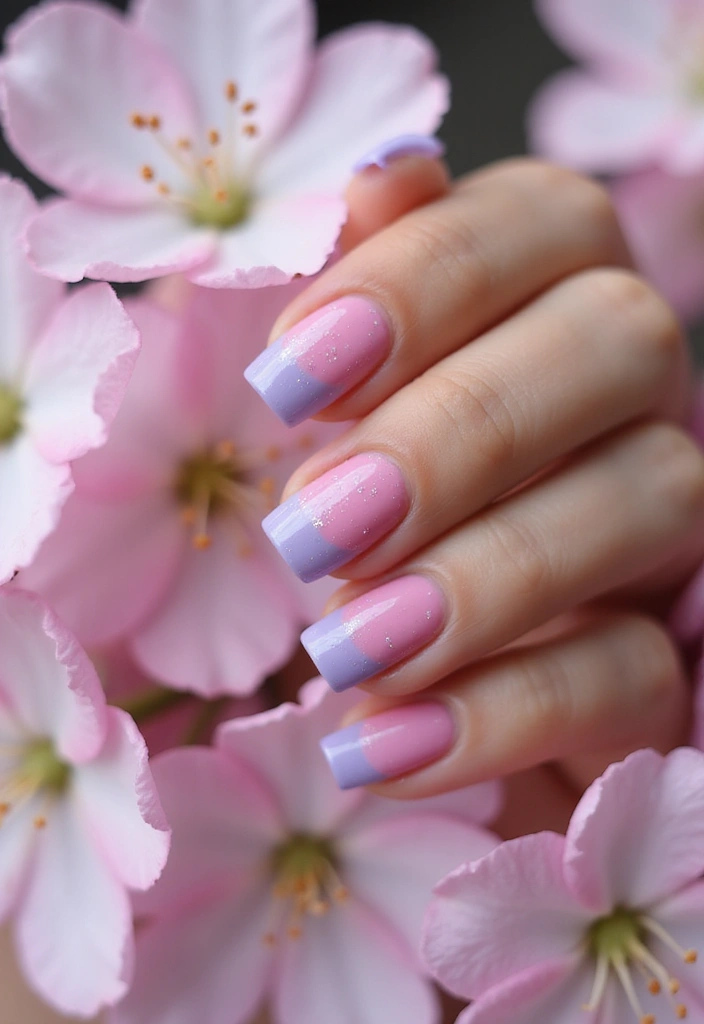
Spring is here, and there’s no better time to flaunt chic Ombre nails that blend colors effortlessly with this Spring nail tutorial!
Imagine a stunning transition from a soft pastel pink at the base to a dreamy lilac at the tips. This eye-catching gradient effect is perfect for the season, adding a touch of elegance to your spring nails.
To achieve this look, start with a light base coat to set the stage. A good base coat not only protects your natural nails but also helps the colors adhere better, ensuring a longer-lasting manicure.
Next, gather your supplies. A makeup sponge is essential for creating that smooth, blended effect. Choose your colors wisely; for this Ombre delight, think soft pink, lilac, and perhaps a hint of sky blue for an extra pop.
Begin by painting the base of the sponge with your chosen shades. You want to create a gradient on the sponge itself—start with the soft pastel pink at the bottom, then layer on the lilac, and finally, add a touch of sky blue at the tips.
Once you’ve got your sponge ready, gently dab it onto your nails. The key here is to apply light pressure and move the sponge in an up-and-down motion to blend the colors seamlessly. You might need to repeat this process a few times to build up the intensity of the colors, so don’t hesitate to go back for more until you achieve your desired look.
After you’ve created the perfect Ombre effect, it’s time to seal the deal. Finish it off with a glossy top coat that adds shine and protects your design. A good top coat not only enhances the beauty of your manicure but also extends its wear, making sure your nails look fresh and fabulous for days to come.
With this versatile style, you can easily adapt your Ombre nails to match any outfit or occasion. Picture your nails glistening under the sun, complemented by a soft-focus background of blooming spring flowers. It’s elegance redefined!
For those eager to recreate this look, here are some product recommendations to help you on your journey to perfect spring nails:
• nail polish set in pastel colors
• makeup sponge for nail art
• high-gloss top coat for nails
Get ready to show off your stunning Ombre nails this spring and enjoy the compliments that are sure to come your way!
3. Geometric Glam
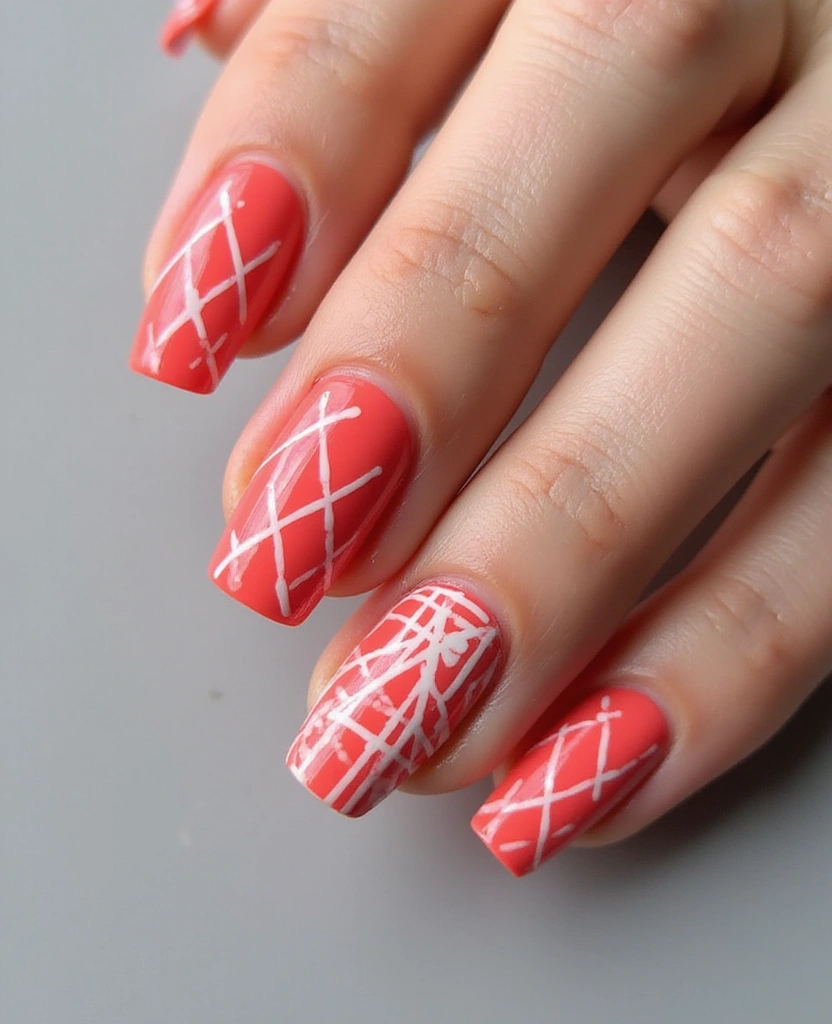
Get ready to elevate your spring nails with a geometric glam twist! This season, it’s all about clean lines and striking contrasts that not only showcase your style but also your creativity.
Using tape or nail vinyls, you can create eye-catching shapes on your nails that scream sophistication. Whether you’re a seasoned nail artist or a beginner, this technique is both accessible and rewarding. The beauty of geometric nail art lies in its versatility; you can experiment with various shapes and designs that reflect your unique personality.
Imagine bold coral hues contrasting beautifully with sharp white geometric designs. The vibrant coral serves as a stunning canvas, while the white shapes add a modern edge. This trendy look isn’t just about colors; it’s about making a statement. Each nail becomes a miniature work of art, and you’ll find yourself admiring them just as much as anyone else will.
To achieve this look, start by applying a base coat to protect your natural nails. Once dry, paint on two coats of your chosen coral nail polish, allowing each layer to dry thoroughly. This rich color will form the foundation of your geometric glam.
Next, take your nail tape or vinyls to create your desired shapes. You can opt for triangles, stripes, or even a mix of different geometric patterns. The key here is precision—make sure to press the tape down firmly to prevent any polish from seeping underneath.
Once you’ve applied the shapes, carefully paint over them with the crisp white polish. When you peel away the tape, you’ll reveal those clean lines that make this design so striking.
Seal your masterpiece with a top coat to keep those clean lines looking fresh and fabulous. A glossy finish not only enhances the overall look but also provides durability, ensuring your spring nails remain stunning for days on end.
The striking contrast and modern patterns will ensure your nails stand out in any crowd this season. Picture this: bright coral nails adorned with crisp white geometric shapes, all set against a minimalist backdrop of soft gray or pastel tones. The result? A chic and contemporary style that turns heads and adds flair to your spring wardrobe!
Ready to get started? Here are some product recommendations to help you on your nail art journey:
• nail tape for geometric designs –
• coral nail polish
• top coat for nail art
With these tips and tools, you’re all set to conquer the world of geometric glam this spring!
4. Tropical Vibes
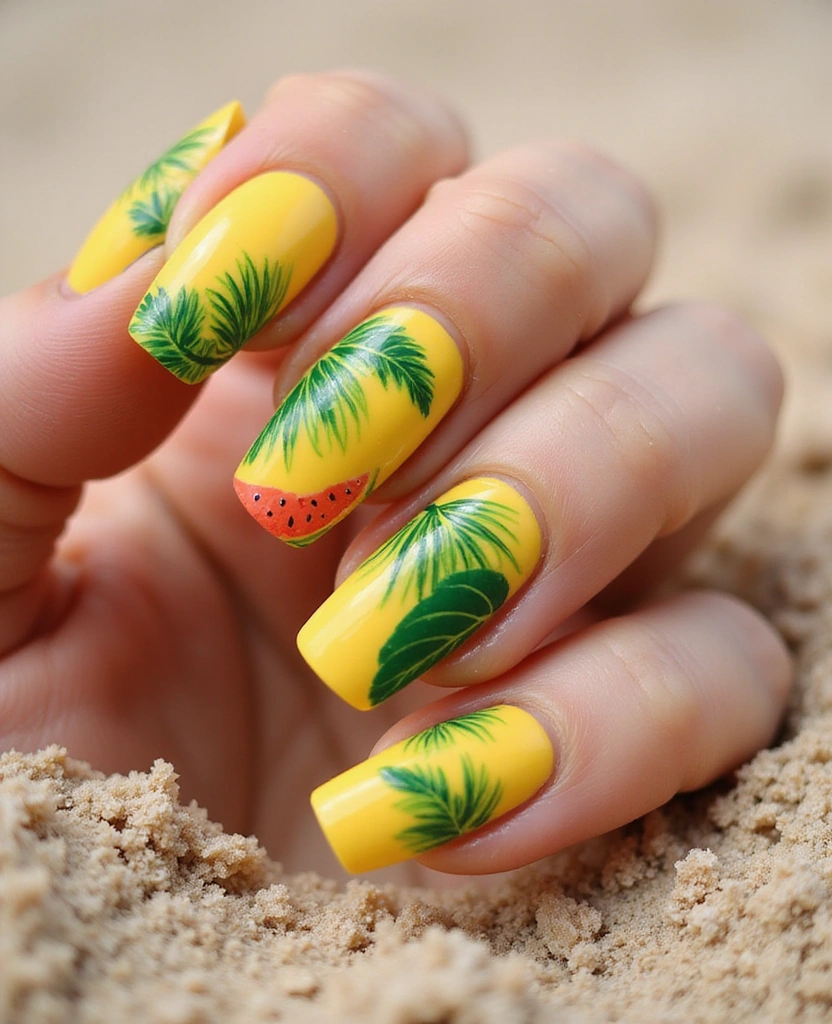
Transform your nails into a slice of paradise with this fun and vibrant tropical Spring tutorial!
Imagine stepping into spring with a cheerful yellow base on your nails, reminiscent of bright sunshine. This lively hue not only catches the light beautifully but also brings an instant boost to your mood, making it a perfect choice for the warmer days ahead. There’s something special about the way yellow can evoke feelings of happiness and warmth, mirroring the joy of the season as everything around us begins to bloom.
As you begin your artistic journey, picture lush green palm leaves gracefully emerging from the edges of your nails. Each frond is painted with intricate detail, bringing a sense of depth and movement to your manicure. The contrast between the sunny yellow and the rich green of the palm leaves creates a stunning visual appeal that captures the essence of a tropical getaway. You might find yourself daydreaming of swaying palm trees and gentle ocean breezes as you work on your design.
And let’s not forget the playful watermelon slices! These adorable accents, painted in shades of pink, red, and green, bring an element of fun to your nail design. They can be styled in a cute, cartoonish manner or given a more realistic look, depending on your artistic flair and personal style. The watermelons peek out from the sides of your nails, inviting smiles and compliments from everyone you meet. They represent summer picnics and the sweet taste of juicy fruit, adding a delightful touch to your overall look.
This nail art isn’t just about aesthetics; it embodies the carefree spirit of summer days spent lounging at the beach, sipping on refreshing drinks, and soaking up the sun. Wearing these nails allows you to carry a piece of that joyous feeling with you wherever you go. Imagine the conversations that will spark as you show off your vibrant nail art, making you the center of attention at any beach bar or sunny outing. It’s a fabulous way to express your personality and zest for life.
To truly elevate this tropical theme, visualize your beautifully manicured nails set against a sandy beach backdrop. The sound of waves gently crashing in the background and the sun shining bright only enhance the festive vibe of your nail art. With each glance at your nails, you’ll be transported to a world filled with relaxation and happiness, a little reminder of summer bliss, even in the middle of spring.
With this seasonal tutorial, you won’t just learn how to create beautiful spring nails; you’ll also embrace the vibrant spirit of the season. Gather your supplies, find a comfortable space, and let your creativity flow as you embark on this colorful nail art adventure! Your fingertips will become a canvas of tropical delight, ready to brighten up any day.
Product Recommendations:
• Green nail polish
• Pink nail polish
• Red nail polish
• Nail art brushes (for detailed designs)
• Nail dotting tools (for watermelon accents)
5. Pastel Polka Dots
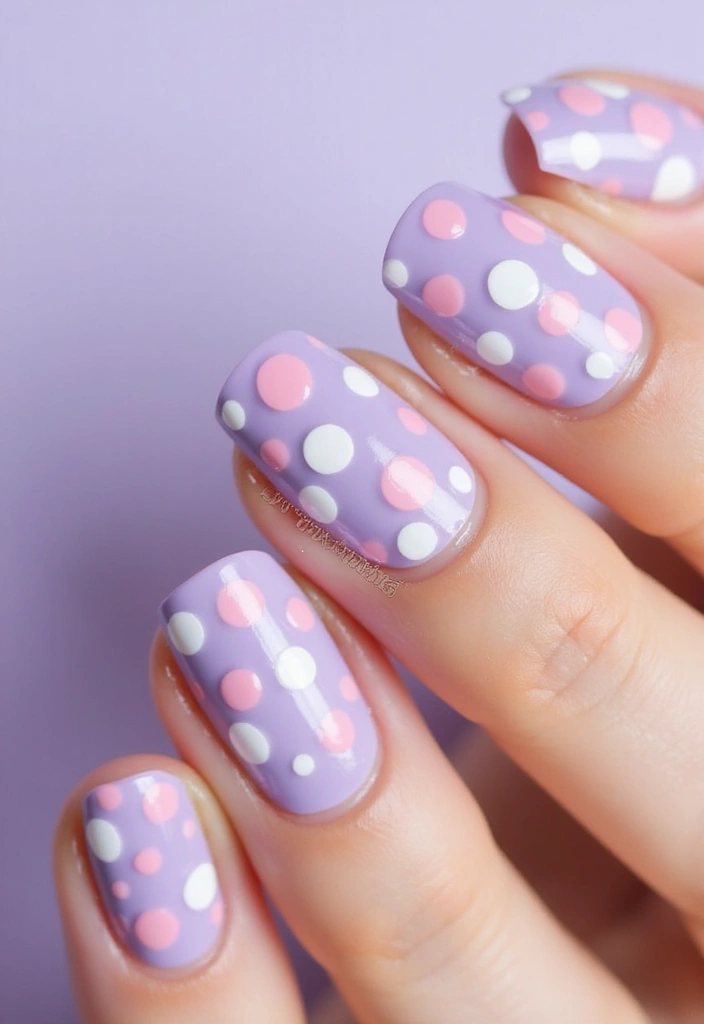
Get ready to embrace spring with perfect Spring designs with a playful twist!
Polka dots are the ultimate spring nail trend, radiating charm and whimsy. This tutorial shows you how to achieve that cute look with minimal effort!
Start with a soft pastel base like lavender or mint. Then, grab a dotting tool and let your creativity shine with contrasting colors. Think pink and white polka dots that pop against your chosen background!
To make your design even more fun, experiment with varying dot sizes. This adds a delightful touch and keeps things interesting!
Picture this: soft lavender nails adorned with pastel dots in playful pink and white. Each nail tells a story with its unique dot pattern, creating an enchanting effect.
With this easy-to-follow guide, you’ll have polished and fun spring nails that are perfect for any occasion!
Product Recommendations:
• Dotting tool set
• Pastel nail polish set
• Nail art top coat
6. Butterfly Dreams
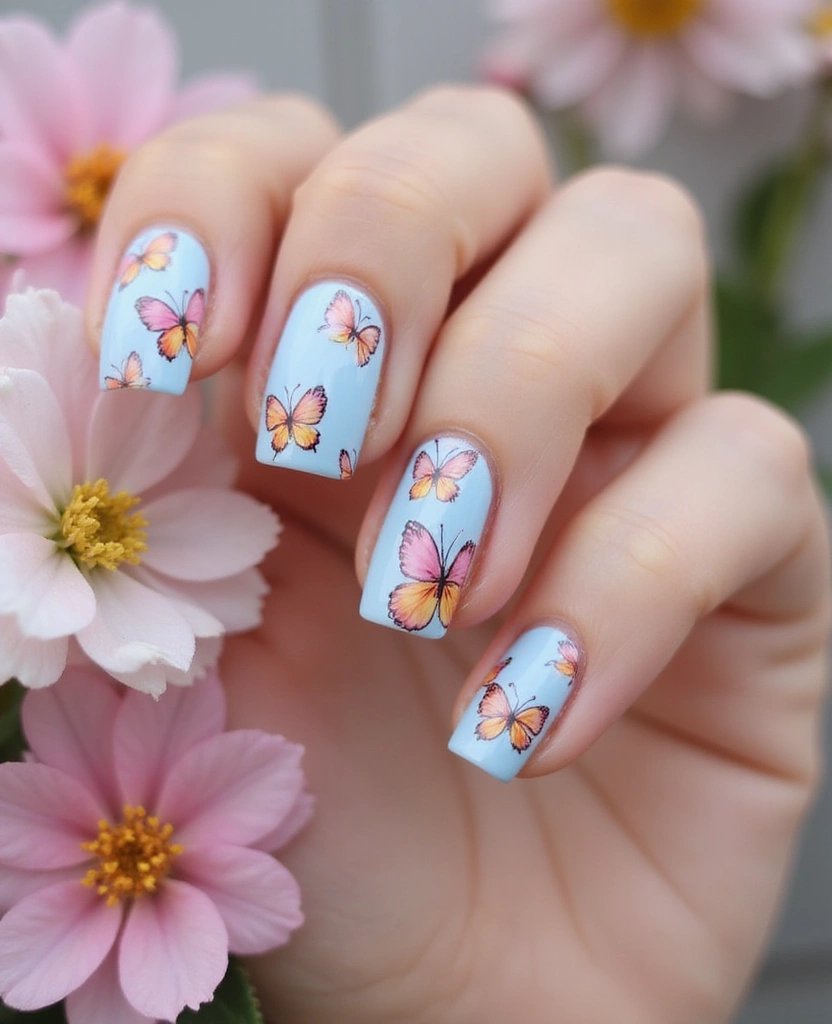
Spring is a season that embodies renewal and beauty, and what better way to celebrate it than with butterfly nail art? This delicate design captures the essence of spring with its vibrant colors and intricate details, making it a perfect addition to your nail art repertoire.
To start your butterfly nail art, choose a soft base color that evokes a sense of calm and freshness. A baby blue nail polish serves as an ideal backdrop, reminiscent of clear skies and blooming flowers. Apply two coats for an even finish, allowing the color to set before moving on to the next steps.
Next, unleash your creativity with nail art brushes. Using these fine-tipped tools, you can hand-paint small butterflies that flutter across your nails. Consider using a variety of shades, such as soft pinks, radiant oranges, and sunny yellows, to create a playful yet elegant look. Each butterfly can be uniquely designed with different patterns—think polka dots, stripes, or even delicate floral details. This customization adds a personal touch to your spring nails.
If painting butterflies feels daunting, don’t worry! Butterfly nail stickers are a fantastic alternative that offers both ease and versatility. Simply peel and stick these charming designs onto your freshly painted nails, and you’re good to go. They come in a range of styles and colors, allowing you to mix and match for a fun springtime effect.
As you arrange the butterflies on your nails, consider their positioning. You might want them to appear as if they are fluttering across your fingertips or resting gently on your nail beds. This playful arrangement enhances the overall design, making your nails look effortlessly chic.
To elevate the springtime feel of your nail art, consider a soft-focus floral background when photographing your creations. This gentle backdrop complements the vibrant colors of the butterflies and adds a dreamy quality to your manicure.
With this butterfly nail art, you’re not just showcasing a beautiful design; you’re also embracing a symbol of transformation and beauty that resonates deeply with the spirit of spring. Whether you choose to paint or apply stickers, this nail art is a delightful way to express your creativity and celebrate the season.
Product Recommendations:
– Nail art brushes set
– Butterfly nail stickers
– Baby blue nail polish
7. Marble Magic
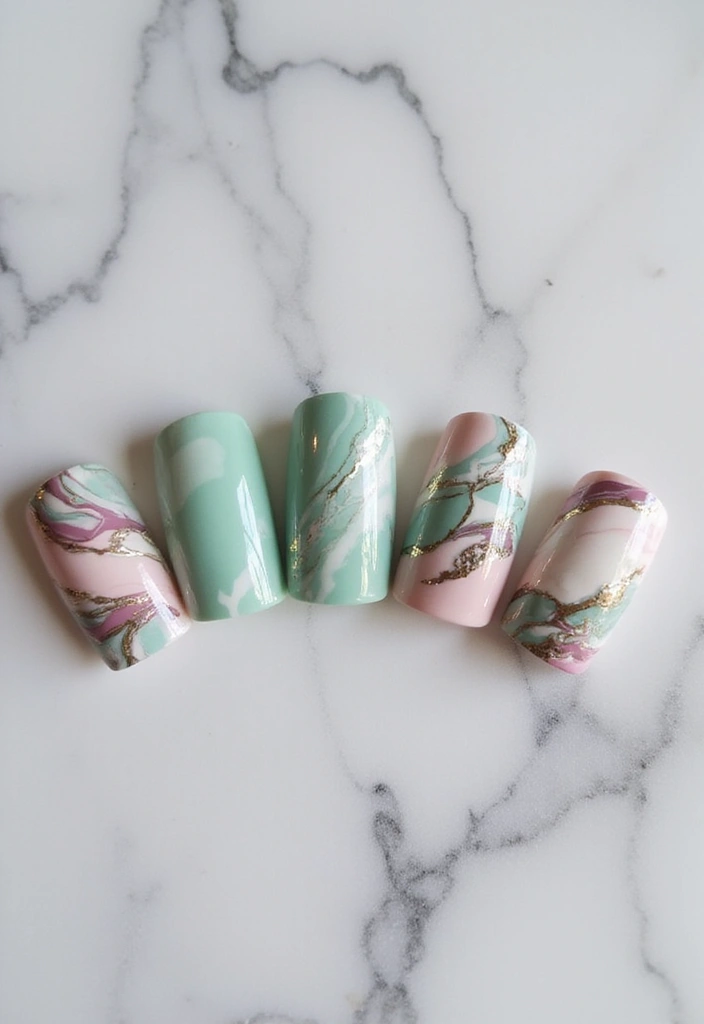
Spring nails just got a fabulous upgrade with the mesmerizing art of marble magic!
Picture this: a stunning array of pastel hues—soft mint green, blush pink, and crisp white—all swirling together to create a one-of-a-kind masterpiece on your fingertips.
Using the water marbling technique, you’ll transform your nails into works of art. It’s all about swirling those colors in a bowl of water and dipping your nails in to capture the unique patterns.
Yes, it can be a little tricky at first, but the payoff is utterly worth it. Each nail will boast its own intricate design, making your manicure not just beautiful but truly unique.
Imagine a set of nails that radiates elegance, with each finger showcasing swirling patterns that evoke luxury. Set against a simple marble table, your nails will shine and steal the spotlight this spring.
Get ready to impress with this stunning spring nail tutorial!
Product Recommendations:
• Nail art water marbling kit
• nail art dotting tools
8. Striped Perfection

Stripes are a timeless design that never goes out of style, making them an excellent choice for refreshing your spring nails. The beauty of stripes lies in their versatility; they can be adapted to suit any occasion, whether you’re dressing up for a formal event or keeping it casual for a day out with friends.
To achieve this look, start with a light base color that embodies the essence of spring. Soft lilac is a fantastic choice, as it evokes a sense of freshness and vibrancy. Once your base coat has dried, it’s time to get creative with the stripes. You can use a fine brush or striping tape to create sharp, clean lines in contrasting shades. Bold white and shimmering gold stripes can add a stunning contrast against the lilac background, giving your nails a chic and modern touch.
For an added flair, consider varying the widths of your stripes or incorporating diagonal lines into your design. This not only adds visual interest but also allows you to express your personal style in a unique way. The key is to keep the lines crisp and polished, ensuring that each stripe stands out beautifully against the soft base color.
As you work on your nail art, remember to take your time. Precision is crucial for achieving that sophisticated look. Once finished, allow your nails to dry completely before applying a top coat to seal in your design and add a glossy finish. This will enhance the overall appearance, making your spring nails look professionally done.
Picture your completed nail art set against a minimalist background. The focus should remain on the striking striped design, emphasizing the elegance and creativity of your work. These spring nails not only reflect the season’s spirit but also showcase your talent and passion for nail art.
Whether you’re attending a garden party, enjoying a casual brunch, or simply want to brighten up your everyday look, this striped perfection is sure to turn heads. With this Spring nail tutorial, you can achieve salon-quality results right at home, proving that with a little patience and creativity, beautiful spring nails are within your reach.
Product Recommendations:
• Nail art striping tape
• Fine detail nail art brush set
9. Sweet Sweetheart
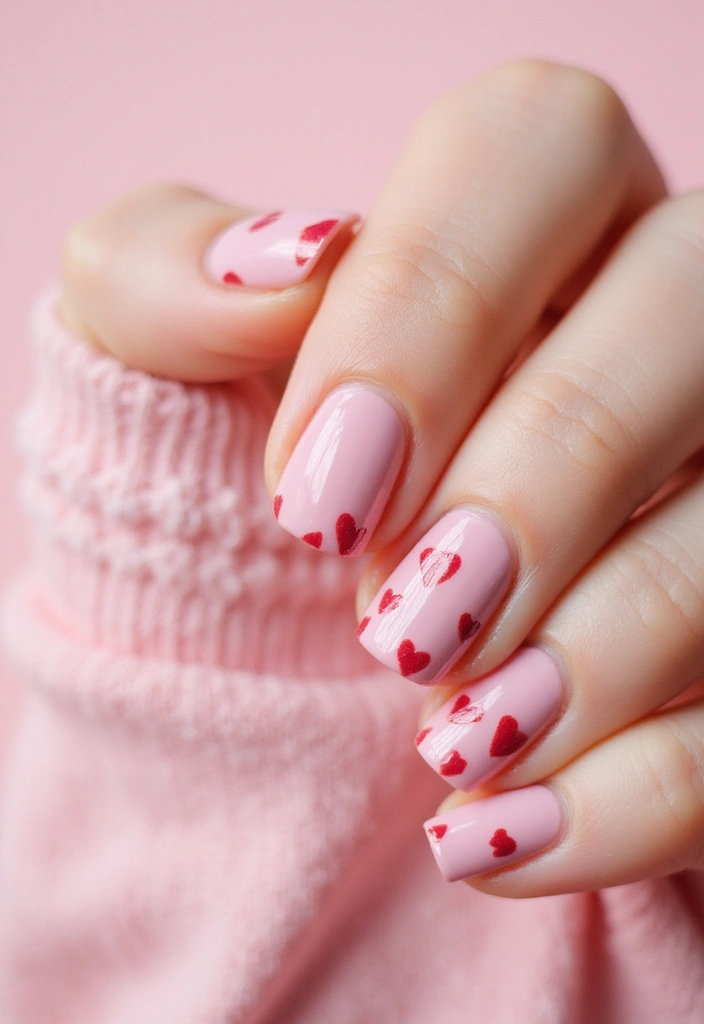
Celebrate spring romance with heart-themed nail art that is both sweet and stylish.
Using a light pink base, create tiny hearts in bright red or white using either nail stickers or a fine brush. This design is perfect for date nights or any occasion where you want to express your love for the season. The hearts add a playful touch, making your nails the perfect accessory for spring outfits.
Imagine a close-up of nails painted in soft pink adorned with tiny, hand-painted red hearts. The nails look charming and delightful, set against a pastel background that enhances the romantic theme of the design.
Product Recommendations:
• Nail art brush set
• light pink nail polish
• red heart nail stickers
10. Rainbow Bright
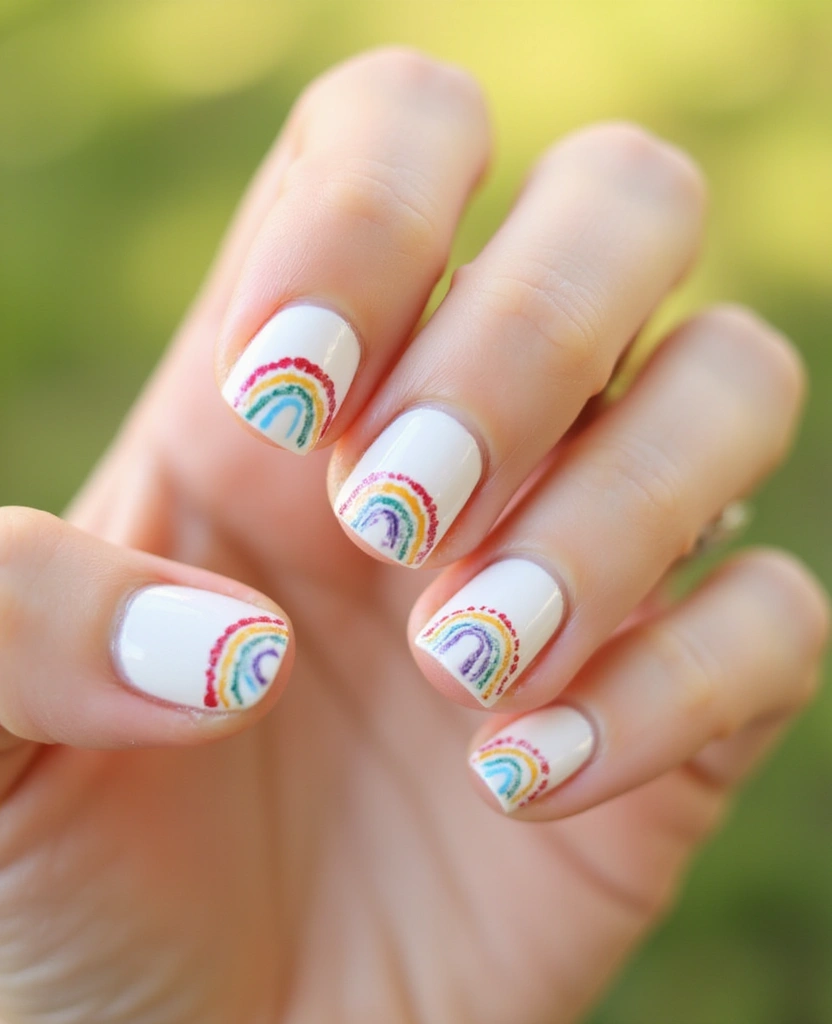
Embrace the joy of spring with a colorful rainbow nail art tutorial that celebrates the season’s vibrancy.
Using a light base coat, create small rainbows on each nail with a variety of bright colors. This playful design is perfect for those who love to make a statement. Finish with a glossy top coat for a stunning shine that will have your nails looking fresh and fun.
Product Recommendations:
• nail art brush set
• pastel nail polish collection
• glossy top coat
11. Tropical Sunset

As the days grow longer and warmer, nothing captures the essence of spring quite like a stunning sunset. This nail art tutorial is designed to help you bring the beauty of a spring evening to your fingertips. Imagine a breathtaking gradient that transitions from vibrant oranges to soft pinks and deep purples, reminiscent of a sun dipping below the horizon. With just a few simple steps, this Spring tutorial will help you can create this eye-catching design that is sure to turn heads and evoke a sense of tropical paradise.
Step 1: Gather Your Materials
Before you begin, make sure you have all the necessary materials at hand. You will need a base coat, nail polishes in shades of orange, pink, and purple, a makeup sponge, a fine nail art brush, and a top coat for that glossy finish.
Step 2: Prepare Your Nails
Start by prepping your nails. Clean, buff, and apply a base coat to protect your nails and make your design last longer.
Step 3: Create the Gradient Base
Using a makeup sponge, apply stripes of orange, pink, and purple nail polish. Gently dab the sponge onto your nails, layering the colors to achieve a smooth gradient effect. Repeat this step until you’re satisfied with the vibrancy.
Step 4: Allow to Dry
Give your gradient base a few moments to dry. Patience is key here to avoid smudging when you add the next elements.
Step 5: Paint Your Palm Trees
Using your fine nail art brush, dip it into black polish and carefully paint the silhouettes of palm trees on each nail. Keep the design simple; a few curved lines for the trunks and spiky shapes for the leaves will suffice to convey that tropical vibe.
Step 6: Add a Soft Beach Background (Optional)
For an extra touch, consider adding a soft-focus beach background. Using a light beige or sandy color, paint a small line at the bottom of your nails to represent the shore. This will enhance the sunset effect and add depth to your design.
Step 7: Top It Off
Once everything is dry, seal your artwork with a high-quality top coat. This will not only give your nails a beautiful shine but will also protect your design from chipping.
Step 8: Clean Up
Use a small brush dipped in nail polish remover to clean up any excess polish around your cuticles. This step ensures a neat and professional-looking finish.
Step 9: Final Touches
If you wish, you can add a few tiny stars using a white polish or a glitter top coat to evoke a magical evening sky.
Step 10: Enjoy Your Tropical Sunset Nails
Once everything is set and completely dry, take a moment to admire your work. The vibrant colors and elegant palm tree silhouettes perfectly encapsulate the spirit of spring evenings.
Step 11: Share and Show Off
Don’t forget to share your stunning tropical sunset nails on social media! Tag your friends and inspire them to try this beautiful spring nails design.
This tutorial not only showcases your creativity but also allows you to embrace the warmth and beauty of the season. With its blend of colors and patterns, your nails will be a canvas of serenity and vibrancy, reminiscent of those enchanting spring sunsets. So grab your materials, follow this step-by-step guide, and let your nails shine like the sky at dusk!
Product Recommendations:
• nail polish set in vibrant colors
• makeup sponge for gradient nails
• fine nail art brush set
12. Sparkling Glitter
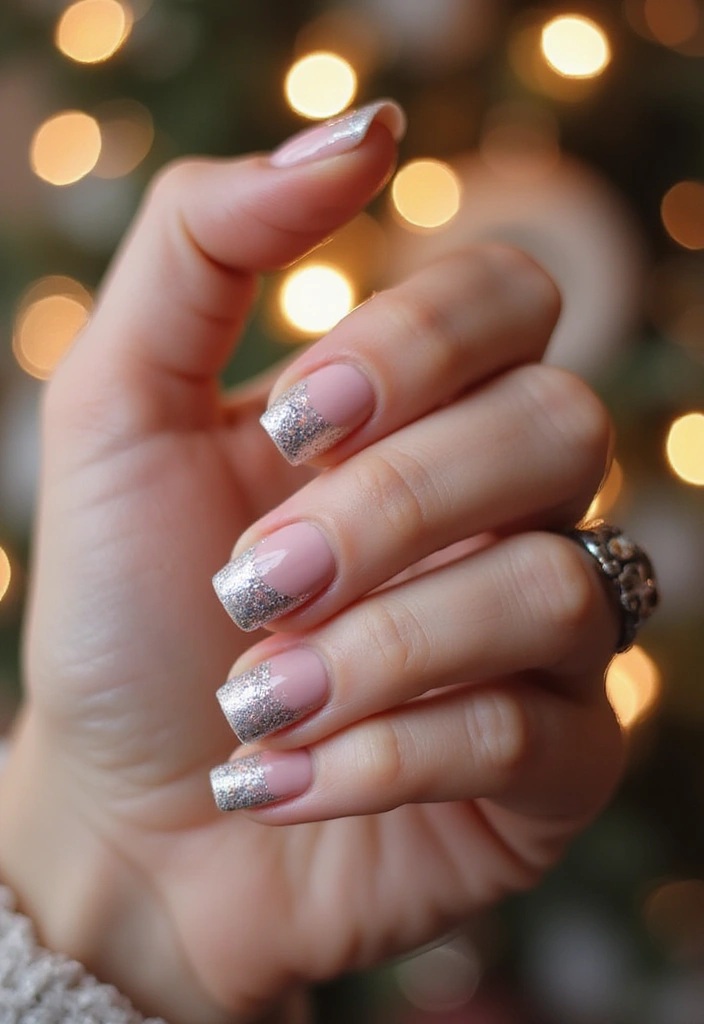
Add a touch of glamour to your spring nails with glittery designs that catch the light beautifully. There’s something incredibly enchanting about the way glitter sparkles, making it a perfect choice for this vibrant season.
Start by selecting a base color that complements your chosen glitter. Soft pastels like lavender, mint green, or blush pink are ideal for spring and provide a lovely backdrop for the dazzling sparkle. Once you’ve painted your nails with the base color, allow it to dry completely. This step is crucial, as it ensures that the glitter adheres properly without disturbing your base layer.
Next, it’s time to unleash the magic of glitter polish! You can apply glitter to the tips of your nails for a chic French manicure twist, or if you’re feeling adventurous, go for full glitter coverage. To achieve a gradient effect, start with a heavier application at the tips and gradually lessen the amount of glitter towards the base of the nail. This technique not only looks stunning but also adds depth to your nail design.
To really make your glitter pop, consider using a top coat. A clear gel or glossy top coat not only seals your design, preventing chipping, but also enhances the shine of the glitter, making it catch the light even more brilliantly.
Imagine a set of nails painted in a soft pastel hue adorned with sparkling glitter at the tips. The way the glitter dances in the light creates a mesmerizing effect that is bound to turn heads. Pair this look with a festive background—think twinkling fairy lights or a shimmering table setting—to amplify the glamorous feel of your nail art.
This glittery nail design is perfect for special occasions or nights out, but it can also add a bit of sparkle to your everyday life. With the right combination of colors and glitters, you can customize your spring nails to perfectly match your outfit, ensuring you always look effortlessly chic.
Whether you’re gearing up for a spring wedding, a night out with friends, or simply want to elevate your everyday style, these glittery designs will perfectly capture the essence of the season while adding that extra pop to your spring style. Grab your nail supplies and get ready to shine with this Spring nail tutorial as your guide!
Product Recommendations:
• Glitter nail polish set
• pastel nail polish collection
• gel top coat for nails
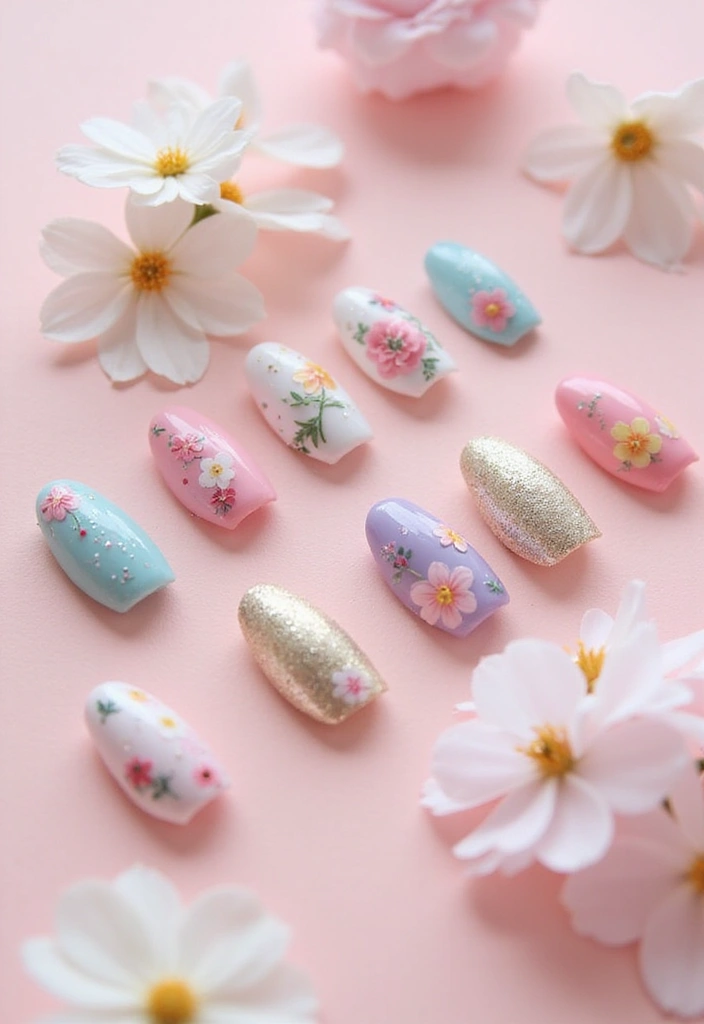
13. Nature’s Touch
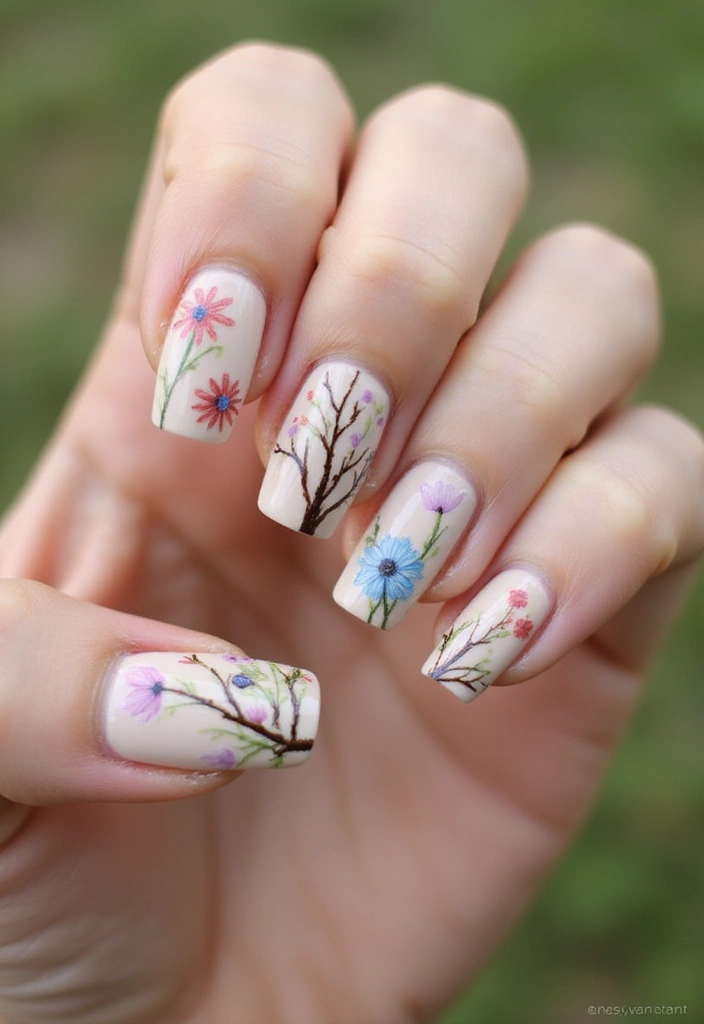
Imagine transforming your nails into a stunning homage to the beauty of the natural world. With the right techniques and a touch of creativity, you can create intricate designs that feature delicate flowers, graceful tree branches, and vibrant leaves—perfect for welcoming the warmth of spring.
Start with a neutral base coat to allow your designs to pop. A soft beige, pale pink, or light taupe provides the ideal canvas for your artistic expression. Once your base is dry, gather your fine detail brushes and an array of nail polishes in various shades that reflect the colors of nature—from deep greens to bright florals.
For the flowers, think about the blooms that inspire you. Whether it’s the cheerful daffodil, the elegant cherry blossom, or the vibrant sunflower, each flower can be hand-painted onto your nails. Use your fine brush to create petals that seem to flutter in the breeze, layering colors to achieve depth and dimension.
Tree branches can be added to create a sense of movement and life. Using a darker polish, carefully outline the branches, then add tiny leaves in shades of green. This not only brings a sense of balance to your design but also creates a captivating contrast against the neutral background.
Each nail can tell its own story, showcasing a unique bloom or branch that reflects your personality and love for nature. Perhaps one nail features a single, large flower while another displays a delicate arrangement of smaller blossoms and leaves. The beauty of this design lies in its individuality; no two nails need to be the same.
As you work on your creations, take a moment to step back and appreciate the progress. Each stroke of your brush is a reflection of the season and your connection to the outdoors. Once you’ve completed your designs, seal everything in with a top coat for a glossy finish that not only protects your artwork but also enhances its vibrancy.
When you flaunt your nature-inspired spring nails, you’re not just showcasing a manicure but a piece of art that celebrates life and the beauty around us. Whether you’re attending a garden party or simply want to feel a little more connected to the earth, these nail designs will serve as a reminder of the season’s splendor.
So, gather your tools and get ready to bring the essence of nature to your fingertips with this tutorial. Your nails are about to become a canvas for the artistry of spring!
Product Recommendations:
• Nail art brush set
• gel nail polish in spring colors
14. Whimsical Waves
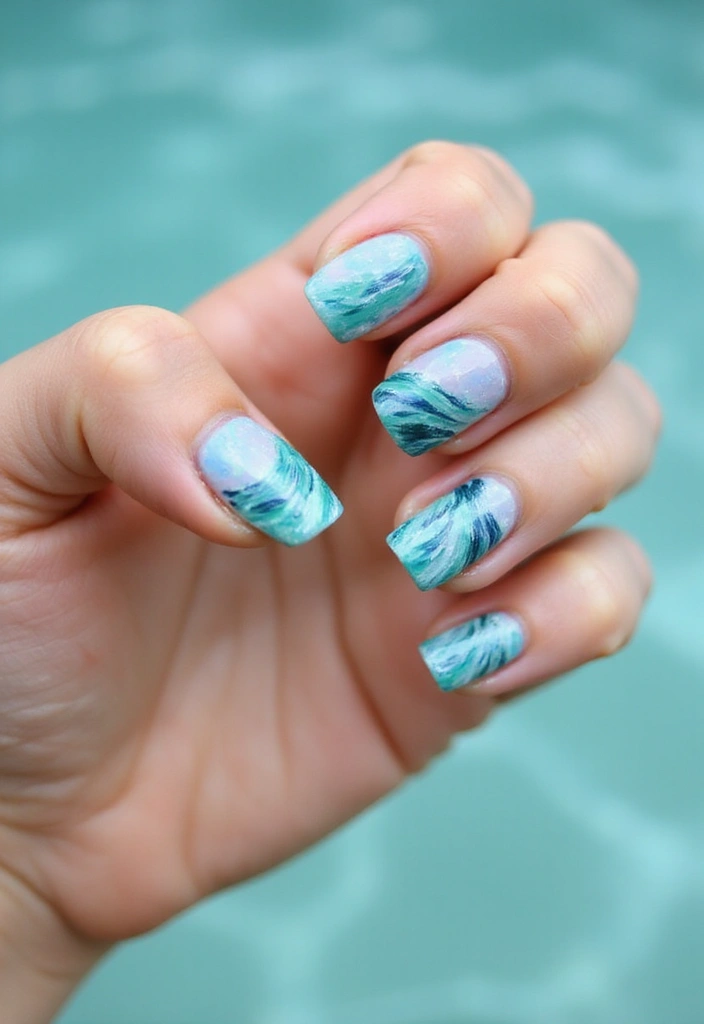
Spring is a season that breathes new life into everything around us, and what better way to celebrate this vibrant time than with a nail art design that captures the essence of freshness? Imagine your nails adorned with flowing wave patterns that mimic the gentle movement of water under the sun. This whimsical waves design is not only visually stunning but also a fantastic way to express your artistic flair.
To begin, select a light pastel base color that embodies the soft hues of spring. Think delicate shades like baby blue, mint green, or a soft lavender. These colors serve as the perfect canvas for your wave-inspired artwork, allowing the flowing patterns to stand out beautifully.
Once your base coat is dry, it’s time to create those mesmerizing wave patterns. Using a fine brush or a sponge technique, you can layer varying shades of blues and greens. Start with a deeper blue at the tips of your nails, gradually blending it into a lighter shade as you move towards the cuticle. This gradient effect mimics the ocean’s depths and enhances the feeling of movement.
Introduce greens to your design to represent the lush foliage that springs to life during this season. You can create swirls and curves that evoke the gentle ebb and flow of waves, making each nail a unique piece of art. The key is to keep the lines smooth and flowing, so take your time and let your creativity guide you.
To elevate the look further, consider adding a touch of sparkle. A subtle shimmer topcoat can give your waves a more dynamic feel, reflecting light just like water does. Alternatively, small gems or rhinestones can be added to accentuate the wave peaks, adding a playful yet elegant touch to your nails.
Once you’ve perfected your design, finish with a high-gloss topcoat to seal in your artwork and ensure its longevity. This not only provides a beautiful shine but also protects your whimsical waves from chips and scratches, allowing you to enjoy your refreshing spring nails for longer.
This tutorial is perfect for those who love to experiment with colors and techniques. The flowing patterns create an eye-catching effect that is sure to mesmerize, making it a standout choice for spring nail art. Whether you’re heading to a garden party or simply want to enjoy the season, these whimsical waves are a delightful way to celebrate spring’s freshness. Enjoy the process, and let your creativity flow!
Product Recommendations:
• nail art brushes set
• pastel nail polish collection
• top coat for nail protection
15. Simple Sparkle

As the flowers begin to bloom and the sun starts to shine, many of us look for ways to refresh our style for the new season. For those who appreciate a minimalist aesthetic, simple sparkle nails can be the perfect choice for spring.
Imagine a soft peach base color that evokes warmth and freshness, perfectly embodying the essence of spring. This understated hue serves as a beautiful canvas, allowing the nails to look effortlessly elegant. The peach shade not only complements various skin tones but also brings a sense of lightness that mirrors the beauty of the season.
To elevate this look while maintaining its simplicity, consider adding a few strategically placed rhinestones or pieces of glitter. The key is to choose a limited number of adornments so they enhance the overall design without overwhelming it. A couple of rhinestones at the base of a nail can create a focal point that draws attention while remaining chic. Alternatively, a light dusting of glitter near the tips can evoke the sparkle of morning dew, adding a whimsical touch that captures the playful spirit of spring.
This design is not only stylish but also versatile. Whether you’re heading to the office, meeting friends for brunch, or enjoying a casual day out, these simple sparkle nails add just the right amount of flair to your ensemble. They embody the spirit of spring, bringing a touch of brightness to your fingertips while keeping things understated and sophisticated.
The beauty of simple sparkle nails lies in their adaptability. You can easily tweak the design to suit any occasion. For a more polished look suitable for a formal event, you might opt for a more subtle placement of rhinestones. On the other hand, if you’re feeling adventurous, adding a few more glitter accents can turn your nails into a dazzling statement piece for a night out.
With just a few basic tools like a good base coat, your favorite peach polish, and some rhinestones or glitter, you’ll be ready to create your own simple sparkle nails right at home.
You don’t need to be a professional nail artist to achieve this elegant design—it’s all about the simplicity and the little touches that make it shine. With a little practice, you’ll master the art of minimalist nail design, allowing you to express your personal style effortlessly.
Picture this: a close-up of nails painted in that soft peach shade, adorned with delicate rhinestones that catch the light just right. Set against a light and airy background, the nails draw the eye, showcasing the beauty of less is more. This design is not just a trend; it’s a timeless way to express your personal style while welcoming the vibrant energy of spring.
So why not give it a try? With a little practice, you’ll find the perfect balance between simplicity and sparkle, ensuring that your spring nails are a beautiful reflection of the season’s charm.
Product Recommendations:
• peach nail polish
• rhinestone nail art kit
• glitter nail polish set
16. Daisies in Bloom
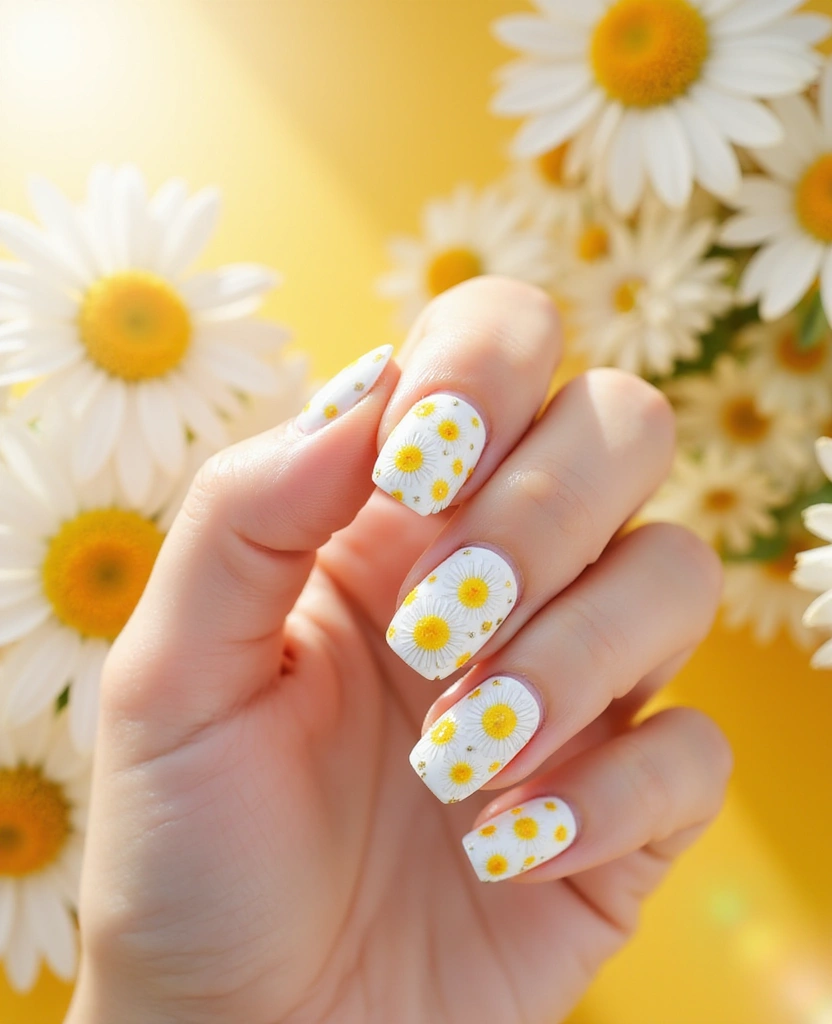
Spring is a season that brings a burst of color and life, and what better way to celebrate than with a delightful daisy nail art design? This cheerful look is not only perfect for welcoming the warmer months but also embodies the joy and freshness that springtime brings.
To start, you’ll need a clean white base on your nails. This pristine canvas will allow your daisies to stand out beautifully. Using a nail polish set, apply two thin coats of white polish to ensure an even and vibrant background. Make sure to allow it to dry completely before moving on to the fun part—creating those lovely daisies!
For the daisies, a simple yet effective technique is to use dotting tools and nail art brushes. Begin by painting small white petals around a central dot of yellow polish. This will create the classic daisy shape that is both charming and iconic. You can vary the size of the petals for a more dynamic look, creating a playful garden of daisies on your fingertips. This step-by-step approach makes it easy for anyone to replicate this joyful design.
As you apply the daisies, consider adding a few variations in the design. Perhaps some nails can feature a single large daisy, while others might have clusters of smaller ones. This mix will not only add an element of surprise but also infuse your nails with a whimsical vibe that embodies the essence of spring.
Additionally, think about incorporating some green accents to mimic leaves or stems. A few delicate strokes of green polish can enhance the overall design, making your daisies pop even more against the white background. This added touch will bring your nail art to life, turning your fingertips into a mini spring garden.
Once you’re satisfied with your daisy designs, seal everything with a clear topcoat. This final step is crucial as it will enhance the vibrancy of your colors and ensure your spring nails stay looking fresh and fabulous for longer. The glossy finish will not only give your nails a professional look but also protect your artwork from chips and wear.
Imagine glancing at your nails and seeing those cheerful daisies—it’s sure to lift your spirits! This design is perfect for any spring occasion, from casual outings to festive gatherings, and it’s a great conversation starter too. Whether you’re heading to a picnic in the park or attending a spring wedding, these daisy nails will complement your seasonal outfits beautifully.
If you’re ready to create your own daisy nail art, check out the product recommendations below to gather all the tools you need for this delightful spring nails tutorial:
• nail polish set
• nail art brushes
• dotting tools
With just a few simple steps, you can bring the essence of spring to your nails and enjoy the beauty of daisies in bloom! Let your creativity shine as you embrace the season with this delightful nail art design.
Conclusion
Spring is the perfect time to express your creativity through vibrant and playful nail art!
With these 16 helpful tutorials, you have a plethora of options to choose from, whether you prefer bold designs or subtle elegance. Grab your polishes and tools, and let your nails bloom with beautiful spring designs that reflect the season’s joy and renewal.
Note: We aim to provide accurate product links, but some may occasionally expire or become unavailable. If this happens, please search directly on Amazon for the product or a suitable alternative.
This post contains Amazon affiliate links, meaning I may earn a small commission if you purchase through my links, at no extra cost to you.