As the blossoms bloom and the world awakens from its winter slumber, it’s time to refresh your nail game with stunning DIY nail accessories that scream spring chic.
From vibrant nail jewels to delightful stickers, this listicle is packed with creative ideas to elevate your manicure to a whole new level.
Whether you’re a nail art novice or a seasoned pro, these accessories will add a touch of whimsy and elegance to your springtime nails, making them a perfect canvas for self-expression. Get ready to unleash your creativity and step into the season with style!
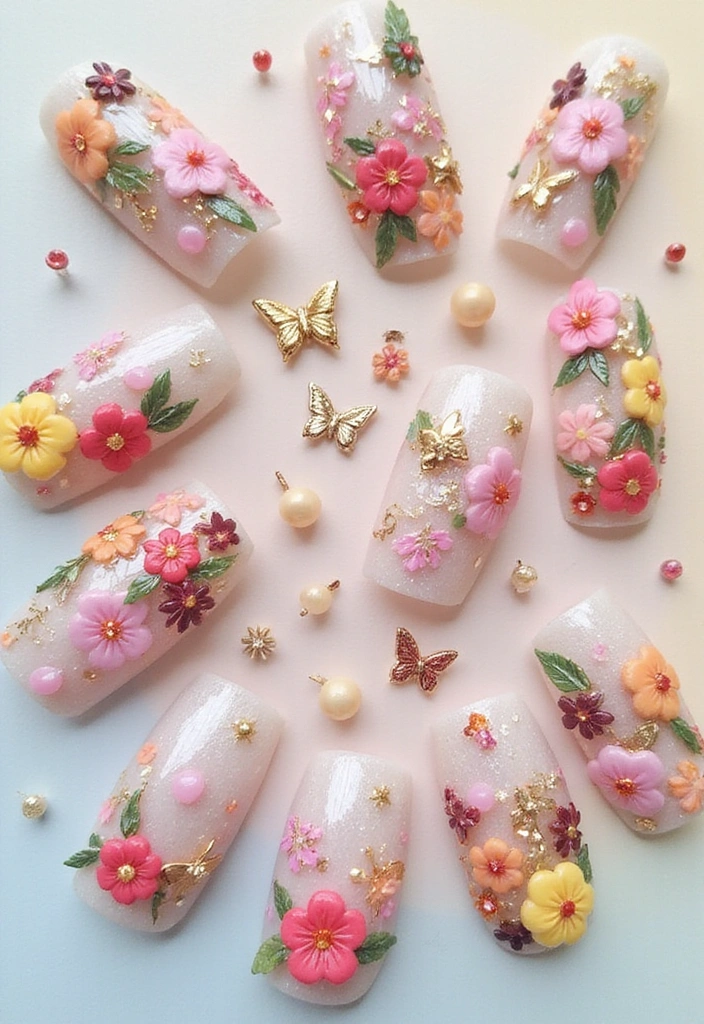
1. Floral Nail Jewels
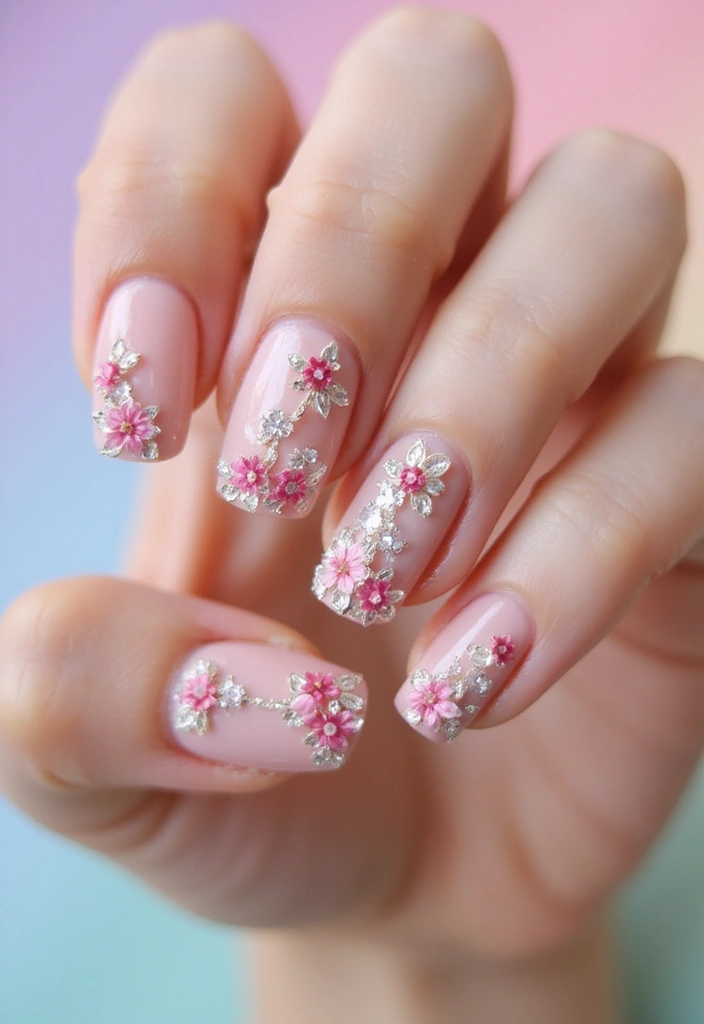
Bring the beauty of spring flowers to your fingertips with delightful floral nail jewels. These intricate designs can add an elegant touch to any manicure, shimmering under the sunlight like dew on petals.
Imagine the soft breeze of spring, the gentle rustle of blooming flowers, and the vibrant colors that awaken the senses. Now, picture this beauty captured on your nails. Floral nail jewels offer a way to express the essence of the season with just a touch of creativity.
Choose from a variety of flower shapes and colors to match your outfit or mood. Whether you opt for bold daisies that demand attention or subtle cherry blossoms that whisper elegance, the options are endless. Each jewel is a tiny piece of artistry, ready to transform your manicure into a garden of colors and textures.
Applying these jewels is a breeze! Simply use a dot of nail glue to secure them onto your nail design. For those looking to elevate their nail art further, consider incorporating a few leaves or vines. This extra detail can create a stunning garden-inspired look that truly celebrates the essence of spring.
Floral nail jewels not only enhance your nails’ aesthetic but also tell a beautiful story of renewal and growth. They embody the spirit of spring, making them the perfect accessory during this vibrant season. Pair them with a soft pastel polish for a harmonious look that evokes tranquility, or go bold with a contrasting base color for a striking statement that showcases your personality.
When putting together your spring nail design, think about the mood you want to convey. The soft pinks and whites of cherry blossoms can bring a touch of romance, while bright yellows and reds of sunflowers can radiate joy and energy. This versatility allows you to curate a unique style that reflects who you are.
To help you get started on your floral nail journey, here are some product recommendations that can elevate your nail art:
• Floral Nail Art Stickers – Easy to apply and available in a variety of designs, these stickers can instantly beautify your nails.
• 3D Flower Nail Charms – For a more dimensional look, these charms add depth and interest to your manicure.
• Nail Art Glue for Jewels – A must-have for ensuring your jewels stay securely in place, this glue will help your nail art last longer.
With floral nail jewels, you can transform your nails into a canvas of springtime beauty, making each manicure a celebration of the season. So gather your DIY nail accessories and let your creativity bloom!
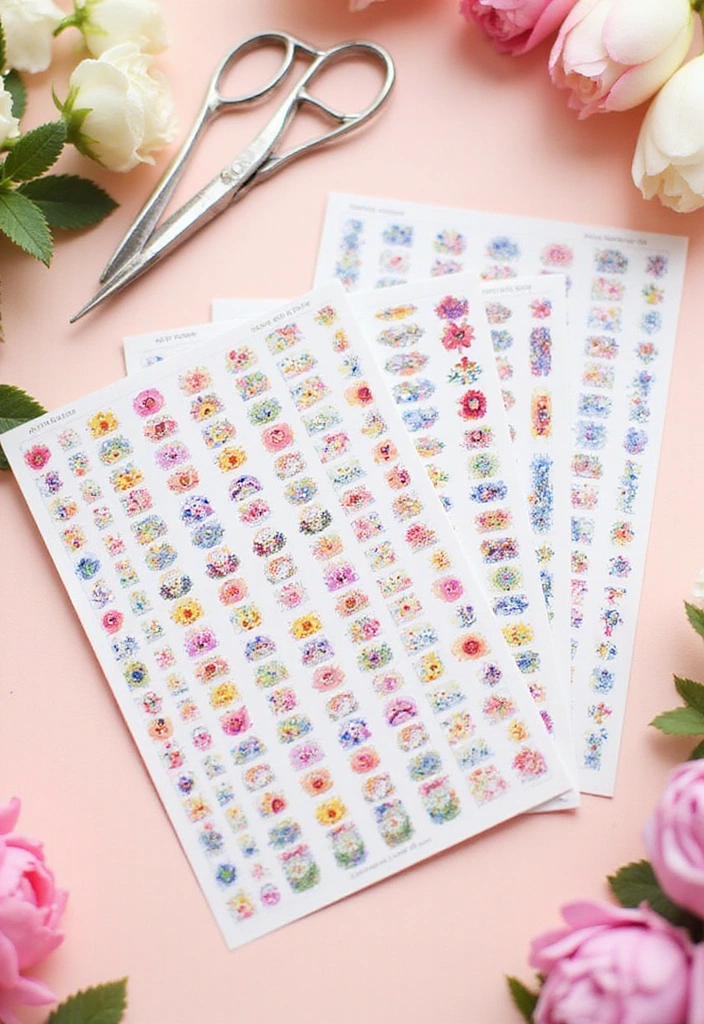
2. Botanical Nail Stickers
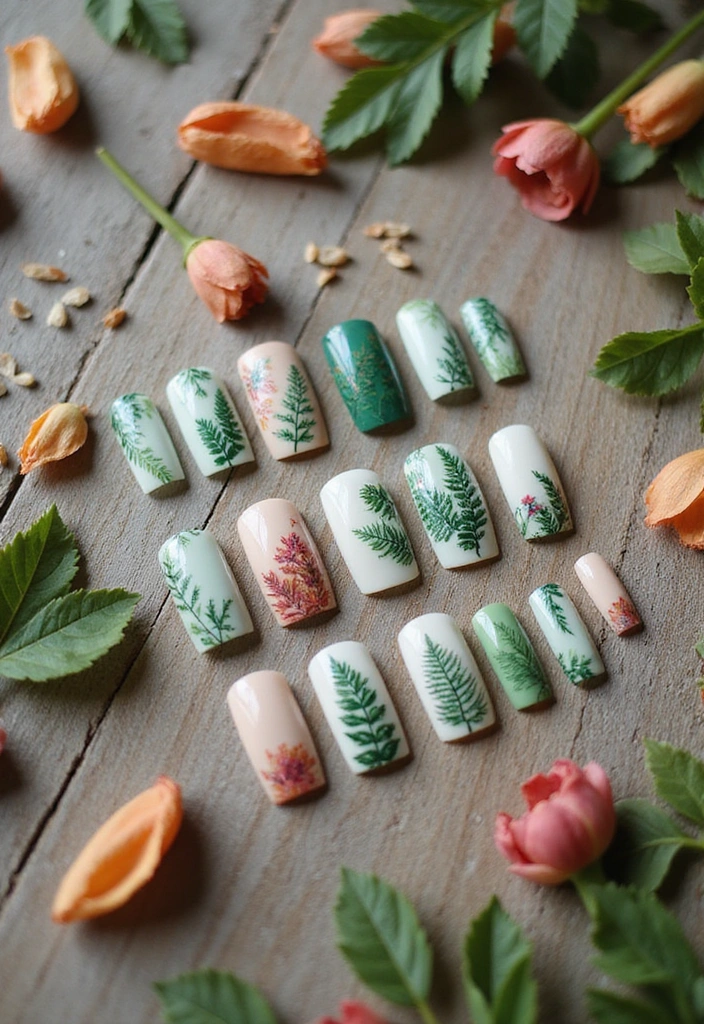
Infuse your nails with nature’s charm using botanical nail stickers. These delightful stickers come in a plethora of designs featuring intricate leaves, delicate ferns, and vibrant blossoms, all of which can easily complement your spring wardrobe. The designs are thoughtfully created to bring a touch of the outdoors right to your fingertips, making them perfect for the season.
Applying these stickers is a breeze—simply peel, place, and seal with a top coat for a long-lasting finish that won’t chip easily. The beauty of botanical stickers lies in their incredible versatility; you can create a full botanical garden on your nails for a bold statement or use them sparingly as accents for a more subtle look. This flexibility allows you to express your personality and style in countless ways.
To achieve a cohesive and polished appearance, consider pairing these botanical stickers with colors inspired by nature. Soft greens can evoke the feeling of fresh new leaves, while earthy browns bring to mind rich soil. Vibrant floral shades can add a pop of color that mirrors blooming gardens. The combination of these colors with your chosen stickers results in a chic and refreshing manicure that celebrates the beauty of spring.
For those who love to personalize their nail art, you can mix and match different sticker designs to create unique patterns that reflect your style. Add in some nail jewels for an extra touch of glamour, and your DIY nail accessories will be the talk of the town.
If you’re ready to elevate your spring nails, here are a few product recommendations to get you started:
• Botanical nail sticker set – A variety of designs to suit your mood.
• Nail art top coat – Ensures your stickers stay put and shine brightly.
• Spring-themed nail polish set – A beautiful selection of colors to complement your botanical designs.
With these tools in hand, you’re set to create stunning spring-inspired nails that showcase your creativity and love for nature.
3. Gemstone Accents
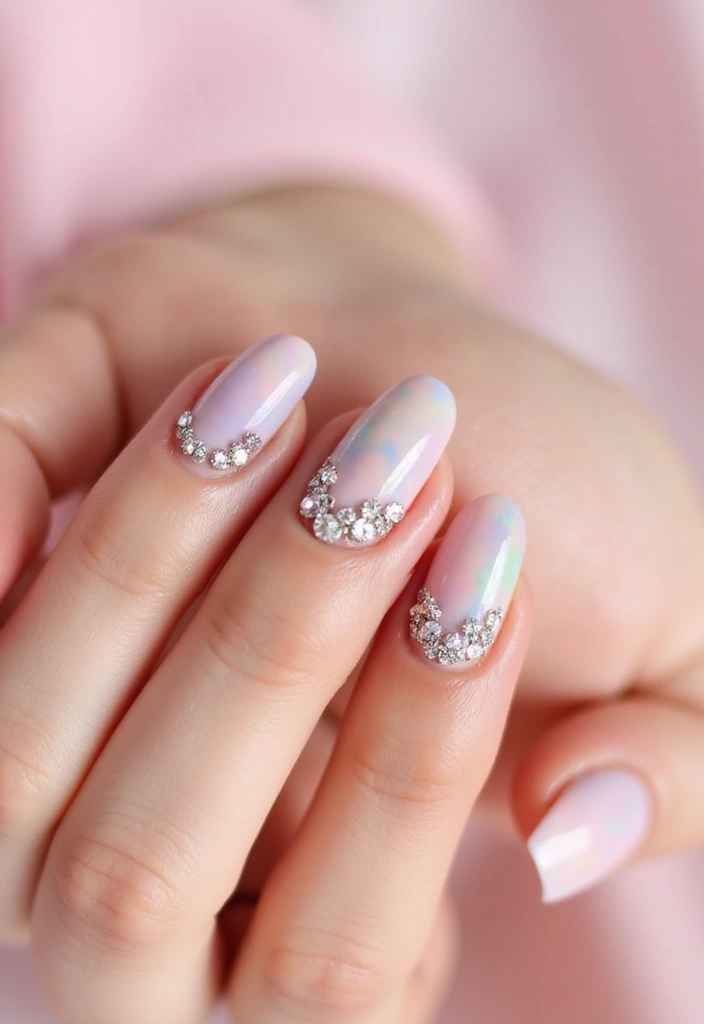
Add a dash of glamour to your spring nails with beautiful gemstone accents. These dazzling gems can transform even the simplest manicures into stunning statements, perfect for any occasion.
Gemstone accents are more than just a passing trend; they make a bold declaration! Their vibrant hues and glimmering finishes embody the spirit of spring. Picture your nails sparkling in the sunlight, each gem catching the light and showcasing your unique style. Whether you lean towards a subtle hint of shimmer or a full-on eye-catching display, nail jewels can be customized to fit any mood or event.
Select from an array of shapes and colors—imagine soft pink quartz, sparkling clear crystals, and calming pastel amethysts—to craft a design that genuinely represents your personality. Pastel amethysts evoke tranquility, while clear crystals lend a timeless elegance. Soft pink quartz adds a romantic touch, perfect for brunch dates or garden gatherings.
For those who favor a minimalist aesthetic, consider placing a single gem on each nail. This refined approach allows the gemstones to stand out without overwhelming your manicure. Each gem serves as a focal point, giving your nails a sophisticated flair while remaining effortlessly chic.
If you’re feeling adventurous, go for elaborate designs featuring clusters of gemstones. Envision a delicate floral motif with sparkling gems at the heart of each blossom—your nails will become true works of art!
Applying these gems is straightforward and satisfying. Use nail glue for secure placement, ensuring that each gem remains steadfast throughout your day. A clear top coat is crucial to complete the look; it adds a glossy finish and safeguards your design against chips and scratches, keeping your manicure looking fresh and fabulous.
The beauty of gemstone accents lies in their adaptability. Combine different colors and shapes to create a distinctive design that mirrors your personal style. Whether you choose a soft pastel palette or a bold color contrast, gemstone nail jewels can seamlessly fit any theme or event.
With the right tools and a sprinkle of creativity, incorporating these stunning accents into your spring nail routine is easy. Whether you’re preparing for a special occasion or just want to elevate your everyday look, these DIY nail accessories will leave you feeling glamorous.
Pair your gemstone accents with complementary nail colors—soft mint greens or lavender shades can enhance the overall effect. Nail stickers featuring matching designs can create a cohesive look that ties everything together. The combination of nail jewels and stickers produces a multidimensional effect that truly stands out!
Feeling daring? Play with different textures. Using matte nail polish beneath glossy gemstone accents adds depth and intrigue to your design. This contrast makes your gems pop even more, resulting in a striking visual that’s sure to catch attention.
Before you start applying your gemstones, remember to care for your nails. A bit of prep can make all the difference! Begin with a nourishing base coat to protect your natural nails and provide a smooth canvas for your manicure.
To help you kick off your gemstone nail adventure, here are some product suggestions for your DIY nail accessories journey:
• Gemstone Nail Art Kit
• Nail Glue for Gemstones
• Clear Top Coat Nail Polish
Celebrate the charm of spring with gemstone accents that reflect your style and personality. Let your nails shine brightly!
4. Watercolor Nail Art
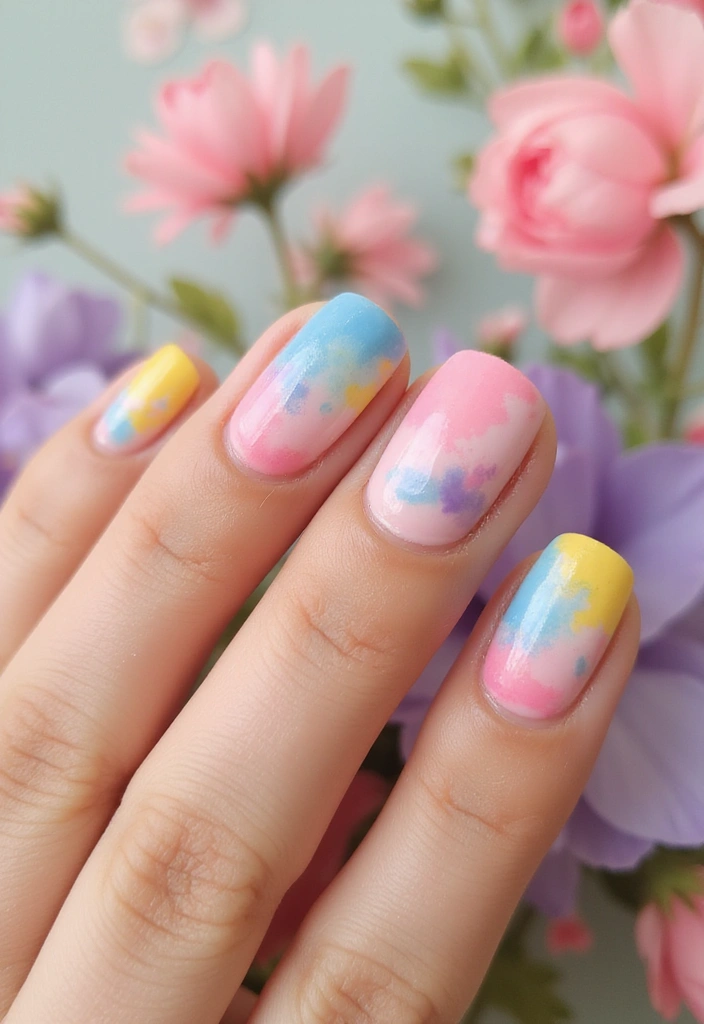
Watercolor nails are a stunning way to showcase your creativity while embracing the soft, whimsical colors of spring. This trendy nail accessory technique captures the essence of a watercolor painting, transforming your fingertips into a canvas of blended hues that are both striking and delicate.
To start your watercolor nail art journey, gather a selection of pastel nail polishes—think soft pinks, baby blues, gentle lavenders, and sunny yellows. These colors will evoke the lightness of springtime and can be mixed and matched to create a unique look that reflects your personal style.
Using a makeup sponge blender, apply a base coat to your nails to create a smooth foundation. Once that’s dry, take your sponge and dab it into the first nail polish color. Gently press the sponge onto your nail, using a dabbing motion to build up the color. This technique helps to create a soft, diffused effect that mimics the natural blending seen in watercolor art.
For a more dynamic appearance, layer different colors on top of one another, allowing each layer to dry slightly before adding the next. This gradual build-up creates a beautiful gradient reminiscent of a spring sunrise, with colors transitioning smoothly from one to another. You can also experiment with varying the intensity of each shade by adjusting the amount of polish on your sponge.
Once you’re satisfied with the watercolor effect, allow your nails to dry completely. To enhance the vibrancy and protect your artwork, seal your design with a fast-drying top coat. This not only gives your nails a glossy finish but also helps the colors pop, ensuring that your artistic expression shines through.
Watercolor nails offer endless possibilities for customization. Consider adding nail jewels or stickers to enhance your design further, bringing an extra touch of flair that complements the dreamy color palette. With this technique, you can express your artistic side and embrace the vibrant colors of spring, making your nails a true reflection of the season’s beauty.
For those ready to try their hand at this captivating technique, here are a few product recommendations to get you started:
• Watercolor Nail Art Kit – A perfect starter kit for all your watercolor nail needs.
• Makeup Sponge Blender – Ideal for achieving that seamless blend essential for the watercolor effect.
• Fast-Drying Top Coat – To lock in your masterpiece and add that beautiful glossy finish.
Embrace the fluid beauty of watercolor art this spring, and let your nails reflect the joy and vibrancy of the season!
5. Pastel Ombre
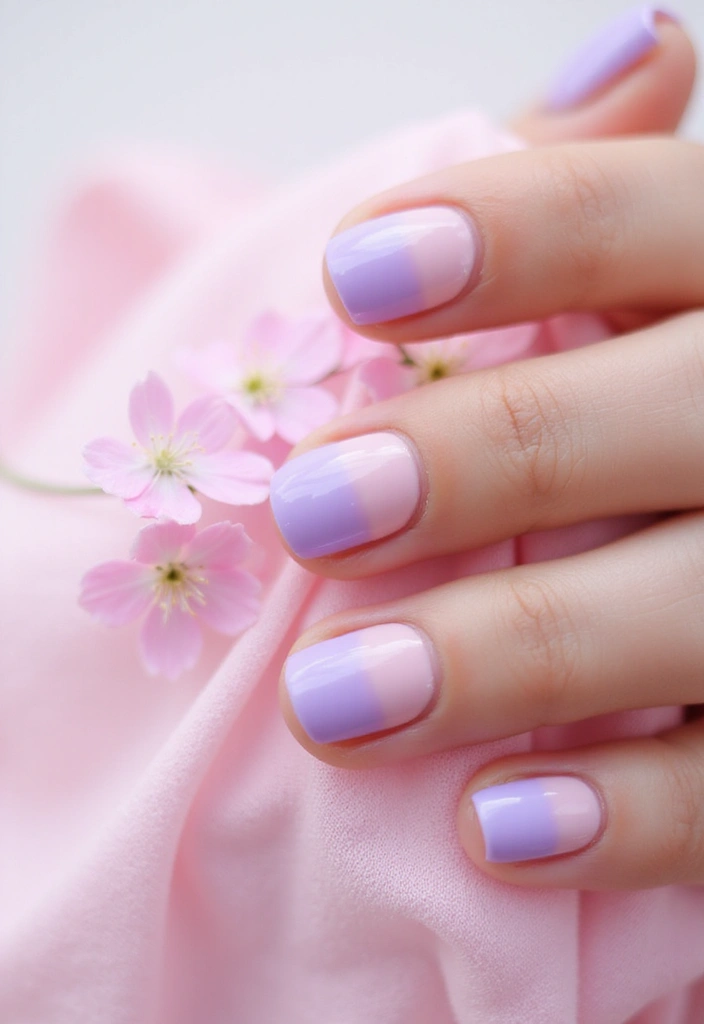
Pastel ombre nails are a beautiful way to embrace the spirit of spring, perfectly capturing the soft hues of blooming flowers and the gentle touch of sunny skies. This method offers a seamless transition between colors, creating a dreamy effect that is both eye-catching and sophisticated.
To begin your pastel ombre journey, select a base coat in your lightest pastel shade. Think delicate colors like baby blue, soft pink, or a gentle mint green. Apply this as your foundation layer, ensuring an even and smooth finish.
Next, it’s time to bring in the magic of blending. Using a makeup sponge, choose two or three additional pastel colors that harmonize beautifully with your base coat. For instance, a soft pink can transition elegantly into a lavender, or you might opt for a peach blending into a light yellow.
To achieve the ombre effect, dab the chosen colors onto the sponge, then gently press and roll it onto your nails, starting from the tips and working your way down. This technique allows the colors to meld together gradually, creating a soft gradient that is visually stunning. Don’t hesitate to go back and layer more color if you want a bolder look!
Once you’re happy with the blend, seal in your masterpiece with a clear top coat. This not only enhances the overall appearance, giving it a glossy finish, but also helps protect your artwork, ensuring it lasts longer through all your springtime activities.
With pastel ombre nails, you can feel lovely and chic for any occasion—whether you’re attending a spring brunch with friends or enjoying a leisurely day in the park.
For those looking to elevate their DIY nail accessories collection, consider trying these products:
• Pastel nail polish set – a perfect assortment of soft hues to create your ombre look.
• Makeup sponge for nail art – an essential tool for achieving that flawless gradient effect.
Embrace the joy of spring with these delightful pastel ombre nails, and let your creativity shine through your DIY nail accessories!
6. Glitter Accents
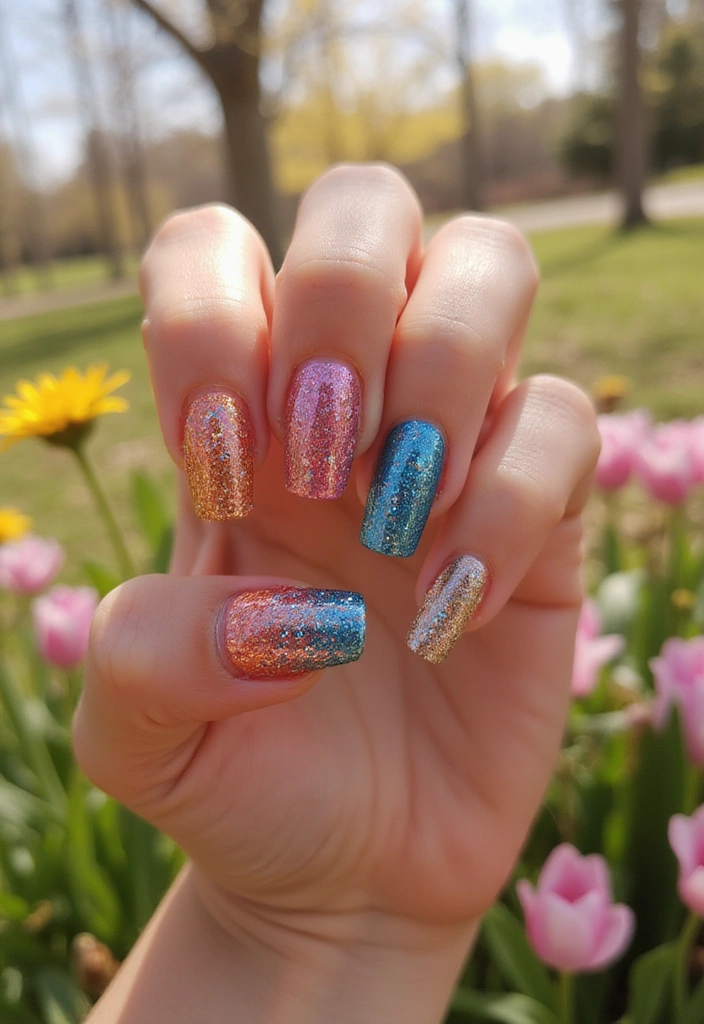
Nothing says fun like a touch of glitter, and spring is the perfect time to experiment with sparkling nail designs that elevate your style. Glitter accents can transform your nails from simple to spectacular with just a few strategic placements, making them the perfect addition to your DIY nail accessories collection.
One of the easiest ways to incorporate glitter into your nail art is by adding it to the tips of your nails. This modern twist on the classic French manicure brings a playful and vibrant energy to your look. You can choose to use a single color for a sleek finish or mix multiple shades for a more eclectic vibe. Consider using iridescent glitter that changes color depending on the light, or pastel shades that scream spring.
For those who love patterns, glitter is your friend. Think outside the box and create fun designs like polka dots, stripes, or even floral motifs using glitter. Mixing different sizes of glitter can add depth and texture to your designs, making them truly eye-catching. The key is to let your creativity shine—don’t hesitate to layer different glitters to achieve a unique look.
When it comes to applying glitter, the process is straightforward. Start with a clear base coat to provide a solid foundation for your art. While the polish is still wet, sprinkle or apply the glitter directly onto your nails. This will help the glitter adhere better and create a more vibrant effect. Once you’re satisfied with your glitter placement, finish off with a top coat. This step is crucial, as it locks in the sparkle and ensures your manicure lasts longer—perfect for spring parties or casual outings.
If you’re looking to elevate your nail game even further, consider incorporating nail jewels and stickers into your designs. These little embellishments can add an extra layer of glamour and sophistication to your glittery nails. Whether you prefer delicate gems or bold stickers, they can serve as the cherry on top of your fabulous DIY nail accessories.
Product Recommendations:
• Glitter nail polish set – A must-have for any glitter enthusiast, this set includes a variety of colors to suit your spring style.
• Nail art brushes for detailing – Perfect for intricate designs, these brushes will help you create stunning patterns with precision.
• Nail jewels and stickers kit – Enhance your nails with this kit, featuring a range of jewels and stickers that can complement your glitter accents beautifully.
With these tips and products, you’re all set to create dazzling spring nails that are totally chic!
7. Whimsical Nail Charms
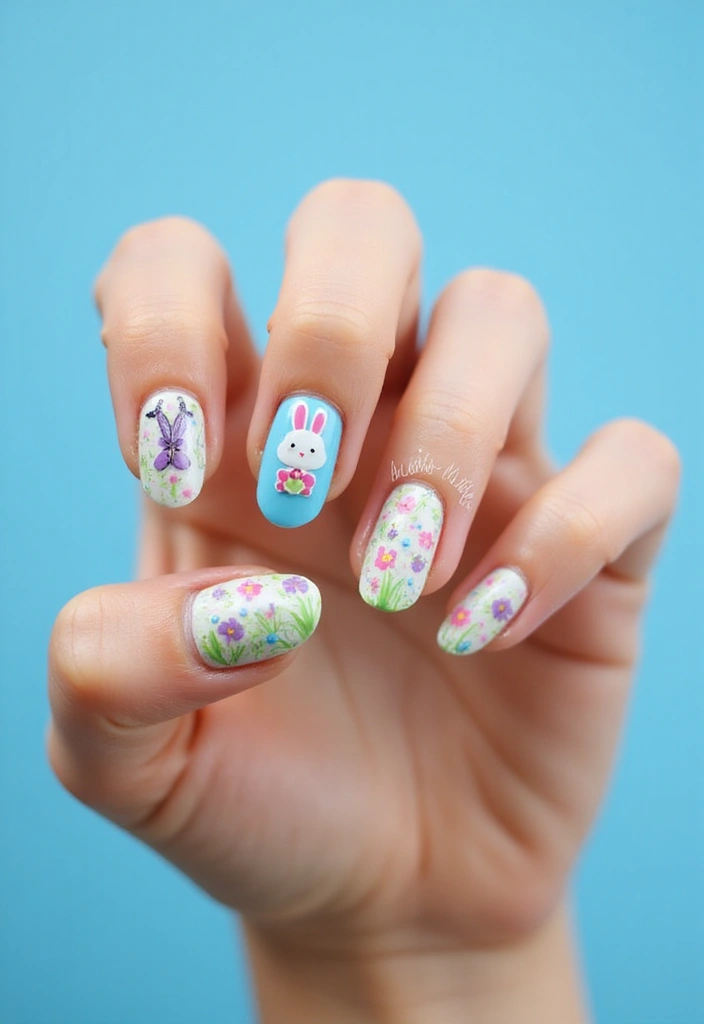
Add a playful touch to your spring nails with whimsical nail charms. These tiny, fun designs can range from cute animals to seasonal motifs like bunnies and butterflies, transforming your nails into a delightful canvas for creativity.
Imagine a little bunny hopping on your pinky or a bright butterfly fluttering on your index finger. The options are endless, and the charm designs can enhance your spring vibe, making your nails a true conversation starter. Whether you’re heading to a picnic or a garden party, these charming accents will make your manicure pop.
This playful approach allows you to showcase your unique style and stay on-trend with seasonal themes. You could create a whimsical garden scene on your nails, complete with flowers, bees, and ladybugs, or simply pick your favorite characters that bring you joy.
Don’t hesitate to get creative with your designs! The beauty of DIY nail accessories is that you can express your personality in a fun and artistic way.
For those ready to elevate their spring nail game, here are some product recommendations to get you started:
• Nail Art Charms Kit – A fabulous assortment of whimsical designs to mix and match.
• Colorful Nail Jewels – These vibrant jewels will add sparkle and shine to your manicure.
• Butterfly Nail Stickers – Perfect for those who want to flutter into spring with elegance.
With whimsical nail stickers, your spring nails will not only look fun but also reflect your joyful spirit. So gather your supplies, unleash your creativity, and let your nails bloom this season!
8. Seasonal Nail Foils
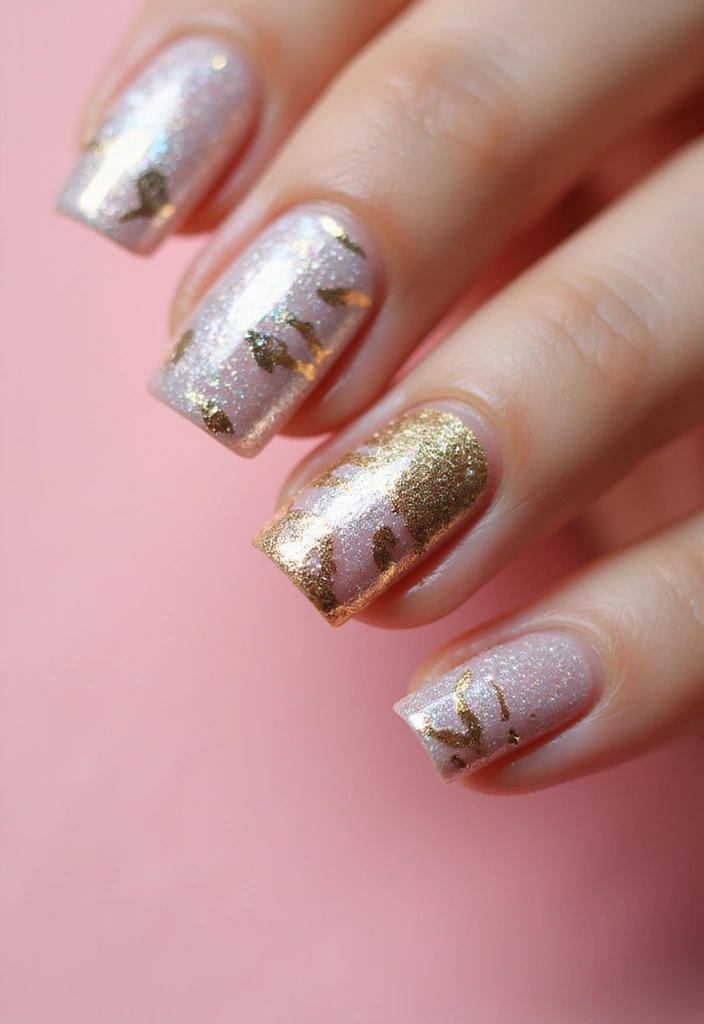
Nail foils are an exciting accessory to elevate your spring nail designs. These thin sheets of metallic or holographic material can add a stunning effect to your manicure, transforming ordinary nails into a work of art.
To get started with nail foils, select a base color that complements your style—pastels and soft hues are particularly lovely for spring. Once your base coat is completely dry, reach for a special adhesive designed specifically for foil application. Apply a thin layer of this adhesive to the area where you want the foil to adhere, and allow it to become slightly tacky for the best results.
Next, take your nail foil and gently press it onto the adhesive surface. You can use your fingers or a silicone tool to ensure that the foil adheres well, creating beautiful patterns. There’s no limit to your creativity here! You can opt for abstract designs, or for a more cohesive look, cover the entire nail. The reflective properties of the foils catch the light beautifully, making them perfect for sunny spring days when you want your nails to shine.
For those looking to capture the essence of spring even further, consider integrating floral or nature-inspired foils into your designs. These options add a touch of glamour and sophistication to your look, making your nails not just a fashion statement but also a celebration of the season’s beauty.
Once you’ve perfected your technique, you can experiment with layering different foils or combining them with other DIY nail accessories, such as nail jewels and stickers, to create a truly unique manicure. The versatility of nail foils allows you to adapt your designs easily, whether you’re going for something understated or a bold, eye-catching statement.
For those interested in trying these out, here are some product recommendations that will help you create stunning spring nail designs:
• Nail foil kit with adhesive – This kit provides everything you need to start your nail foil journey.
• Floral nail foil sheets – Perfect for capturing the vibrant and fresh feel of spring.
• Metallic nail foil transfer sheets – These sheets will add a modern twist to your designs with their stunning reflective surfaces.
Whether you’re a nail art novice or a seasoned pro, incorporating nail foils into your spring nail routine can enhance your DIY nail accessories collection and elevate your overall look. So gather your supplies and get ready to create some fabulous manicures that celebrate the beauty of spring!
9. Cute Animal Nail Art
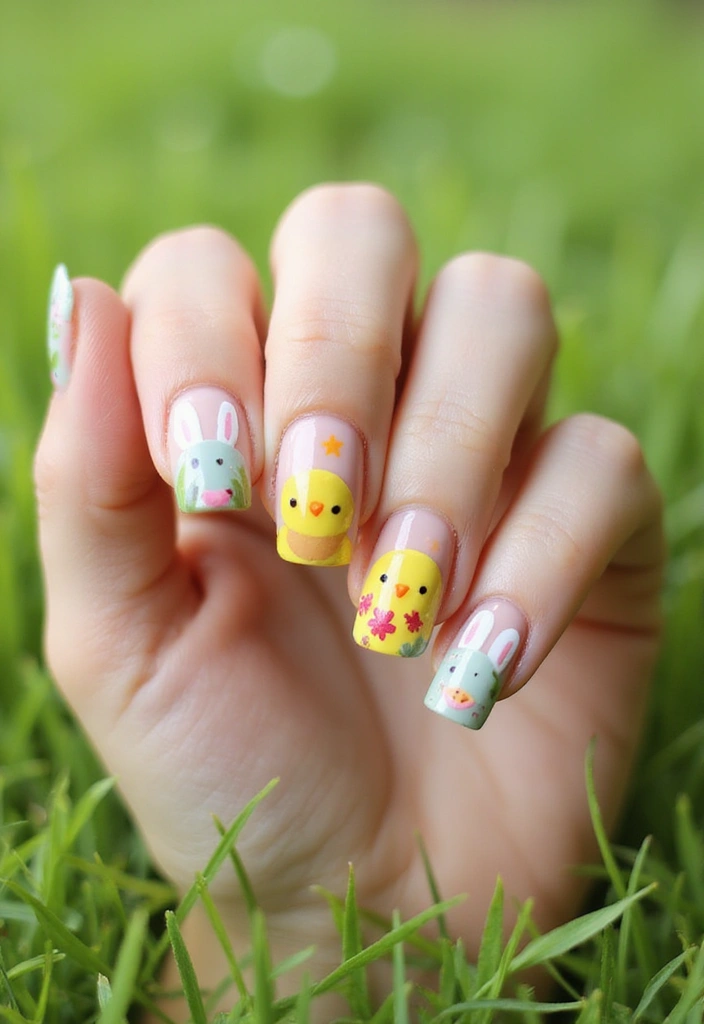
Celebrate the whimsical side of spring with cute animal nail art that captures the essence of the season. From adorable bunnies hopping across your tips to playful chicks peeking out from pastel backgrounds, these designs can add a cheerful touch to your nails, making them a delightful accessory for any spring outing.
Using nail art brushes or dotting tools, you can unleash your creativity and craft intricate animal designs that showcase your artistic flair. If you’re short on time or prefer a simpler approach, stickers and decals offer an easy way to achieve a polished look without the fuss.
Consider experimenting with different colors and patterns to make each nail unique. Pastel shades like soft pinks, baby blues, and mint greens not only reflect the freshness of spring but also enhance the playful vibe of your animal designs. Mixing and matching these colors with your animal motifs can lead to a charming and whimsical nail art experience.
Cute animal nail art isn’t just a personal expression; it’s also a great conversation starter. Whether you’re enjoying a picnic in the park or attending a spring gathering, your nails can be a delightful focal point that brings smiles and compliments wherever you go.
To help you get started on your cute animal nail art journey, here are some handy product recommendations:
• Nail art brushes set – Perfect for creating fine details and intricate designs.
• Dotting tools kit – Ideal for adding those cute little dots or patterns that can elevate your design.
• Animal nail stickers – Quick and easy options for a fun, whimsical look without the need for extensive painting.
Let your nails reflect the joy of spring with these charming designs, and enjoy the compliments that follow!
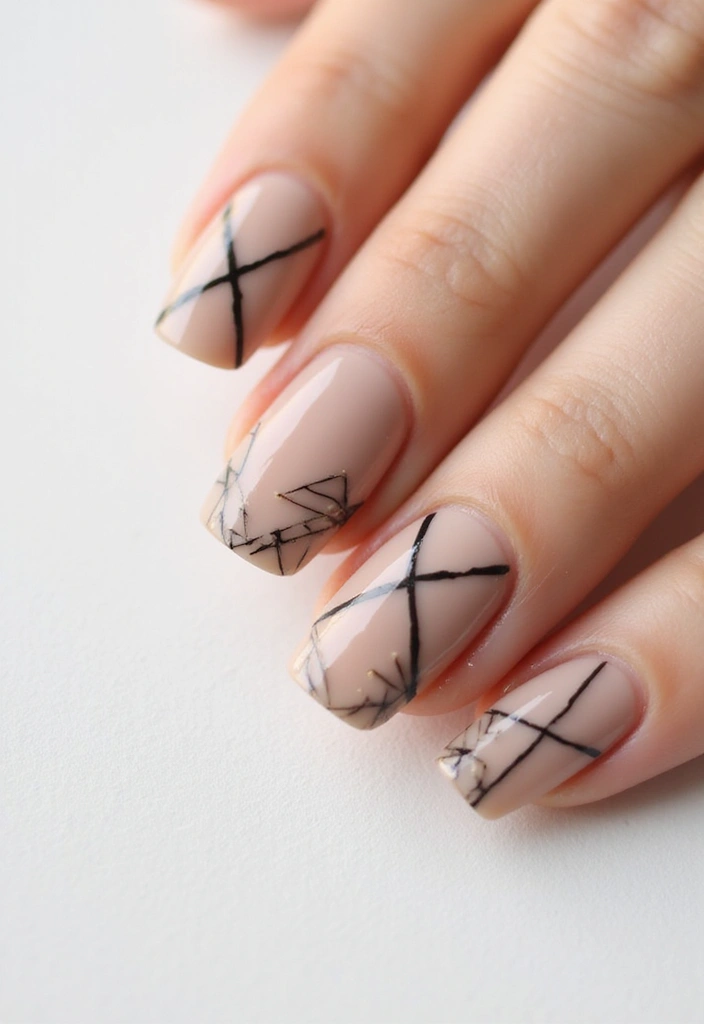
10. Minimalist Line Art
Minimalist Line Art
If you prefer a more understated look, minimalist line art is the perfect nail accessory for you. This style embraces simplicity, using clean lines and geometric shapes that create elegant and modern designs. The result is an effortlessly chic manicure that speaks volumes without being overly flashy.
To achieve this look, start with a neutral polish base that provides a subtle canvas for your art. Shades like soft beige, pale pink, or classic white work beautifully, allowing the line art to take center stage. Using a fine nail art brush, you can carefully draw clean lines or geometric shapes on each nail. For a touch of sophistication, consider incorporating metallic colors like gold or silver. These metallic polishes not only elevate the overall look but also add a hint of glamour that can make your nails shine in any light.
Minimalist line art is incredibly versatile, making it suitable for a variety of occasions—from casual outings to formal events. Whether you’re heading to brunch with friends or attending an evening gala, this nail design can seamlessly complement your outfit. Its simplicity allows you to express your artistic side while maintaining a polished and refined appearance.
This trend is especially perfect for spring, as it embodies the essence of renewal and fresh beginnings. As the season brings about vibrant colors and blooming flowers, minimalist line art offers a refreshing contrast that remains stylish and sophisticated. You can play with different patterns, from simple lines to more intricate geometric designs, making it easy to customize your look to suit your personality.
If you’re ready to give this chic trend a try, consider the following product recommendations to help you get started:
• nail art brush set – A quality brush set is essential for creating those precise lines and shapes that define minimalist art.
• neutral nail polish – Choose a versatile base color that enhances the beauty of your nail art without overpowering it.
• gold nail art polish – Adding a metallic polish can bring an elegant touch to your designs, making them pop and adding a hint of luxury.
With these tools at your disposal, you’ll be able to create stunning minimalist line art that’s sure to turn heads this spring. So gather your supplies, unleash your creativity, and enjoy the process of crafting your own chic DIY nail accessories!
11. Colorful Nail Wraps
Colorful nail wraps are an absolute game changer for those looking to refresh their manicure with minimal effort. These adhesive wraps come in a dazzling array of spring-inspired designs, from delicate florals that evoke the essence of blooming flowers to bold, abstract patterns that can add a pop of personality to any outfit.
The beauty of nail wraps lies in their simplicity. You don’t need to be a nail art expert or spend hours at a salon to achieve stunning results. The process is incredibly straightforward: start by ensuring your nails are clean and dry. Then, carefully peel off a wrap from the set, align it with your nail, and press it down firmly. Once it’s in place, simply file away any excess material for a crisp and polished look.
These wraps not only save time but also offer an impressive level of versatility. Whether you’re dressing up for a brunch date or preparing for a casual day out, you can easily switch your nail designs to match your mood or outfit. This adaptability makes colorful nail wraps an essential part of your spring nail accessories collection.
With a myriad of options available, you can change your nail designs as often as you like, making it easy to keep your look fresh and fun. Plus, nail wraps can be a fantastic canvas for adding extra flair. Consider pairing them with some nail jewels or stickers for an even more personalized touch.
If you’re ready to give your nails a quick makeover this spring, here are a few product recommendations that you might find helpful:
• Colorful Nail Wraps Set
• Floral Nail Stickers
• Nail File and Buffer Set
With colorful nail wraps in your beauty arsenal, you’re all set to embrace the joyous spirit of spring while keeping your nails looking chic and fabulous!
12. Sparkling Rhinestones
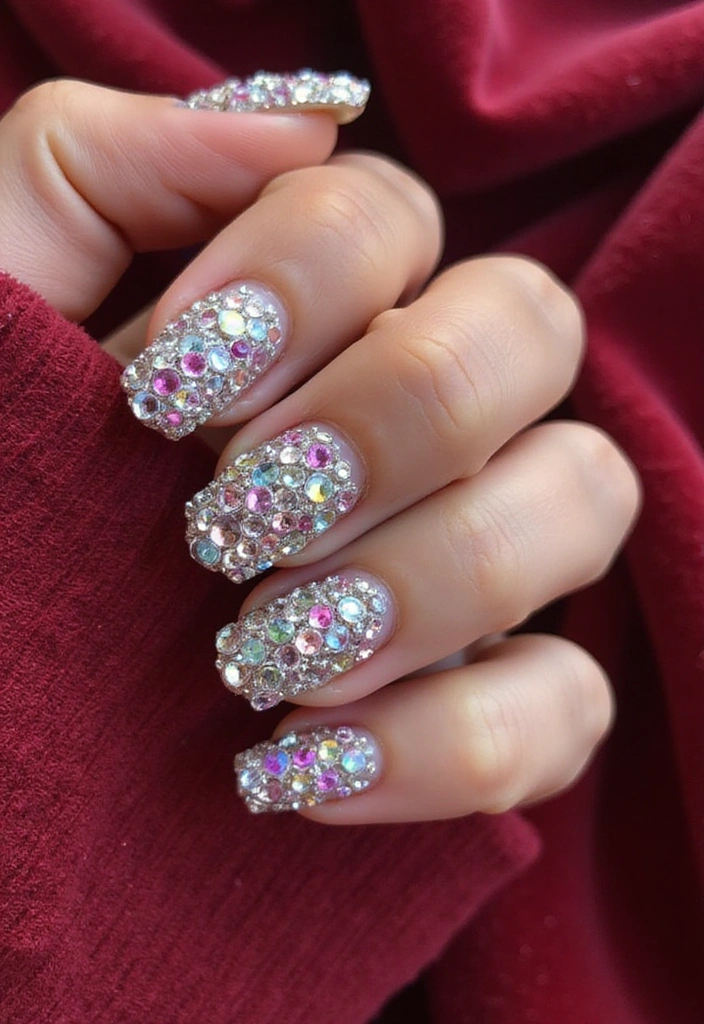
Rhinestones are a classic nail accessory that can add a touch of sparkle to your spring nails. These dazzling gems come in a myriad of sizes and colors, allowing you to create stunning designs that catch the light beautifully.
When it comes to applying rhinestones, the process is both simple and rewarding. Start by painting your nails with your chosen polish and let it dry completely. Once your base color is set, use a small dot of nail glue to secure each rhinestone onto your nails. You can get creative with your arrangement—try lining them up in a row, forming shapes, or even creating a gradient effect with different shades of rhinestones. The shine and brilliance of these gems can elevate any manicure, making them perfect for special occasions or simply to make everyday nails feel more glamorous.
For a chic spring look, consider pairing these sparkling accents with soft pastel polishes like lavender, mint green, or baby pink. The subtle hues will allow the rhinestones to pop, creating an elegant contrast. If you’re feeling bold, opt for contrasting colors that make a statement. Think bright oranges or electric blues alongside clear or iridescent rhinestones for a striking effect that is sure to turn heads.
Rhinestones are not only versatile but also easy to find. You can purchase a variety of options, from basic kits to more elaborate designs that include different shapes and sizes. For a complete look, consider incorporating nail jewels and stickers alongside your rhinestones. They can complement each other beautifully and add even more dimension to your nail art.
To help you get started on your rhinestone journey, here are a few product recommendations:
• Rhinestone Nail Art Kit – A comprehensive set that includes an array of rhinestones in different colors and sizes, perfect for crafting unique designs.
• Nail Glue for Gems and Jewels – Essential for securely attaching your rhinestones and ensuring they stay put.
• Assorted Nail Stickers and Decals – A fun addition to mix and match with your rhinestones, enhancing your overall nail look.
With these tips and products, you’ll be well on your way to creating stunning spring nails that sparkle and shine, making your DIY nail accessories the talk of the town!
13. Tie-Dye Nail Art

Tie-dye is a vibrant and fun trend that brings a splash of color and creativity to your nails, making it a perfect choice for spring. This playful technique involves swirling different shades together, resulting in a unique and colorful design that truly embodies the lively spirit of the season.
To create your own tie-dye nails, start with a clean base coat to protect your natural nails. Once the base is dry, gather a small brush or sponge, which will be your tools for applying the colors. Choose a palette that speaks to you—think bright pastels or bold neons, depending on your mood. Using the brush or sponge, dab on various colors, allowing them to blend seamlessly for that dreamy, swirled effect. The beauty of tie-dye is in its randomness; no two nails have to be the same, which makes each one a one-of-a-kind masterpiece. It’s a fantastic way to express your individuality and creativity.
This cheerful and colorful style not only enhances your look but also embraces the essence of spring, reminding us of blooming flowers and sunny days. Whether you’re heading to a picnic, a brunch with friends, or simply enjoying the season, tie-dye nails are sure to turn heads and spark conversations.
To elevate your tie-dye nail art further, consider adding some nail jewels or stickers. These embellishments can bring an extra touch of flair and sophistication, allowing you to customize your look even more. Whether you opt for sparkly gems or playful stickers, they can complement your tie-dye design beautifully.
For those looking to get started on their tie-dye nail journey, here are some product recommendations to help you achieve the perfect look:
• nail art brush set – A must-have for precision application and blending.
• tie-dye nail polish kit – Everything you need to create vibrant, eye-catching designs in one convenient package.
• nail jewel stickers – These will add an extra layer of glam to your tie-dye creation, making your nails truly stand out.
With these tools and a little creativity, you can easily transform your nails into a canvas of colorful art that celebrates the arrival of spring. Happy crafting!
14. Seasonal Charms and Studs
Seasonal charms and studs can add a delightful twist to your spring nails. These tiny embellishments come in various shapes, such as flowers, butterflies, and even festive Easter-themed designs, making them the perfect addition to your nail art.
Imagine adorning your fingertips with charming little flowers that capture the essence of spring blooms or whimsical butterflies that flutter with every gesture. These embellishments are more than just decorative; they provide a unique opportunity to express your creativity and embrace the cheerful spirit of the season.
Applying these charms is a breeze. All you need is a simple dot of nail glue. Once your nails are freshly painted, secure the charms onto your nails for a playful and festive look that will undoubtedly catch the eye. Whether you choose to mix and match different charms for a dynamic effect or stick with chic studs for a more polished appearance, the choice is yours. This versatility allows you to reflect your personal style while adding texture and dimension to your manicure.
For the ultimate spring vibe, consider pairing these charms with pastel or bright nail colors. Soft pinks, sunny yellows, and vibrant greens create a cheerful backdrop for your nail jewels, transforming your nails into a stunning canvas that celebrates the beauty of the season. Imagine the joy of looking down at your hands and seeing a burst of color, accentuated by charming little designs that evoke feelings of warmth and renewal.
Incorporating seasonal charms and studs into your nail art not only enhances your manicure but also gives you the chance to enjoy a bit of whimsy. These DIY nail accessories can instantly elevate your look, making them perfect for spring events, casual outings, or even just brightening up your everyday routine.
Whether you’re preparing for a garden party, a brunch with friends, or simply want to infuse your day with a touch of creativity, these embellishments will surely turn heads and spark conversations. They invite compliments and inspire others to embrace their own creative flair.
To get started on your spring nail artistry, you’ll want to have the right products on hand. Here are some fantastic recommendations to help you create the perfect spring-themed manicure that showcases your unique style and creativity:
• Nail Art Charms Set
• 3D Butterfly & Flower Nail Stickers
• Rhinestone Nail Gems Set
Gather your supplies, unleash your imagination, and get ready to adorn your nails with seasonal charm! With such a wide variety of DIY nail accessories available, the possibilities are endless. So why not take a moment to celebrate spring by transforming your nails into a beautiful expression of the season?
15. Nail Art Pens
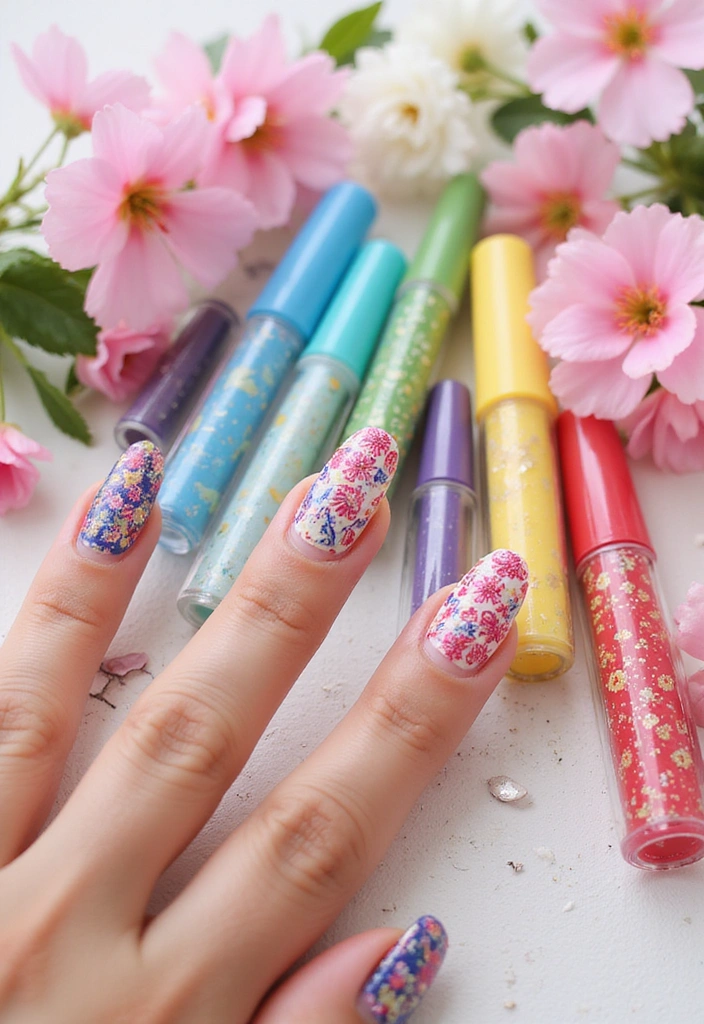
Nail art pens are a must-have for anyone who enjoys the art of nail design, especially during the vibrant season of spring. These handy tools empower you to express your creativity with precision, allowing you to draw fine lines and intricate patterns directly onto your nails. Whether you’re a beginner just starting out or a seasoned nail artist, nail art pens can elevate your DIY nail accessories game to a whole new level.
With a rainbow of colors at your disposal, the possibilities for design are virtually endless. Imagine creating delicate floral patterns inspired by blooming gardens or bold abstract designs that capture the essence of spring. The versatility of these pens means you can mix and match colors, experiment with different styles, and even layer your designs for a more dynamic effect.
Before you start your artistic journey, it’s essential to prepare your canvas. Begin with a solid base color of your choice—this not only sets the stage for your artwork but also ensures that your designs pop. Allow your base coat to dry thoroughly; this step is crucial as it prevents smudging and helps your nail art stand out.
Nail art pens are designed for ease of use, featuring fine tips that make it simple to create detailed designs without any fuss. If you’re feeling adventurous, try combining your nail art pens with other DIY nail accessories, such as nail jewels and stickers, to add an extra layer of flair to your creations. These accessories can enhance your designs, making them even more eye-catching and unique.
Whether you’re prepping for a spring celebration or just want to brighten up your everyday look, nail art pens are an excellent way to unleash your artistic side. They provide a fun and engaging way to personalize your nails, transforming them into a true reflection of the beauty of spring. So grab your nail art pens and let your imagination run wild!
Product Recommendations:
• Nail Art Pens Set
• Acrylic Nail Art Brushes
• Nail Art Stickers for Spring Designs
16. Spring-Themed Nail Decals
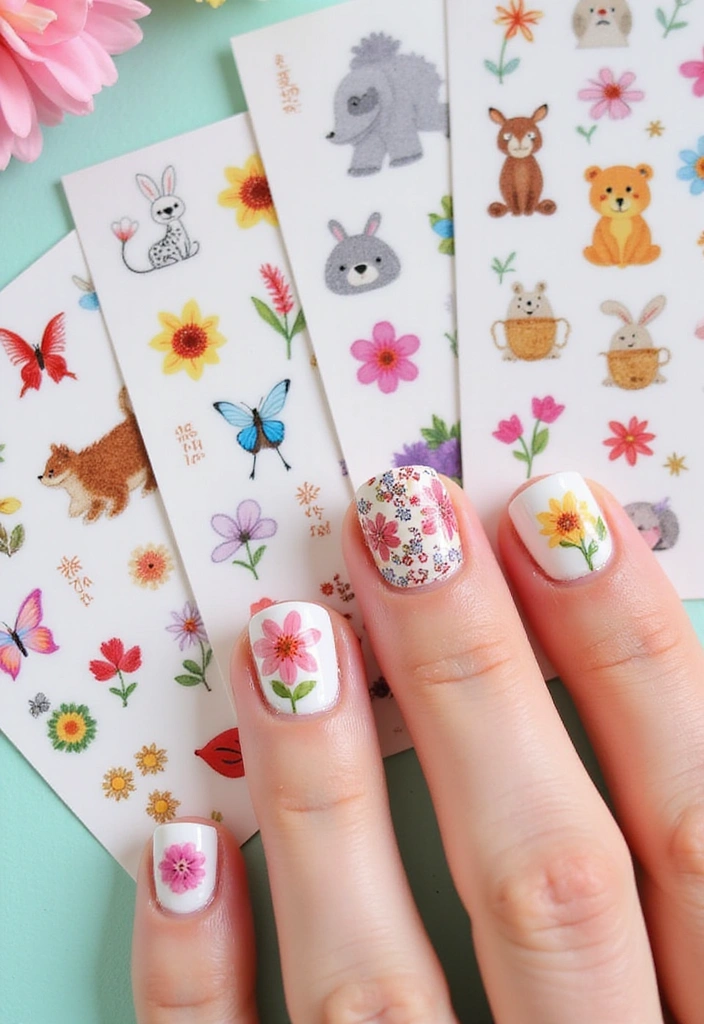
Spring-themed nail decals are a delightful and easy way to infuse a seasonal vibe into your manicure. As the flowers bloom and the days grow warmer, what better way to celebrate than with a fresh set of nails adorned with cheerful designs? These decals come in an array of styles, ranging from intricate floral patterns to whimsical animal motifs, allowing you to express your personality and embrace the spirit of spring.
Applying nail decals is a straightforward process, making them ideal for anyone looking to elevate their nail game without needing advanced nail art skills. Begin by selecting your favorite decal from the set; whether it’s a dainty flower or an adorable bunny, the choices are plentiful. Simply peel off the decal, position it on your nail, and press gently to adhere it. For longevity and a polished finish, seal your design with a top coat. This not only protects your decals but also adds a beautiful shine to your nails.
One of the joys of using spring-themed nail decals is the ability to mix and match different designs. Combine floral stickers with cute animal jewels for a playful look or choose a few standout decals to accentuate your favorite nail polish color. The versatility of these DIY nail accessories means you can create a unique manicure that reflects your personal style while celebrating the beauty of spring.
These nail decals are more than just an accessory; they’re a fun way to bring a bit of whimsy and cheer to your daily routine. Whether you’re preparing for a special event or simply want to brighten up your day-to-day look, spring-themed nail decals provide an effortless solution.
To help you get started on your spring nail journey, check out these product recommendations:
• Spring-themed nail decal set – A comprehensive collection featuring various designs to suit every mood.
• Floral nail stickers – Perfect for those who adore the classic beauty of flowers.
• Cute animal nail jewels – Add a touch of playfulness to your manicure with these charming designs.
Embrace the season with these delightful nail accessories that are sure to make your manicure pop, all while keeping your routine fun and simple!
Conclusion
Spring is the perfect season to embrace creativity and self-expression through your nails, and these 16 DIY nail accessories offer endless possibilities for chic designs.
Whether you prefer the playful charm of stickers or the elegance of floral jewels, there’s something for everyone in this guide. Get inspired, gather your supplies, and let your nails bloom this spring!
16 DIY Nail Accessories for Spring Nails That Are Totally Chic!
As the blossoms bloom and the world awakens from its winter slumber, it’s time to refresh your nail game with stunning DIY nail accessories that scream spring chic.
From vibrant nail jewels to delightful stickers, this listicle is packed with creative ideas to elevate your manicure to a whole new level.
Whether you’re a nail art novice or a seasoned pro, these accessories will add a touch of whimsy and elegance to your springtime nails, making them a perfect canvas for self-expression. Get ready to unleash your creativity and step into the season with style!
1. Floral Nail Jewels
Bring the beauty of spring flowers to your fingertips with delightful floral nail jewels. These intricate designs can add an elegant touch to any manicure, shimmering under the sunlight like dew on petals.
Imagine the soft breeze of spring, the gentle rustle of blooming flowers, and the vibrant colors that awaken the senses. Now, picture this beauty captured on your nails. Floral nail jewels offer a way to express the essence of the season with just a touch of creativity.
Choose from a variety of flower shapes and colors to match your outfit or mood. Whether you opt for bold daisies that demand attention or subtle cherry blossoms that whisper elegance, the options are endless. Each jewel is a tiny piece of artistry, ready to transform your manicure into a garden of colors and textures.
Applying these jewels is a breeze! Simply use a dot of nail glue to secure them onto your nail design. For those looking to elevate their nail art further, consider incorporating a few leaves or vines. This extra detail can create a stunning garden-inspired look that truly celebrates the essence of spring.
Floral nail jewels not only enhance your nails’ aesthetic but also tell a beautiful story of renewal and growth. They embody the spirit of spring, making them the perfect accessory during this vibrant season. Pair them with a soft pastel polish for a harmonious look that evokes tranquility, or go bold with a contrasting base color for a striking statement that showcases your personality.
When putting together your spring nail design, think about the mood you want to convey. The soft pinks and whites of cherry blossoms can bring a touch of romance, while bright yellows and reds of sunflowers can radiate joy and energy. This versatility allows you to curate a unique style that reflects who you are.
To help you get started on your floral nail journey, here are some product recommendations that can elevate your nail art:
• Floral Nail Art Stickers – Easy to apply and available in a variety of designs, these stickers can instantly beautify your nails.
• 3D Flower Nail Charms – For a more dimensional look, these charms add depth and interest to your manicure.
• Nail Art Glue for Jewels – A must-have for ensuring your jewels stay securely in place, this glue will help your nail art last longer.
With floral nail jewels, you can transform your nails into a canvas of springtime beauty, making each manicure a celebration of the season. So gather your DIY nail accessories and let your creativity bloom!
2. Botanical Nail Stickers
Infuse your nails with nature’s charm using botanical nail stickers. These delightful stickers come in a plethora of designs featuring intricate leaves, delicate ferns, and vibrant blossoms, all of which can easily complement your spring wardrobe. The designs are thoughtfully created to bring a touch of the outdoors right to your fingertips, making them perfect for the season.
Applying these stickers is a breeze—simply peel, place, and seal with a top coat for a long-lasting finish that won’t chip easily. The beauty of botanical stickers lies in their incredible versatility; you can create a full botanical garden on your nails for a bold statement or use them sparingly as accents for a more subtle look. This flexibility allows you to express your personality and style in countless ways.
To achieve a cohesive and polished appearance, consider pairing these botanical stickers with colors inspired by nature. Soft greens can evoke the feeling of fresh new leaves, while earthy browns bring to mind rich soil. Vibrant floral shades can add a pop of color that mirrors blooming gardens. The combination of these colors with your chosen stickers results in a chic and refreshing manicure that celebrates the beauty of spring.
For those who love to personalize their nail art, you can mix and match different sticker designs to create unique patterns that reflect your style. Add in some nail jewels for an extra touch of glamour, and your DIY nail accessories will be the talk of the town.
If you’re ready to elevate your spring nails, here are a few product recommendations to get you started:
• Botanical nail sticker set – A variety of designs to suit your mood.
• Nail art top coat – Ensures your stickers stay put and shine brightly.
• Spring-themed nail polish set – A beautiful selection of colors to complement your botanical designs.
With these tools in hand, you’re set to create stunning spring-inspired nails that showcase your creativity and love for nature.
3. Gemstone Accents
Add a dash of glamour to your spring nails with beautiful gemstone accents. These dazzling gems can transform even the simplest manicures into stunning statements, perfect for any occasion.
Gemstone accents are more than just a passing trend; they make a bold declaration! Their vibrant hues and glimmering finishes embody the spirit of spring. Picture your nails sparkling in the sunlight, each gem catching the light and showcasing your unique style. Whether you lean towards a subtle hint of shimmer or a full-on eye-catching display, nail jewels can be customized to fit any mood or event.
Select from an array of shapes and colors—imagine soft pink quartz, sparkling clear crystals, and calming pastel amethysts—to craft a design that genuinely represents your personality. Pastel amethysts evoke tranquility, while clear crystals lend a timeless elegance. Soft pink quartz adds a romantic touch, perfect for brunch dates or garden gatherings.
For those who favor a minimalist aesthetic, consider placing a single gem on each nail. This refined approach allows the gemstones to stand out without overwhelming your manicure. Each gem serves as a focal point, giving your nails a sophisticated flair while remaining effortlessly chic.
If you’re feeling adventurous, go for elaborate designs featuring clusters of gemstones. Envision a delicate floral motif with sparkling gems at the heart of each blossom—your nails will become true works of art!
Applying these gems is straightforward and satisfying. Use nail glue for secure placement, ensuring that each gem remains steadfast throughout your day. A clear top coat is crucial to complete the look; it adds a glossy finish and safeguards your design against chips and scratches, keeping your manicure looking fresh and fabulous.
The beauty of gemstone accents lies in their adaptability. Combine different colors and shapes to create a distinctive design that mirrors your personal style. Whether you choose a soft pastel palette or a bold color contrast, gemstone nail jewels can seamlessly fit any theme or event.
With the right tools and a sprinkle of creativity, incorporating these stunning accents into your spring nail routine is easy. Whether you’re preparing for a special occasion or just want to elevate your everyday look, these DIY nail accessories will leave you feeling glamorous.
Pair your gemstone accents with complementary nail colors—soft mint greens or lavender shades can enhance the overall effect. Nail stickers featuring matching designs can create a cohesive look that ties everything together. The combination of nail jewels and stickers produces a multidimensional effect that truly stands out!
Feeling daring? Play with different textures. Using matte nail polish beneath glossy gemstone accents adds depth and intrigue to your design. This contrast makes your gems pop even more, resulting in a striking visual that’s sure to catch attention.
Before you start applying your gemstones, remember to care for your nails. A bit of prep can make all the difference! Begin with a nourishing base coat to protect your natural nails and provide a smooth canvas for your manicure.
To help you kick off your gemstone nail adventure, here are some product suggestions for your DIY nail accessories journey:
• Gemstone Nail Art Kit
• Nail Glue for Gemstones
• Clear Top Coat Nail Polish
Celebrate the charm of spring with gemstone accents that reflect your style and personality. Let your nails shine brightly!
4. Watercolor Nail Art
Watercolor nails are a stunning way to showcase your creativity while embracing the soft, whimsical colors of spring. This trendy nail accessory technique captures the essence of a watercolor painting, transforming your fingertips into a canvas of blended hues that are both striking and delicate.
To start your watercolor nail art journey, gather a selection of pastel nail polishes—think soft pinks, baby blues, gentle lavenders, and sunny yellows. These colors will evoke the lightness of springtime and can be mixed and matched to create a unique look that reflects your personal style.
Using a makeup sponge blender, apply a base coat to your nails to create a smooth foundation. Once that’s dry, take your sponge and dab it into the first nail polish color. Gently press the sponge onto your nail, using a dabbing motion to build up the color. This technique helps to create a soft, diffused effect that mimics the natural blending seen in watercolor art.
For a more dynamic appearance, layer different colors on top of one another, allowing each layer to dry slightly before adding the next. This gradual build-up creates a beautiful gradient reminiscent of a spring sunrise, with colors transitioning smoothly from one to another. You can also experiment with varying the intensity of each shade by adjusting the amount of polish on your sponge.
Once you’re satisfied with the watercolor effect, allow your nails to dry completely. To enhance the vibrancy and protect your artwork, seal your design with a fast-drying top coat. This not only gives your nails a glossy finish but also helps the colors pop, ensuring that your artistic expression shines through.
Watercolor nails offer endless possibilities for customization. Consider adding nail jewels or stickers to enhance your design further, bringing an extra touch of flair that complements the dreamy color palette. With this technique, you can express your artistic side and embrace the vibrant colors of spring, making your nails a true reflection of the season’s beauty.
For those ready to try their hand at this captivating technique, here are a few product recommendations to get you started:
• Watercolor Nail Art Kit – A perfect starter kit for all your watercolor nail needs.
• Makeup Sponge Blender – Ideal for achieving that seamless blend essential for the watercolor effect.
• Fast-Drying Top Coat – To lock in your masterpiece and add that beautiful glossy finish.
Embrace the fluid beauty of watercolor art this spring, and let your nails reflect the joy and vibrancy of the season!
5. Pastel Ombre
Pastel ombre nails are a beautiful way to embrace the spirit of spring, perfectly capturing the soft hues of blooming flowers and the gentle touch of sunny skies. This method offers a seamless transition between colors, creating a dreamy effect that is both eye-catching and sophisticated.
To begin your pastel ombre journey, select a base coat in your lightest pastel shade. Think delicate colors like baby blue, soft pink, or a gentle mint green. Apply this as your foundation layer, ensuring an even and smooth finish.
Next, it’s time to bring in the magic of blending. Using a makeup sponge, choose two or three additional pastel colors that harmonize beautifully with your base coat. For instance, a soft pink can transition elegantly into a lavender, or you might opt for a peach blending into a light yellow.
To achieve the ombre effect, dab the chosen colors onto the sponge, then gently press and roll it onto your nails, starting from the tips and working your way down. This technique allows the colors to meld together gradually, creating a soft gradient that is visually stunning. Don’t hesitate to go back and layer more color if you want a bolder look!
Once you’re happy with the blend, seal in your masterpiece with a clear top coat. This not only enhances the overall appearance, giving it a glossy finish, but also helps protect your artwork, ensuring it lasts longer through all your springtime activities.
With pastel ombre nails, you can feel lovely and chic for any occasion—whether you’re attending a spring brunch with friends or enjoying a leisurely day in the park.
For those looking to elevate their DIY nail accessories collection, consider trying these products:
• Pastel nail polish set – a perfect assortment of soft hues to create your ombre look.
• Makeup sponge for nail art – an essential tool for achieving that flawless gradient effect.
Embrace the joy of spring with these delightful pastel ombre nails, and let your creativity shine through your DIY nail accessories!
6. Glitter Accents
Nothing says fun like a touch of glitter, and spring is the perfect time to experiment with sparkling nail designs that elevate your style. Glitter accents can transform your nails from simple to spectacular with just a few strategic placements, making them the perfect addition to your DIY nail accessories collection.
One of the easiest ways to incorporate glitter into your nail art is by adding it to the tips of your nails. This modern twist on the classic French manicure brings a playful and vibrant energy to your look. You can choose to use a single color for a sleek finish or mix multiple shades for a more eclectic vibe. Consider using iridescent glitter that changes color depending on the light, or pastel shades that scream spring.
For those who love patterns, glitter is your friend. Think outside the box and create fun designs like polka dots, stripes, or even floral motifs using glitter. Mixing different sizes of glitter can add depth and texture to your designs, making them truly eye-catching. The key is to let your creativity shine—don’t hesitate to layer different glitters to achieve a unique look.
When it comes to applying glitter, the process is straightforward. Start with a clear base coat to provide a solid foundation for your art. While the polish is still wet, sprinkle or apply the glitter directly onto your nails. This will help the glitter adhere better and create a more vibrant effect. Once you’re satisfied with your glitter placement, finish off with a top coat. This step is crucial, as it locks in the sparkle and ensures your manicure lasts longer—perfect for spring parties or casual outings.
If you’re looking to elevate your nail game even further, consider incorporating nail jewels and stickers into your designs. These little embellishments can add an extra layer of glamour and sophistication to your glittery nails. Whether you prefer delicate gems or bold stickers, they can serve as the cherry on top of your fabulous DIY nail accessories.
Product Recommendations:
• Glitter nail polish set – A must-have for any glitter enthusiast, this set includes a variety of colors to suit your spring style.
• Nail art brushes for detailing – Perfect for intricate designs, these brushes will help you create stunning patterns with precision.
• Nail jewels and stickers kit – Enhance your nails with this kit, featuring a range of jewels and stickers that can complement your glitter accents beautifully.
With these tips and products, you’re all set to create dazzling spring nails that are totally chic!
7. Whimsical Nail Charms
Add a playful touch to your spring nails with whimsical nail charms. These tiny, fun designs can range from cute animals to seasonal motifs like bunnies and butterflies, transforming your nails into a delightful canvas for creativity.
Imagine a little bunny hopping on your pinky or a bright butterfly fluttering on your index finger. The options are endless, and the charm designs can enhance your spring vibe, making your nails a true conversation starter. Whether you’re heading to a picnic or a garden party, these charming accents will make your manicure pop.
This playful approach allows you to showcase your unique style and stay on-trend with seasonal themes. You could create a whimsical garden scene on your nails, complete with flowers, bees, and ladybugs, or simply pick your favorite characters that bring you joy.
Don’t hesitate to get creative with your designs! The beauty of DIY nail accessories is that you can express your personality in a fun and artistic way.
For those ready to elevate their spring nail game, here are some product recommendations to get you started:
• Nail Art Charms Kit – A fabulous assortment of whimsical designs to mix and match.
• Colorful Nail Jewels – These vibrant jewels will add sparkle and shine to your manicure.
• Butterfly Nail Stickers – Perfect for those who want to flutter into spring with elegance.
With whimsical nail stickers, your spring nails will not only look fun but also reflect your joyful spirit. So gather your supplies, unleash your creativity, and let your nails bloom this season!
8. Seasonal Nail Foils
Nail foils are an exciting accessory to elevate your spring nail designs. These thin sheets of metallic or holographic material can add a stunning effect to your manicure, transforming ordinary nails into a work of art.
To get started with nail foils, select a base color that complements your style—pastels and soft hues are particularly lovely for spring. Once your base coat is completely dry, reach for a special adhesive designed specifically for foil application. Apply a thin layer of this adhesive to the area where you want the foil to adhere, and allow it to become slightly tacky for the best results.
Next, take your nail foil and gently press it onto the adhesive surface. You can use your fingers or a silicone tool to ensure that the foil adheres well, creating beautiful patterns. There’s no limit to your creativity here! You can opt for abstract designs, or for a more cohesive look, cover the entire nail. The reflective properties of the foils catch the light beautifully, making them perfect for sunny spring days when you want your nails to shine.
For those looking to capture the essence of spring even further, consider integrating floral or nature-inspired foils into your designs. These options add a touch of glamour and sophistication to your look, making your nails not just a fashion statement but also a celebration of the season’s beauty.
Once you’ve perfected your technique, you can experiment with layering different foils or combining them with other DIY nail accessories, such as nail jewels and stickers, to create a truly unique manicure. The versatility of nail foils allows you to adapt your designs easily, whether you’re going for something understated or a bold, eye-catching statement.
For those interested in trying these out, here are some product recommendations that will help you create stunning spring nail designs:
• Nail foil kit with adhesive – This kit provides everything you need to start your nail foil journey.
• Floral nail foil sheets – Perfect for capturing the vibrant and fresh feel of spring.
• Metallic nail foil transfer sheets – These sheets will add a modern twist to your designs with their stunning reflective surfaces.
Whether you’re a nail art novice or a seasoned pro, incorporating nail foils into your spring nail routine can enhance your DIY nail accessories collection and elevate your overall look. So gather your supplies and get ready to create some fabulous manicures that celebrate the beauty of spring!
9. Cute Animal Nail Art
Celebrate the whimsical side of spring with cute animal nail art that captures the essence of the season. From adorable bunnies hopping across your tips to playful chicks peeking out from pastel backgrounds, these designs can add a cheerful touch to your nails, making them a delightful accessory for any spring outing.
Using nail art brushes or dotting tools, you can unleash your creativity and craft intricate animal designs that showcase your artistic flair. If you’re short on time or prefer a simpler approach, stickers and decals offer an easy way to achieve a polished look without the fuss.
Consider experimenting with different colors and patterns to make each nail unique. Pastel shades like soft pinks, baby blues, and mint greens not only reflect the freshness of spring but also enhance the playful vibe of your animal designs. Mixing and matching these colors with your animal motifs can lead to a charming and whimsical nail art experience.
Cute animal nail art isn’t just a personal expression; it’s also a great conversation starter. Whether you’re enjoying a picnic in the park or attending a spring gathering, your nails can be a delightful focal point that brings smiles and compliments wherever you go.
To help you get started on your cute animal nail art journey, here are some handy product recommendations:
• Nail art brushes set – Perfect for creating fine details and intricate designs.
• Dotting tools kit – Ideal for adding those cute little dots or patterns that can elevate your design.
• Animal nail stickers – Quick and easy options for a fun, whimsical look without the need for extensive painting.
Let your nails reflect the joy of spring with these charming designs, and enjoy the compliments that follow!
10. Minimalist Line Art
Minimalist Line Art
If you prefer a more understated look, minimalist line art is the perfect nail accessory for you. This style embraces simplicity, using clean lines and geometric shapes that create elegant and modern designs. The result is an effortlessly chic manicure that speaks volumes without being overly flashy.
To achieve this look, start with a neutral polish base that provides a subtle canvas for your art. Shades like soft beige, pale pink, or classic white work beautifully, allowing the line art to take center stage. Using a fine nail art brush, you can carefully draw clean lines or geometric shapes on each nail. For a touch of sophistication, consider incorporating metallic colors like gold or silver. These metallic polishes not only elevate the overall look but also add a hint of glamour that can make your nails shine in any light.
Minimalist line art is incredibly versatile, making it suitable for a variety of occasions—from casual outings to formal events. Whether you’re heading to brunch with friends or attending an evening gala, this nail design can seamlessly complement your outfit. Its simplicity allows you to express your artistic side while maintaining a polished and refined appearance.
This trend is especially perfect for spring, as it embodies the essence of renewal and fresh beginnings. As the season brings about vibrant colors and blooming flowers, minimalist line art offers a refreshing contrast that remains stylish and sophisticated. You can play with different patterns, from simple lines to more intricate geometric designs, making it easy to customize your look to suit your personality.
If you’re ready to give this chic trend a try, consider the following product recommendations to help you get started:
• nail art brush set – A quality brush set is essential for creating those precise lines and shapes that define minimalist art.
• neutral nail polish – Choose a versatile base color that enhances the beauty of your nail art without overpowering it.
• gold nail art polish – Adding a metallic polish can bring an elegant touch to your designs, making them pop and adding a hint of luxury.
With these tools at your disposal, you’ll be able to create stunning minimalist line art that’s sure to turn heads this spring. So gather your supplies, unleash your creativity, and enjoy the process of crafting your own chic DIY nail accessories!
11. Colorful Nail Wraps
Colorful nail wraps are an absolute game changer for those looking to refresh their manicure with minimal effort. These adhesive wraps come in a dazzling array of spring-inspired designs, from delicate florals that evoke the essence of blooming flowers to bold, abstract patterns that can add a pop of personality to any outfit.
The beauty of nail wraps lies in their simplicity. You don’t need to be a nail art expert or spend hours at a salon to achieve stunning results. The process is incredibly straightforward: start by ensuring your nails are clean and dry. Then, carefully peel off a wrap from the set, align it with your nail, and press it down firmly. Once it’s in place, simply file away any excess material for a crisp and polished look.
These wraps not only save time but also offer an impressive level of versatility. Whether you’re dressing up for a brunch date or preparing for a casual day out, you can easily switch your nail designs to match your mood or outfit. This adaptability makes colorful nail wraps an essential part of your spring nail accessories collection.
With a myriad of options available, you can change your nail designs as often as you like, making it easy to keep your look fresh and fun. Plus, nail wraps can be a fantastic canvas for adding extra flair. Consider pairing them with some nail jewels or stickers for an even more personalized touch.
If you’re ready to give your nails a quick makeover this spring, here are a few product recommendations that you might find helpful:
• Colorful Nail Wraps Set
• Floral Nail Stickers
• Nail File and Buffer Set
With colorful nail wraps in your beauty arsenal, you’re all set to embrace the joyous spirit of spring while keeping your nails looking chic and fabulous!
12. Sparkling Rhinestones
Rhinestones are a classic nail accessory that can add a touch of sparkle to your spring nails. These dazzling gems come in a myriad of sizes and colors, allowing you to create stunning designs that catch the light beautifully.
When it comes to applying rhinestones, the process is both simple and rewarding. Start by painting your nails with your chosen polish and let it dry completely. Once your base color is set, use a small dot of nail glue to secure each rhinestone onto your nails. You can get creative with your arrangement—try lining them up in a row, forming shapes, or even creating a gradient effect with different shades of rhinestones. The shine and brilliance of these gems can elevate any manicure, making them perfect for special occasions or simply to make everyday nails feel more glamorous.
For a chic spring look, consider pairing these sparkling accents with soft pastel polishes like lavender, mint green, or baby pink. The subtle hues will allow the rhinestones to pop, creating an elegant contrast. If you’re feeling bold, opt for contrasting colors that make a statement. Think bright oranges or electric blues alongside clear or iridescent rhinestones for a striking effect that is sure to turn heads.
Rhinestones are not only versatile but also easy to find. You can purchase a variety of options, from basic kits to more elaborate designs that include different shapes and sizes. For a complete look, consider incorporating nail jewels and stickers alongside your rhinestones. They can complement each other beautifully and add even more dimension to your nail art.
To help you get started on your rhinestone journey, here are a few product recommendations:
• Rhinestone Nail Art Kit – A comprehensive set that includes an array of rhinestones in different colors and sizes, perfect for crafting unique designs.
• Nail Glue for Gems and Jewels – Essential for securely attaching your rhinestones and ensuring they stay put.
• Assorted Nail Stickers and Decals – A fun addition to mix and match with your rhinestones, enhancing your overall nail look.
With these tips and products, you’ll be well on your way to creating stunning spring nails that sparkle and shine, making your DIY nail accessories the talk of the town!
13. Tie-Dye Nail Art
Tie-dye is a vibrant and fun trend that brings a splash of color and creativity to your nails, making it a perfect choice for spring. This playful technique involves swirling different shades together, resulting in a unique and colorful design that truly embodies the lively spirit of the season.
To create your own tie-dye nails, start with a clean base coat to protect your natural nails. Once the base is dry, gather a small brush or sponge, which will be your tools for applying the colors. Choose a palette that speaks to you—think bright pastels or bold neons, depending on your mood. Using the brush or sponge, dab on various colors, allowing them to blend seamlessly for that dreamy, swirled effect. The beauty of tie-dye is in its randomness; no two nails have to be the same, which makes each one a one-of-a-kind masterpiece. It’s a fantastic way to express your individuality and creativity.
This cheerful and colorful style not only enhances your look but also embraces the essence of spring, reminding us of blooming flowers and sunny days. Whether you’re heading to a picnic, a brunch with friends, or simply enjoying the season, tie-dye nails are sure to turn heads and spark conversations.
To elevate your tie-dye nail art further, consider adding some nail jewels or stickers. These embellishments can bring an extra touch of flair and sophistication, allowing you to customize your look even more. Whether you opt for sparkly gems or playful stickers, they can complement your tie-dye design beautifully.
For those looking to get started on their tie-dye nail journey, here are some product recommendations to help you achieve the perfect look:
• nail art brush set – A must-have for precision application and blending.
• tie-dye nail polish kit – Everything you need to create vibrant, eye-catching designs in one convenient package.
• nail jewel stickers – These will add an extra layer of glam to your tie-dye creation, making your nails truly stand out.
With these tools and a little creativity, you can easily transform your nails into a canvas of colorful art that celebrates the arrival of spring. Happy crafting!
14. Seasonal Charms and Studs
Seasonal charms and studs can add a delightful twist to your spring nails. These tiny embellishments come in various shapes, such as flowers, butterflies, and even festive Easter-themed designs, making them the perfect addition to your nail art.
Imagine adorning your fingertips with charming little flowers that capture the essence of spring blooms or whimsical butterflies that flutter with every gesture. These embellishments are more than just decorative; they provide a unique opportunity to express your creativity and embrace the cheerful spirit of the season.
Applying these charms is a breeze. All you need is a simple dot of nail glue. Once your nails are freshly painted, secure the charms onto your nails for a playful and festive look that will undoubtedly catch the eye. Whether you choose to mix and match different charms for a dynamic effect or stick with chic studs for a more polished appearance, the choice is yours. This versatility allows you to reflect your personal style while adding texture and dimension to your manicure.
For the ultimate spring vibe, consider pairing these charms with pastel or bright nail colors. Soft pinks, sunny yellows, and vibrant greens create a cheerful backdrop for your nail jewels, transforming your nails into a stunning canvas that celebrates the beauty of the season. Imagine the joy of looking down at your hands and seeing a burst of color, accentuated by charming little designs that evoke feelings of warmth and renewal.
Incorporating seasonal charms and studs into your nail art not only enhances your manicure but also gives you the chance to enjoy a bit of whimsy. These DIY nail accessories can instantly elevate your look, making them perfect for spring events, casual outings, or even just brightening up your everyday routine.
Whether you’re preparing for a garden party, a brunch with friends, or simply want to infuse your day with a touch of creativity, these embellishments will surely turn heads and spark conversations. They invite compliments and inspire others to embrace their own creative flair.
To get started on your spring nail artistry, you’ll want to have the right products on hand. Here are some fantastic recommendations to help you create the perfect spring-themed manicure that showcases your unique style and creativity:
• Nail Art Charms Set
• 3D Butterfly & Flower Nail Stickers
• Rhinestone Nail Gems Set
Gather your supplies, unleash your imagination, and get ready to adorn your nails with seasonal charm! With such a wide variety of DIY nail accessories available, the possibilities are endless. So why not take a moment to celebrate spring by transforming your nails into a beautiful expression of the season?
15. Nail Art Pens
Nail art pens are a must-have for anyone who enjoys the art of nail design, especially during the vibrant season of spring. These handy tools empower you to express your creativity with precision, allowing you to draw fine lines and intricate patterns directly onto your nails. Whether you’re a beginner just starting out or a seasoned nail artist, nail art pens can elevate your DIY nail accessories game to a whole new level.
With a rainbow of colors at your disposal, the possibilities for design are virtually endless. Imagine creating delicate floral patterns inspired by blooming gardens or bold abstract designs that capture the essence of spring. The versatility of these pens means you can mix and match colors, experiment with different styles, and even layer your designs for a more dynamic effect.
Before you start your artistic journey, it’s essential to prepare your canvas. Begin with a solid base color of your choice—this not only sets the stage for your artwork but also ensures that your designs pop. Allow your base coat to dry thoroughly; this step is crucial as it prevents smudging and helps your nail art stand out.
Nail art pens are designed for ease of use, featuring fine tips that make it simple to create detailed designs without any fuss. If you’re feeling adventurous, try combining your nail art pens with other DIY nail accessories, such as nail jewels and stickers, to add an extra layer of flair to your creations. These accessories can enhance your designs, making them even more eye-catching and unique.
Whether you’re prepping for a spring celebration or just want to brighten up your everyday look, nail art pens are an excellent way to unleash your artistic side. They provide a fun and engaging way to personalize your nails, transforming them into a true reflection of the beauty of spring. So grab your nail art pens and let your imagination run wild!
Product Recommendations:
• Nail Art Pens Set
• Acrylic Nail Art Brushes
• Nail Art Stickers for Spring Designs
16. Spring-Themed Nail Decals
Spring-themed nail decals are a delightful and easy way to infuse a seasonal vibe into your manicure. As the flowers bloom and the days grow warmer, what better way to celebrate than with a fresh set of nails adorned with cheerful designs? These decals come in an array of styles, ranging from intricate floral patterns to whimsical animal motifs, allowing you to express your personality and embrace the spirit of spring.
Applying nail decals is a straightforward process, making them ideal for anyone looking to elevate their nail game without needing advanced nail art skills. Begin by selecting your favorite decal from the set; whether it’s a dainty flower or an adorable bunny, the choices are plentiful. Simply peel off the decal, position it on your nail, and press gently to adhere it. For longevity and a polished finish, seal your design with a top coat. This not only protects your decals but also adds a beautiful shine to your nails.
One of the joys of using spring-themed nail decals is the ability to mix and match different designs. Combine floral stickers with cute animal jewels for a playful look or choose a few standout decals to accentuate your favorite nail polish color. The versatility of these DIY nail accessories means you can create a unique manicure that reflects your personal style while celebrating the beauty of spring.
These nail decals are more than just an accessory; they’re a fun way to bring a bit of whimsy and cheer to your daily routine. Whether you’re preparing for a special event or simply want to brighten up your day-to-day look, spring-themed nail decals provide an effortless solution.
To help you get started on your spring nail journey, check out these product recommendations:
• Spring-themed nail decal set – A comprehensive collection featuring various designs to suit every mood.
• Floral nail stickers – Perfect for those who adore the classic beauty of flowers.
• Cute animal nail jewels – Add a touch of playfulness to your manicure with these charming designs.
Embrace the season with these delightful nail accessories that are sure to make your manicure pop, all while keeping your routine fun and simple!
Conclusion
Spring is the perfect season to embrace creativity and self-expression through your nails, and these 16 DIY nail accessories offer endless possibilities for chic designs.
Whether you prefer the playful charm of stickers or the elegance of floral jewels, there’s something for everyone in this guide. Get inspired, gather your supplies, and let your nails bloom this spring!
Note: We aim to provide accurate product links, but some may occasionally expire or become unavailable. If this happens, please search directly on Amazon for the product or a suitable alternative.
This post contains Amazon affiliate links, meaning I may earn a small commission if you purchase through my links, at no extra cost to you.