Usher in Spring with and these Easy Spring Nail Art Tutorials!
Spring is the ultimate playground for nail art lovers ready to bring their creativity to life with bold colors!
As the flowers begin to bloom and the temperatures rise, it’s the ideal moment to experiment with fresh, vibrant designs that truly embody the spirit of spring.
Whether you’re just starting your nail art journey or looking to polish your skills, we’ve got you covered with 14 fabulous, step-by-step nail art tutorials that will turn your nails into eye-catching masterpieces.
Get set to elevate your manicure game with these delightful spring nail art ideas that are both simple and oh-so-chic!
1. Floral Accent Nails
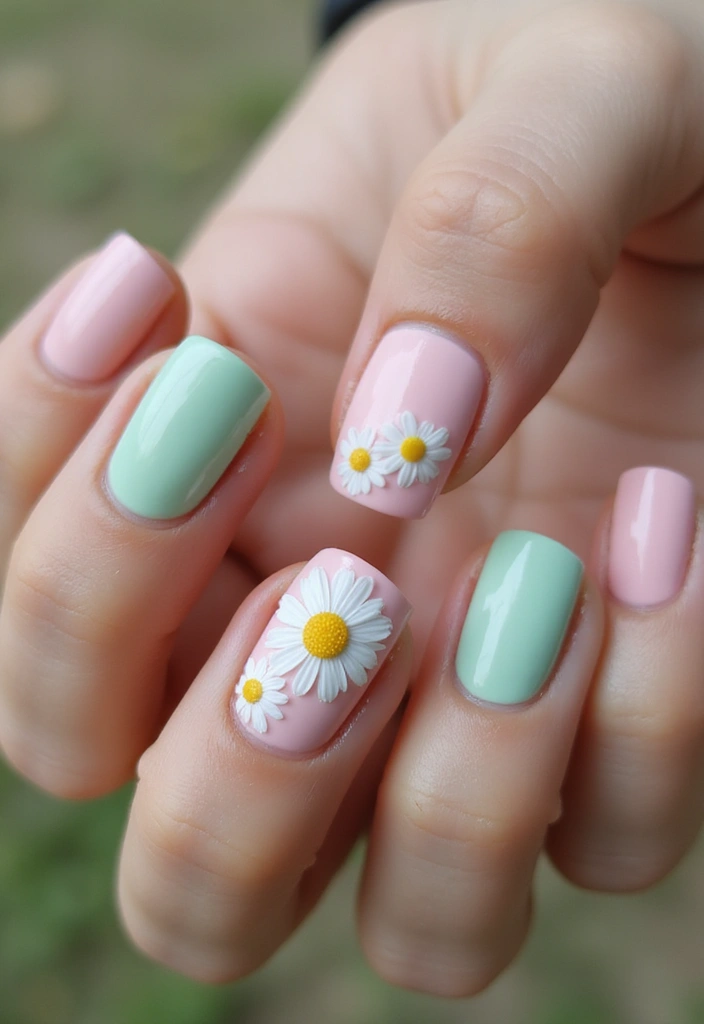
Spring is the perfect season to embrace vibrant colors and beautiful designs, and what better way to celebrate than with floral accent nails? This delightful spring nail art design featuring daisies or tulips adds a fresh, cheerful touch to your manicure, making it ideal for any spring outing, from picnics in the park to brunch with friends.
To start your floral nail art journey, choose a soft pink or mint green base coat. These pastel shades evoke the essence of spring and provide the perfect backdrop for your floral creations. Apply a thin layer of your chosen base color and allow it to dry completely. This step is crucial because a well-dried base coat ensures that your designs will adhere properly and last longer.
Once your base coat is ready, grab a thin nail art brush. This tool is essential for creating those intricate floral designs that will transform your nails into a blooming garden. Dip the brush into white polish and carefully paint small flowers on one or two accent nails. You can create daisies with simple petal shapes or add tulip designs for a lovely spring flair.
For added vibrancy, use yellow polish to add centers to your flowers, and don’t forget about the leaves! A touch of green will bring your design to life, adding a fresh pop of color that complements the pastel base. Remember, the beauty of this design lies in its versatility. Feel free to mix and match colors, or even use different floral patterns on each accent nail.
This spring nail art design is not only easy to execute but also allows for personalization. Whether you prefer a more minimalistic approach or a fully adorned look, you can adjust the number of flowers and their placement to fit your style.
To finish off your masterpiece, seal your design with a top coat for shine and protection. This final step not only enhances the overall look but also helps your spring nail art withstand everyday wear.
With your floral accent nails complete, you’ll have a cheerful reminder of spring at your fingertips, ready to brighten up any outfit or occasion.
Product Recommendations:
• nail art brush set – Perfect for creating those delicate floral details.
• pastel nail polish set – A must-have collection of spring colors to inspire your creativity.
• top coat for shine – Essential for sealing your design and adding that glossy finish.
Get ready to flaunt your beautiful floral accent nails and embrace the joy of spring with this easy and fun nail art tutorial!
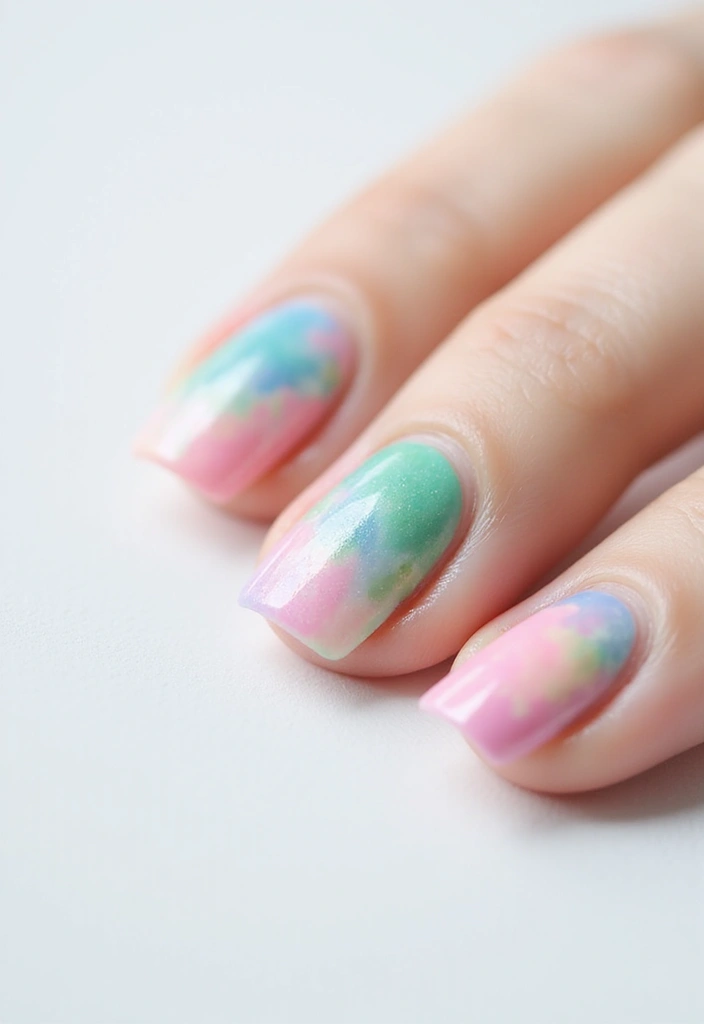
2. Rainbow Ombre Nails

Bring the joy of a spring rainbow to your fingertips with vibrant ombre nails! This delightful nail art design is perfect for welcoming the season, and it’s surprisingly simple to achieve, making it an ideal choice for both beginners and seasoned nail enthusiasts
To start, apply a white base coat. This step is crucial as it not only enhances the vibrancy of the colors but also provides a clean canvas for your artwork. A white background allows each hue to pop, ensuring your nails truly reflect the cheerful spirit of spring.
Next, gather your favorite spring colors. Think of soft pastels and bright, cheerful shades that remind you of blooming flowers and clear skies. Light blue, soft pink, and sunny yellow are wonderful choices that blend beautifully together.
Using a makeup sponge, begin dabbing on the colors. Start with the lightest shade at the base of your nail and gradually layer on the darker colors, working your way towards the tip. The key to achieving that stunning gradient effect lies in blending the colors seamlessly. You can dab the sponge gently back and forth where the colors meet, ensuring they flow into one another without harsh lines.
Take your time during this process, as patience will yield the best results. If you feel any color is too bold, simply add a bit more of the lighter shade to balance it out. Remember, the beauty of ombre nails is in the transition, so aim for a soft, blended look.
Once you’re satisfied with your gradient, it’s time to seal in your masterpiece. A glossy top coat is essential not only for a shiny, salon-quality finish but also to protect your design from chips and wear. Apply it carefully over your nails, ensuring you cover every bit of color for a smooth, professional look.
These ombre nails are a fun way to celebrate the season and showcase your playful side! With just a few simple steps, you can create a stunning spring nail art design that’s sure to turn heads.
For those looking to gather the right tools for this project, here are some product recommendations:
• Nail art sponge applicators – Perfect for creating that smooth gradient effect.
• Colorful nail polish set – A selection of spring colors to bring your ombre nails to life.
• Quick-dry top coat – To ensure your design dries quickly and stays vibrant.
Embrace the beauty of spring with these easy and delightful rainbow ombre nails!
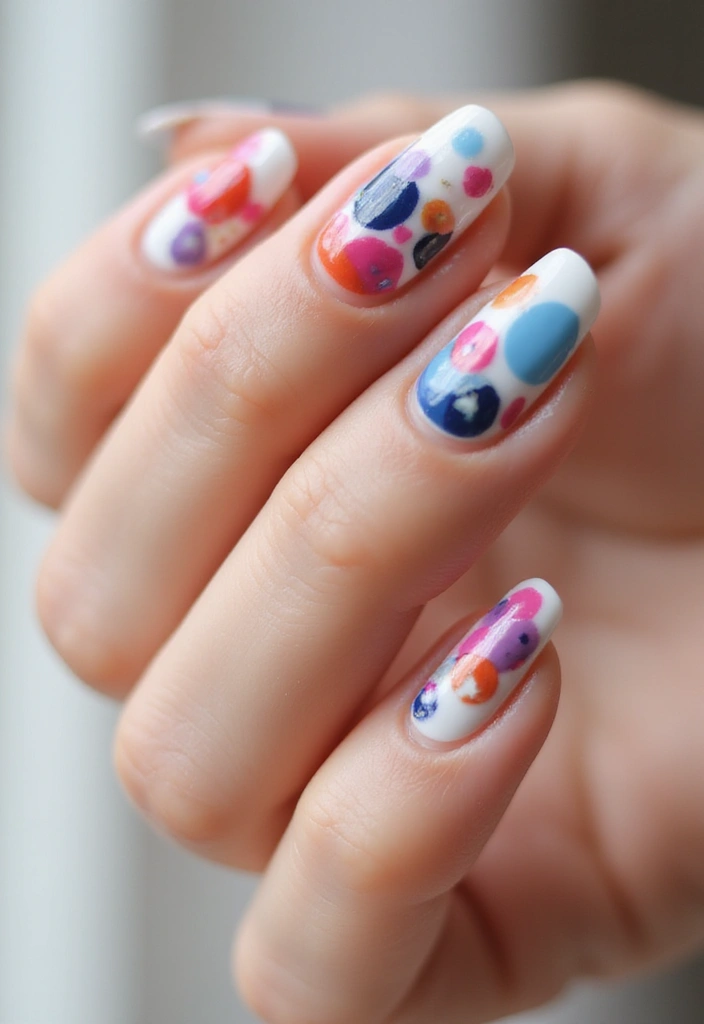
3. Polka Dot Delight
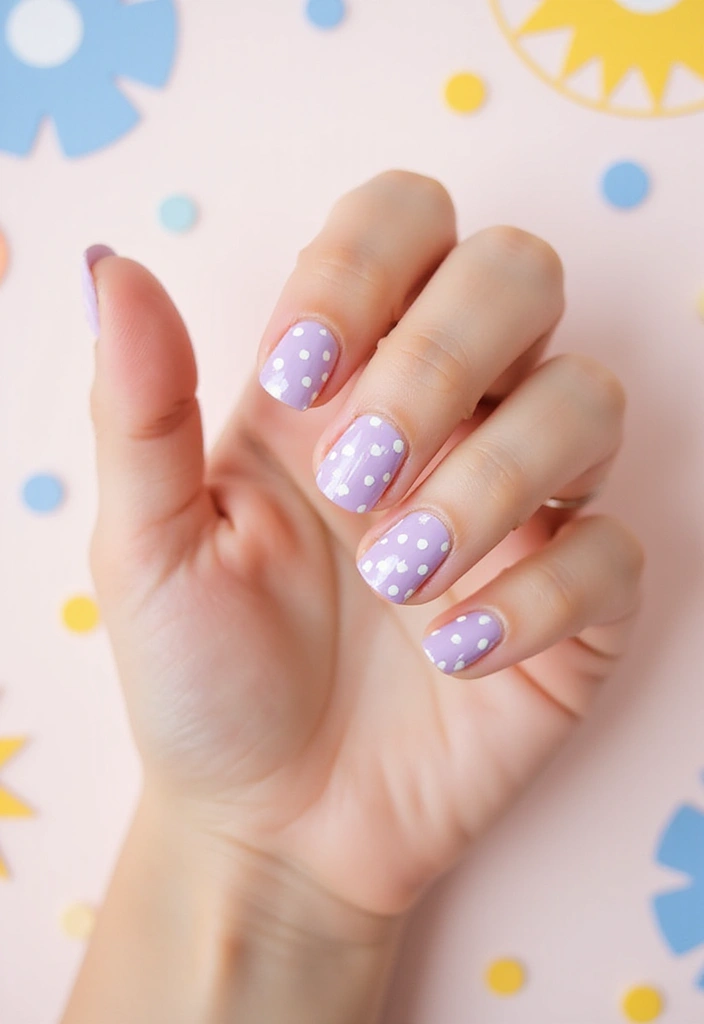
Polka dots are a classic nail art design that never goes out of style! This cheerful look not only brightens your nails but also your mood, making it a perfect choice for the spring season.
To begin creating this delightful design, select a pastel base color that speaks to you. Soft shades like baby blue, pale pink, or mint green can set a lovely foundation for your polka dots. Once you’ve applied your base coat, allow it to dry completely. This step is crucial as it prevents any smudging when you add the dots.
Next, grab your dotting tool. If you don’t have one, a simple bobby pin or toothpick can work in a pinch. Dip the tool into a contrasting color—think crisp white, sunny yellow, or soft lilac. Gently press the tool onto your nails to create evenly spaced dots. The beauty of this design lies in its versatility; feel free to mix and match sizes for a playful touch. Large dots can make a bold statement, while smaller ones can add a delicate accent.
As you apply the dots, take your time to ensure they are evenly spaced. This attention to detail will elevate your design from simple to stylish. The combination of soft pastels and cheerful dots will give your nails a whimsical feel that perfectly embodies the spirit of spring.
To finish off your masterpiece, seal the design with a glossy top coat. This not only enhances the colors but also adds durability to your fresh manicure, keeping it looking vibrant for days to come.
For those looking to replicate this look, here are a few product recommendations to help you achieve the perfect polka dot nails:
• dotting tools set – essential for creating those perfectly rounded dots.
• pastel nail polish collection – a delightful array of colors to choose from for your base and dots.
• top coat for glossy finish – to ensure your design stays fresh and shiny.
With just a few simple steps, you can create this playful polka dot delight that’s perfect for any spring occasion. Enjoy the process and let your creativity shine!
4. Butterfly Nail Art
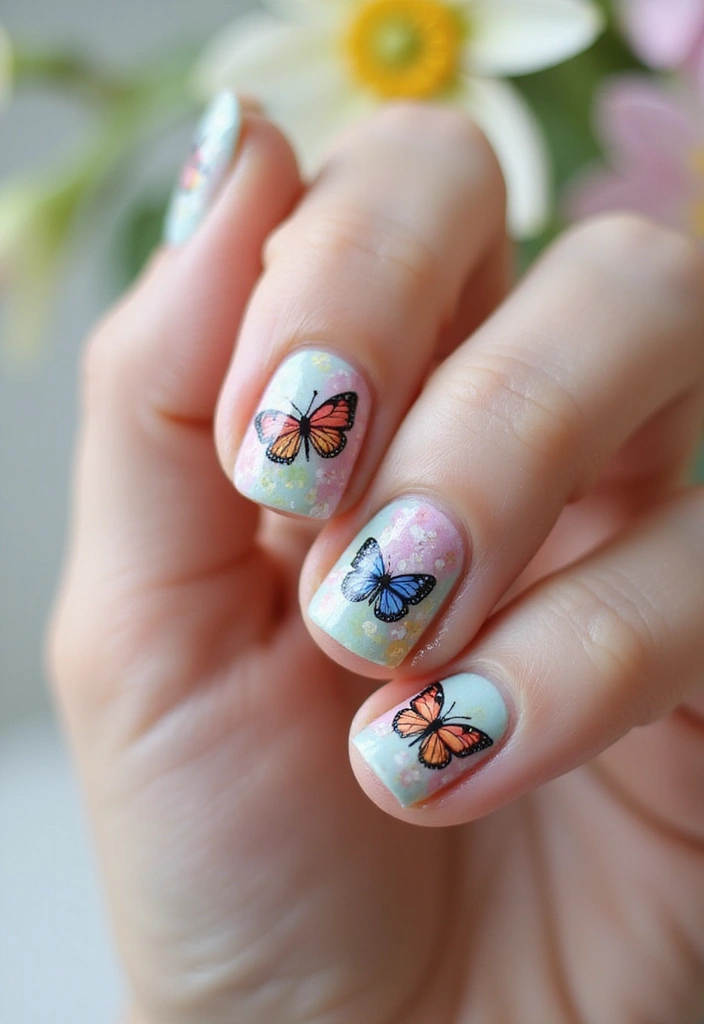
Capture the essence of spring with beautiful butterfly designs on your nails! This delightful nail art not only reflects the vibrancy of the season but also allows your artistic side to shine through. Whether you’re preparing for a spring gathering or simply want to brighten your day, butterfly nails are a fantastic way to celebrate the beauty of nature.
Begin with a light base coat to set the stage for your colorful masterpiece. A light shade like pastel pink, soft lavender, or even a gentle mint green serves as the perfect backdrop. Allow your base coat to dry completely to ensure a smooth application for your butterfly designs.
Next, using a thin brush, paint small butterfly silhouettes in vibrant colors such as orange, blue, and purple. These lively hues not only capture the spirit of spring but also add a cheerful pop to your nails. Don’t worry about making them perfect—each butterfly can be unique, just like the ones you see fluttering around in gardens.
To enhance the visual appeal, add details like delicate antennae and decorative patterns on the wings. Swirls, dots, or tiny floral motifs can elevate your butterfly designs, creating a more intricate and personalized look. These little touches make all the difference and allow you to express your creativity.
This design is perfect for those who love nature and want to celebrate the beauty of spring in a unique way. As you admire your vibrant butterfly nails, you’ll feel inspired by the blossoming flowers and fresh air that characterize this lovely season.
Your butterfly nails will surely flutter to the top of everyone’s favorites list, sparking conversations and compliments wherever you go. Whether you’re a seasoned nail art enthusiast or a beginner, this spring nail art design is an easy and fun project that you can enjoy at home.
For those looking to enhance their nail art experience, consider these product recommendations:
• Nail art brushes set – These brushes will give you the precision you need to create detailed designs effortlessly.
• Butterfly nail stickers – For a quicker option, these stickers are perfect for adding that butterfly charm without the need for intricate painting.
With these tips and tools, you’re well on your way to creating stunning spring nail art that reflects your love for the season. Enjoy the process and let your creativity take flight!
5. Geometric Spring Patterns
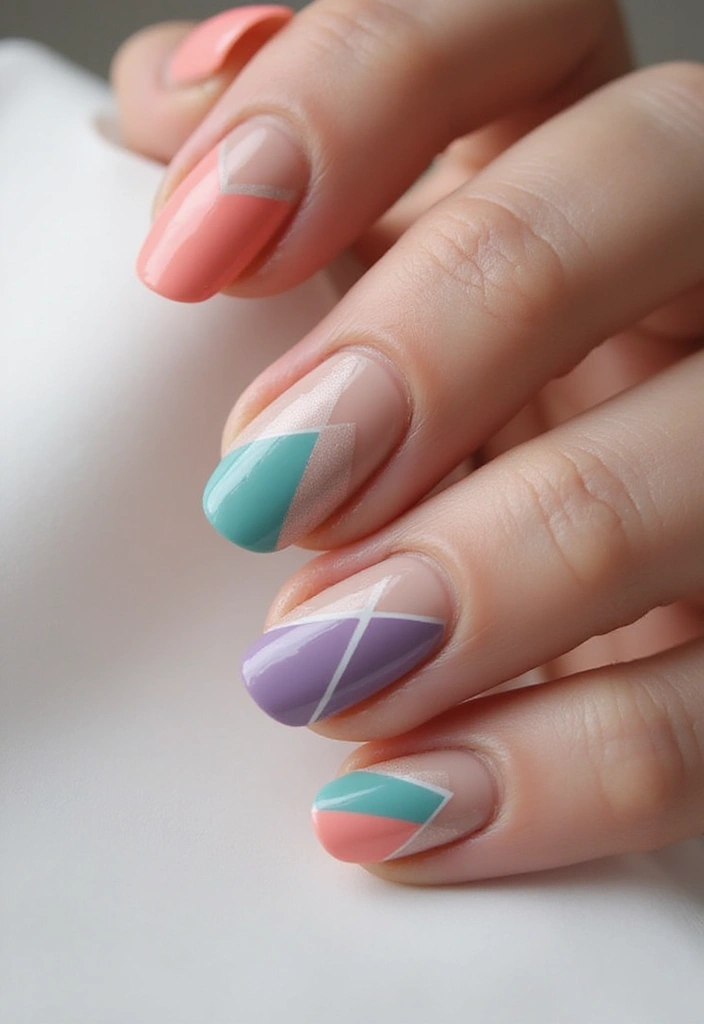
When it comes to spring nail art, incorporating geometric patterns can add a modern flair to your manicure. This design is not only trendy but also easy to execute, making it perfect for nail art enthusiasts of all skill levels, especially beginners looking for step-by-step guidance.
Start your nail art journey with a clean slate by applying a base coat of white or nude polish. This neutral foundation sets the perfect backdrop for the vibrant colors that will define your geometric patterns. A clean base also allows the bold spring hues to pop, ensuring your nails are fresh and eye-catching.
Next, grab some nail tape—this tool is essential for achieving sharp, precise lines. Use the tape to create triangles, stripes, or any geometric shapes you desire. The beauty of this technique lies in its versatility; you can experiment with different patterns to find what resonates with your style.
Once your tape is in place, it’s time to bring your design to life with bright spring colors. Think coral, teal, and lavender—these shades embody the essence of the season, evoking feelings of warmth and renewal. Carefully fill in each shape, allowing the colors to blend harmoniously without overwhelming the design.
After you’ve filled in your shapes and allowed them to dry, gently remove the tape to reveal your chic geometric patterns. You’ll be left with a striking manicure that’s both contemporary and playful, perfect for any spring occasion.
For added durability, consider sealing your design with a top coat. This step not only protects your artwork but also adds a glossy finish that enhances the vibrant colors.
This geometric spring nail art is a fantastic way to make a statement while still embracing the spirit of the season. It’s an easy design that invites creativity and can be tailored to suit any personal style, whether you prefer bold contrasts or softer blends.
To help you get started, here are a couple of product recommendations to ensure your nail art experience is seamless:
• Nail tape for precision designs
• Bright spring nail polish set
With these tools in hand, you’ll be well on your way to creating stunning geometric patterns that celebrate the beauty of spring
6. Spring Gradient Nails
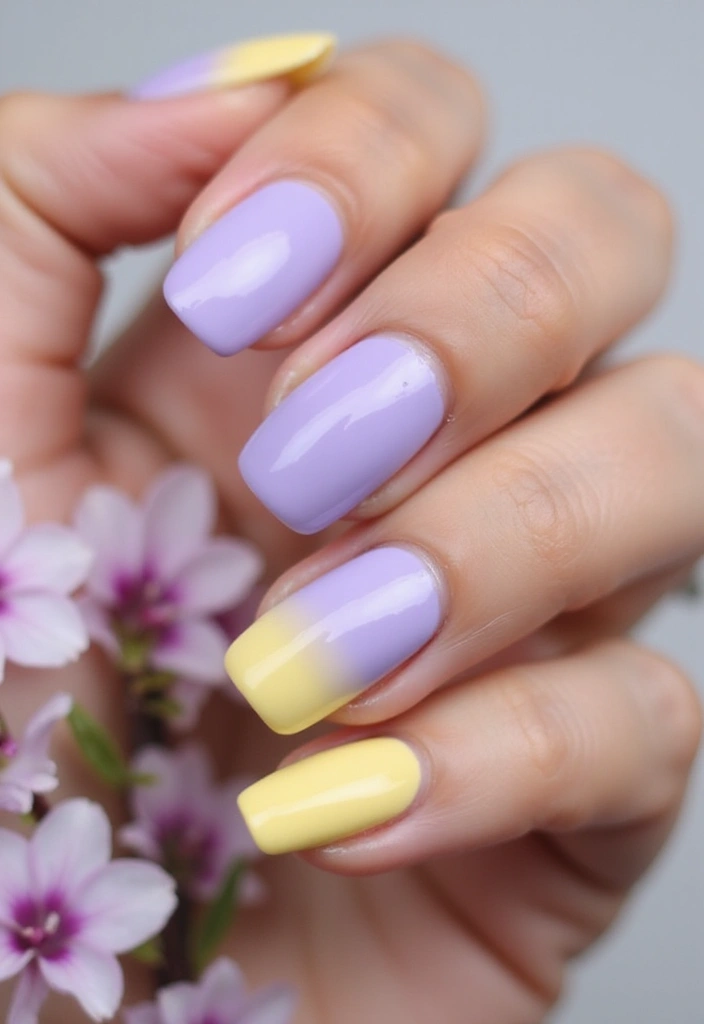
Spring is the perfect season to embrace vibrant colors and fresh designs, and what better way to do that than with stunning spring gradient nails? This nail art technique allows you to create a beautiful ombre effect that blends multiple shades seamlessly, giving your nails a soft and elegant look that’s ideal for any occasion.
To achieve this look, start with a light base coat to set the foundation for your stunning design. This will not only enhance the colors you choose but also help your nail art last longer. For the colors, select two or three complementary shades that reflect the spirit of spring. Think pastel pinks, soft blues, and gentle yellows. These colors not only evoke the freshness of spring but also blend together beautifully for a gradient effect.
Once you have your colors ready, grab a nail sponge applicator. Using a sponge is key to achieving that smooth transition from one color to another. Start by applying the lighter shade to the sponge, then layer on the darker shade. Lightly dab the sponge onto your nails, starting at the cuticle and moving towards the tip. Repeat this process until you achieve the desired gradient effect, being sure to blend the colors together for a seamless transition.
Don’t forget to let each layer dry before applying additional colors. This will help prevent any smudging and ensure that your gradient looks flawless. Once you’re satisfied with the blend, finish off your design with a quick-dry top coat. This not only adds a beautiful glossy finish but also protects your artwork, making it last longer through all your spring adventures.
The beauty of spring gradient nails lies in their versatility. Whether you’re heading to a casual brunch, a garden party, or a more formal event, this design complements any outfit and captures the essence of the season perfectly.
For easy execution, check out these recommended products:
• nail sponge applicators – These are perfect for creating that smooth gradient effect without the mess.
• pastel nail polish set – A collection of soft colors that are ideal for spring and perfect for blending.
• quick-dry top coat – This will seal in your design and give it that professional finish.
With just a few steps and the right tools, you can create a beautiful spring nail art look that will have everyone asking where you got your nails done. So gather your supplies, get creative, and enjoy showcasing your lovely gradient nails this season!
7. Rainbow Stripes
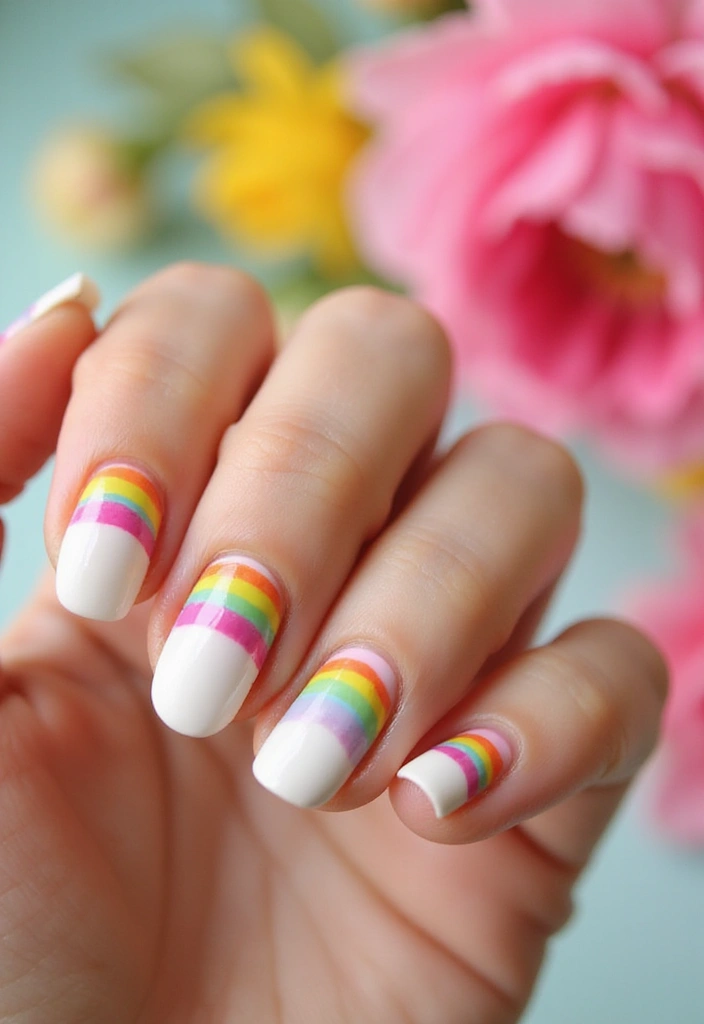
Bright and cheerful stripes can instantly uplift your mood, making them a perfect choice for spring! This season, why not bring a splash of color to your fingertips with a delightful rainbow stripe design? It’s an engaging way to celebrate the warmth and vibrancy that spring brings.
To get started, paint your nails with a clean, crisp white base coat. This will serve as the perfect canvas for the colorful stripes to pop. Once your base coat is dry, it’s time to get creative with striping tape. Use this tape to section off areas of your nails, giving you the freedom to fill each section with a different color.
When selecting your color palette, opt for vibrant spring colors that evoke the feeling of blooming flowers and sunny days. Think shades of pink, bright yellow, and fresh green. These lively colors not only reflect the spirit of the season but also work harmoniously together to create an eye-catching design.
Once you have filled in each section with your chosen colors, carefully remove the striping tape. This step reveals the crisp lines and vibrant colors you’ve created. To ensure your beautiful design lasts, don’t forget to seal everything with a high-quality top coat. This will not only protect your nail art but also give it a lovely glossy finish.
What’s fantastic about these striped nails is their versatility. You can easily customize the colors and widths of the stripes to match your personal style or even the outfit you’re wearing. Whether you prefer bold, wide stripes or delicate, thin ones, this design allows for endless possibilities.
Perfect for beginners, these spring nail art stripes can be achieved with just a few simple tools and some creativity. So gather your supplies and get ready to showcase your unique flair with this fun and easy design!
Product Recommendations:
• striping tape for nail art
• vibrant nail polish set
• top coat for nail polish
Get ready to flaunt your fabulous, striped spring nails!
8. Cute Critters Nail Art
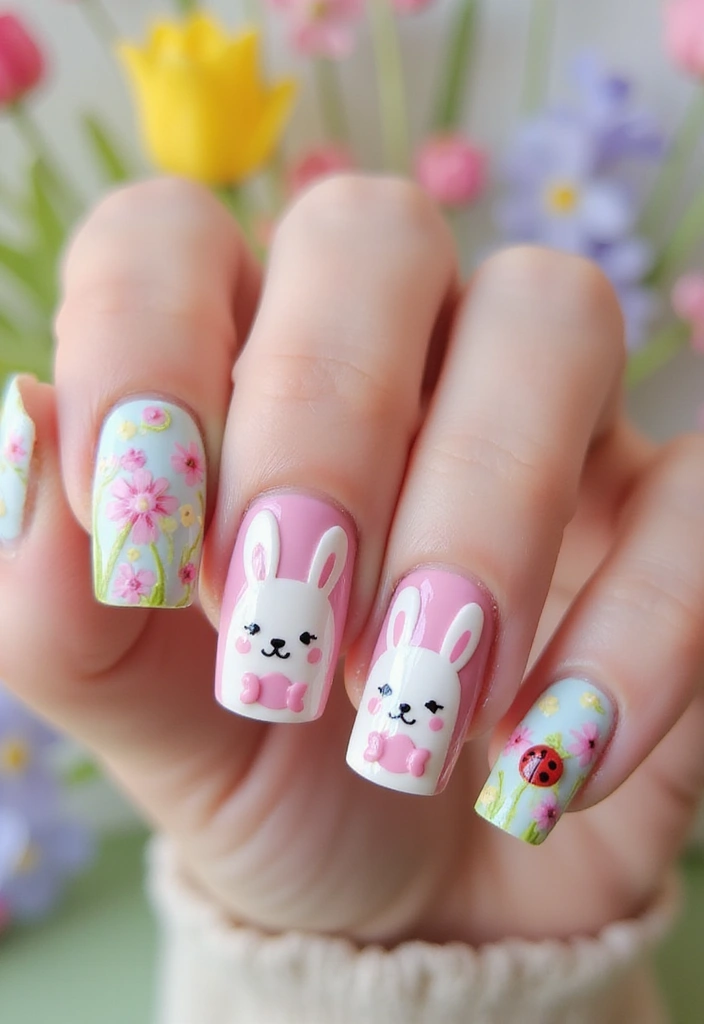
Bring the charm of spring’s wildlife to your nails with cute critter designs! This delightful nail art style captures the essence of the season, making it the perfect way to celebrate the playful side of spring.
Start with a light base color that embodies the freshness of spring. Soft pastels like mint green, baby blue, or pale pink work beautifully, creating a serene canvas for your adorable animal designs.
For your critter accents, think of sweet little bunnies hopping across your nails, cheerful ladybugs with their distinctive spots, or buzzing bees that add a touch of whimsy. You can keep the designs simple by using dots and lines or challenge yourself with more intricate details if you’re feeling adventurous.
To create these designs, a nail art brush set is essential. It allows for precision and control, making it easier to bring your cute critters to life. Begin by sketching the basic shapes of your chosen animals. For example, bunnies can be made with round bodies and long ears, while ladybugs can be simplified to a half-circle with dots for their spots.
Once you’ve painted your critters, let them dry completely before moving on. This step is crucial to avoid smudging your hard work!
To finish off your whimsical nails, apply a glossy top coat. This not only seals your designs, ensuring they last longer, but also adds a beautiful shine that makes your spring nail art pop. The glossy finish will reflect the sunlight, making your nails look even more vibrant and eye-catching.
With these easy designs, you’ll surely brighten up your day and those around you.
Whether you’re preparing for a spring outing or simply want to add a bit of fun to your everyday look, this cute critters nail art tutorial is perfect for anyone looking to embrace the joy of the season.
Product Recommendations:
• nail art brush set
• pastel nail polish collection
• glossy top coat
Now, gather your supplies and prepare to bring the essence of spring to your nails with these charming critter designs!
9. Minimalist Leaf Designs
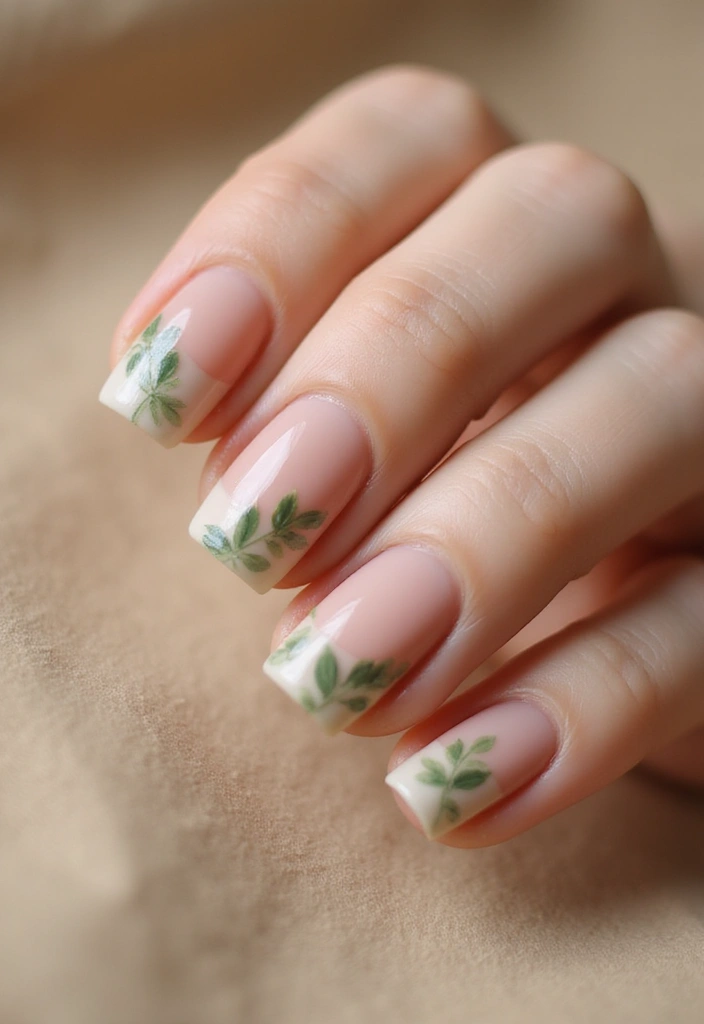
If you’re looking for a chic and understated nail art option this spring, minimalist leaf designs offer the perfect blend of elegance and simplicity. These designs are not only visually appealing but also versatile, making them suitable for any occasion—from casual outings to formal events.
To start, choose a neutral base color that complements your skin tone. Soft beige, pale pink, or classic white work beautifully as a backdrop for your leaf designs. The goal here is to create a subtle canvas that allows the leaf motifs to take center stage.
Once your base color is dry, it’s time to get creative with the leaf shapes. Using a fine nail art brush, gently paint simple leaf outlines in shades of green or metallic gold. The beauty of this design lies in its simplicity; you don’t need to be a professional artist to achieve stunning results. Focus on varying the shapes and sizes of your leaves for a more dynamic look. A delicate fern or a bold monstera leaf can make all the difference, adding personality to your nails.
This minimalist approach not only captures the essence of spring but also ensures that your nails remain sophisticated and refined. It’s a design that can transition seamlessly from day to night, making it an excellent choice for anyone who values versatility in their nail art.
For those who are just starting out, this design is incredibly beginner-friendly. The key is to practice your brush strokes and find a rhythm that works for you. Remember, it’s okay if your leaves aren’t perfect; the charm of minimalist art often lies in its imperfections.
To help you get started on your minimalist leaf nail art journey, here are some product recommendations:
• Nail art brush set – A set with fine brushes will give you the precision needed to create intricate leaf designs.
• Neutral nail polish – A high-quality neutral base will ensure that your leaf designs pop beautifully against your nails.
• Green nail art gel polish – Choose a gel polish that dries quickly and adheres well for long-lasting results.
With these simple yet stunning minimalist leaf designs, you can celebrate the beauty of spring without overwhelming your style. Enjoy the process, and don’t hesitate to experiment with colors and shapes to make this design your own!
10. Sweet Pastel Swirls
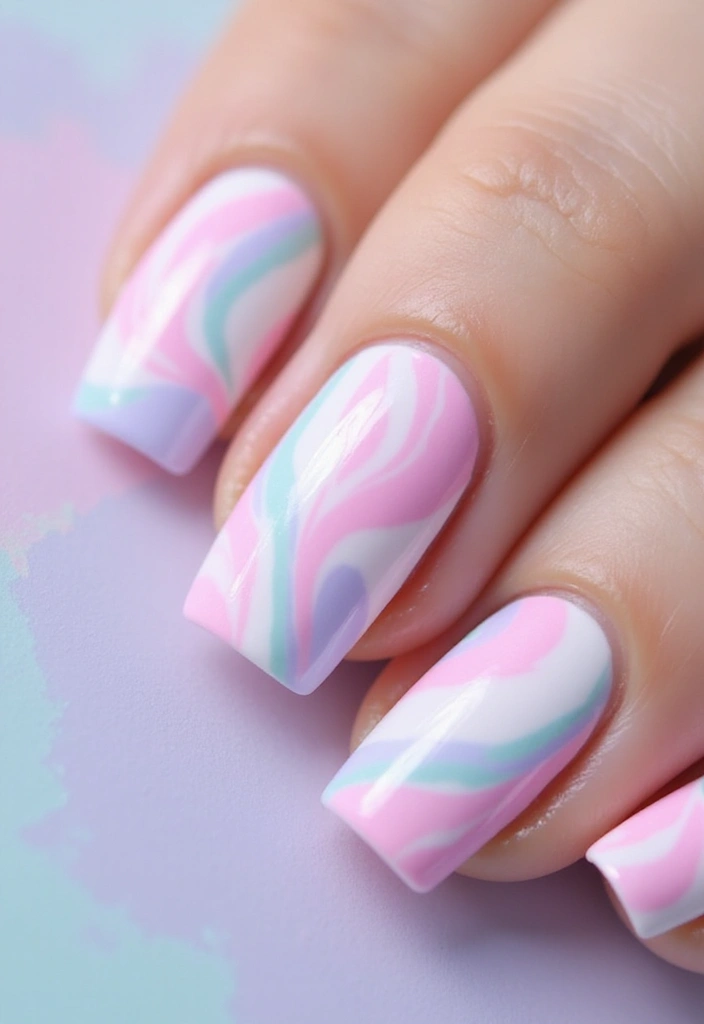
Spring is the season of renewal and creativity, and what better way to celebrate it than with a whimsical nail art design? The Sweet Pastel Swirls are a delightful way to express your artistic side while keeping things light and airy. This design is perfect for spring, bringing to mind blooming flowers and sunny days.
To start, gather your materials. A white base coat will serve as the perfect canvas for your colorful masterpiece. Once your nails are prepped and polished with the white base, it’s time to get creative.
Take your nail art brush and choose a palette of soft pastel colors. Think of gentle shades like blush pink, calming lavender, and refreshing mint green. These colors not only reflect the essence of spring but also blend beautifully together.
When applying the colors, the technique is key. Use your brush to gently swirl the colors together, allowing them to merge and create a soft gradient effect. It’s important to maintain a light hand during this process; too much pressure can lead to a muddled look. Instead, aim for a fluid motion that allows the colors to dance together harmoniously.
As you work, step back occasionally to assess your design. This will help you determine if you want to add more color or if you’re happy with the blending. The beauty of this design is its uniqueness; no two sets of nails will look the same, making each creation a personal expression of your style.
Once you’re satisfied with your swirls, seal your masterpiece with a glossy top coat. This will not only enhance the vibrancy of the colors but also protect your design, ensuring it lasts for days. The final look is playful and enchanting, making it a perfect choice for any spring outing or just to brighten up your day.
For those who are eager to try this design at home, consider investing in a good quality nail art brush set to help you achieve those delicate swirls. Pair it with a pastel nail polish collection, and you’ll be set to create your very own spring nail art.
With Sweet Pastel Swirls, you can easily embrace your inner artist while enjoying the cheerful vibes of spring. Grab your supplies and let your creativity flow—your nails will thank you!
Product Recommendations:
• Nail art brush set
• pastel nail polish collection
• glossy top coat.
11. Classic French Tip with a Twist
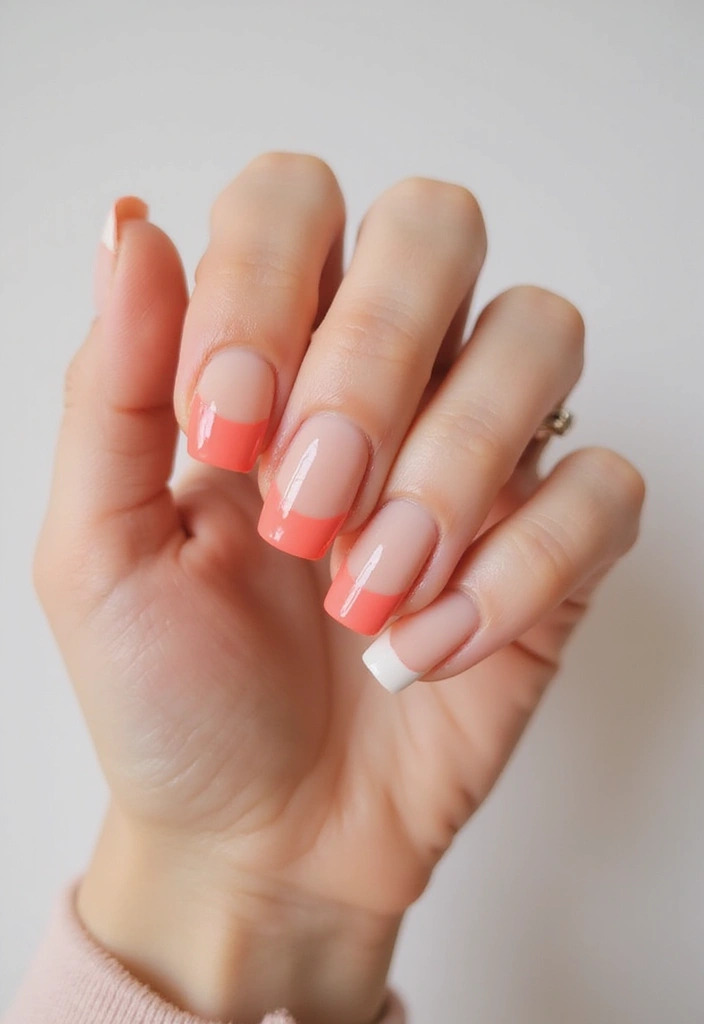
The timeless French tip receives a vibrant update this spring, making it a perfect choice for those who want to add a splash of color to their nail art. This elegant style is not just for special occasions; it can easily be incorporated into your daily routine, giving your nails a fresh and modern look.
To start, choose a nude or soft pink base. This neutral foundation allows the colorful tips to truly stand out. Once your base coat is completely dry, it’s time to unleash your creativity! Select vibrant colors like coral, teal, or even pastel shades to paint the tips of your nails. This playful twist on the classic French tip adds a fun element while still maintaining an air of sophistication.
For the best results, consider using a nail art brush. This tool will help you achieve precise lines and smooth edges, making your colorful tips look professional and polished. Apply your chosen color carefully, ensuring that each tip is evenly coated and matches the others for a cohesive look.
After you’ve perfected your colorful tips, don’t forget the finishing touch: a high-quality top coat. This step is essential for sealing your design and ensuring longevity. A quick-dry top coat not only adds a glossy shine but also helps prevent chipping, keeping your nails looking fresh for days.
This spring nail art design is incredibly versatile. Whether you’re heading to work, meeting friends for brunch, or going out for an evening event, these nails seamlessly transition from day to night. The combination of classic elegance and playful color makes this design a go-to choice for any occasion.
For those looking to recreate this look at home, here are some product recommendations to help you get started:
• Nail polish set with vibrant colors – Perfect for experimenting with different shades.
• Nail art brush set for precision designs – Essential for creating clean lines and intricate details.
• Quick-dry top coat for long-lasting shine – Ensures your design stays beautiful and chip-free.
With just a few easy steps, you can elevate your spring nail art game and enjoy a chic, colorful twist on the classic French tip. Get ready to show off your stylish nails this season!
12. Glittery Spring Magic
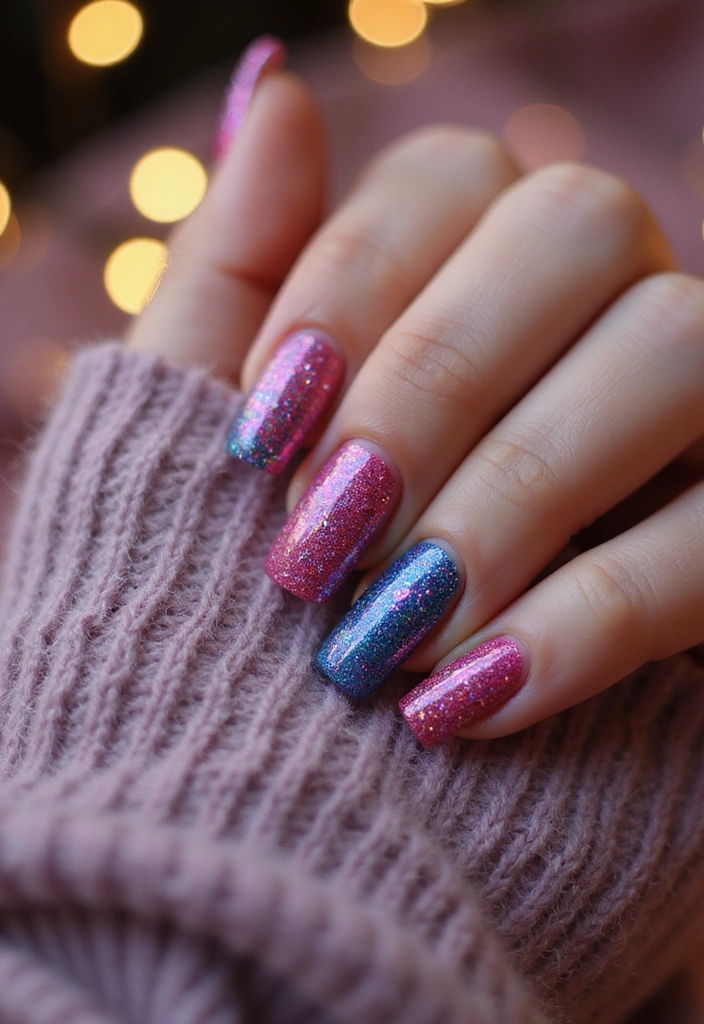
Add a touch of sparkle to your spring nails with glittery designs!
Spring is all about fresh beginnings and vibrant colors, and what better way to celebrate the season than with some eye-catching nail art? Glittery nails are not only fun but also incredibly versatile, allowing you to express your personality with ease.
To start your glittery spring nail art, choose a colored base coat that complements your style. Soft pastels like lavender or mint green are perfect for spring, but feel free to go bold with bright pinks or sunny yellows. Apply two coats for a rich and even finish.
Once your base coat is dry, it’s time to add the glitter! You can apply glitter polish over all of your nails for a full-on sparkle effect, or opt for an accent nail look where you apply glitter to just a few fingers. This adds a playful touch while keeping the overall look balancedg.
For those who are looking for more control during application, using a makeup sponge can work wonders. Simply pour a small amount of glitter polish onto the sponge and gently dab it onto your nails, concentrating on the areas where you want the most sparkle. This technique not only allows for a more precise application but also helps to create a beautiful gradient effect if you desire.
After you’ve achieved your desired level of glitter, don’t forget to seal the deal with a high-quality top coat. This step is crucial as it smooths out the textured surface of the glitter and gives your nails a glossy finish that lasts. It also helps to prevent chipping, ensuring your glittery masterpiece stays intact for days.
These glittery nails are perfect for adding a fun and festive touch to your spring look! Whether you’re heading to a picnic, a garden party, or simply enjoying the sunny weather, sparkling nails will surely catch the eye and elevate your overall vibe.
Product Recommendations:
• Glitter nail polish set – A variety of colors to suit every mood and occasion.
• makeup sponge applicators – Perfect for achieving a controlled and precise glitter application.
• top coat nail polish – To enhance shine and durability, ensuring your nails look fabulous for longer.
Let your creativity shine this spring with these easy designs that even beginners can do!
13. Watercolor Technique
As spring bursts forth with vibrant colors and blooming flowers, why not let that beauty blossom right at your fingertips? The watercolor technique for spring nail art is not just stunning; it’s a fun way to showcase your creativity. Imagine your nails transformed into tiny canvases, adorned with soft, flowing hues that echo a serene spring day.
Begin your artistic journey with a clean slate by applying a crisp white base coat. This essential first step sets the stage for your watercolor masterpiece, creating a bright backdrop that allows those colors to truly shine. A well-applied base coat not only enhances the overall look of your design but also helps the colors pop, giving your nails that fresh, springtime feel.
Once your base is dry, it’s time to let your artistic side shine. Gather your tools and grab a nail art brush. This is where the magic happens! Dab on a palette of pastel colors that capture the essence of spring—think soft pinks, delicate blues, and fresh greens. These hues can evoke the feeling of a blooming garden, bringing joy and brightness to your fingertips.
The beauty of the watercolor technique lies in the blending of colors. With a gentle touch, stroke and mix the hues on your nails, crafting a dreamy gradient effect that mirrors the fluidity of watercolor paint. Start with one color at the tip of the nail and gradually blend it into another color towards the base. This soft transition mimics the natural blending of colors found in nature, making your nails a true reflection of the season.
Feel free to get creative! Each nail can showcase a different color combination, or you can create a harmonious look across all ten fingers. Consider using a variety of techniques, such as sponging or flicking, to create texture and depth. The charm of this technique is in its individuality; no two nails will be identical. This not only makes your manicure special but also allows you to express your unique style and personality.
If you want to enhance your design further, think about incorporating delicate floral patterns or abstract shapes using a fine brush. These little details can elevate your watercolor nails to another level, making them a true statement piece. Remember, the goal is to have fun and let your creativity flow!
Once your masterpiece is complete, don’t forget the finishing touch. A top coat is essential to seal your design. It adds a glossy finish that enhances the watercolor effect while protecting your artwork, ensuring it lasts. A good top coat not only provides shine but also prevents chipping, allowing you to enjoy your beautiful spring nails for days to come.
With a bit of practice, your nails will become stunning canvases that celebrate the vibrant spirit of spring. Every time you glance at your hands, you’ll be reminded of blooming flowers and sunny days, making a bold statement about your creativity and love for the season.
Now that you’re equipped with the knowledge to create this breathtaking spring nail art technique, why not gather your supplies and get started? Whether you’re preparing for a special occasion or simply treating yourself to some DIY pampering, this watercolor nail art is sure to bring a smile to your face. Happy painting!
Product Recommendations:
– Nail Art Brush Set
– Water-Based Nail Polish in Pastel Colors
– Top Coat for Nail Polish
14. Abstract Art Nails
Spring is the perfect time to embrace creativity, and what better way to showcase your artistic flair than with abstract art nails? This nail art trend is all about freedom, allowing you to express yourself through vibrant colors and unique shapes.
Begin your nail art journey with a light base coat that sets the stage for your masterpiece. A soft pastel or a classic white works beautifully as a blank canvas, offering a fresh backdrop for the lively colors to come.
Once your base is dry, grab your nail art brush set and let your imagination run wild. Dip your brush into a selection of bold, eye-catching hues—think bright yellows, deep blues, playful pinks, and energizing greens.
Using fluid strokes, create random shapes and lines across your nails. There’s no need to adhere to any specific pattern; in fact, the charm of abstract art lies in its unpredictability. You might find yourself drawing swirls, dots, or even jagged shapes—whatever inspires you in the moment.
Remember, this is about celebrating your individuality, so allow yourself the freedom to play with color and form. The beauty of abstract art is that every design is truly one-of-a-kind, making your nails a personal reflection of your creativity.
Once you are satisfied with your colorful creation, seal the design with a quality top coat. This not only protects your artwork from chips and scratches but also adds a glossy finish that enhances the vibrancy of your colors.
As you look down at your stunning abstract art nails, you’ll feel a sense of accomplishment and joy. These easy designs are perfect for anyone wanting to add a splash of color and personality to their spring look.
Product Recommendations:
• gel nail polish set – A variety of colors to spark your creativity.
• nail art brush set – Essential tools for those intricate designs.
• top coat nail polish – To ensure your art stays vibrant and protected.
Let your nails be a canvas this spring, and enjoy the process of creating beautiful art right at your fingertips!
Conclusion
Spring is a time for renewal and creativity, making it the perfect season to experiment with nail art.
With these 14 easy step-by-step tutorials, even beginners can create stunning nail designs that celebrate the beauty of spring.
So gather your tools and unleash your inner artist – your nails will thank you for it!
Note: We aim to provide accurate product links, but some may occasionally expire or become unavailable. If this happens, please search directly on Amazon for the product or a suitable alternative.
This post contains Amazon affiliate links, meaning I may earn a small commission if you purchase through my links, at no extra cost to you.